Showing posts with label CLI. Show all posts

Thursday, June 1, 2023

OCI-CLI Warning on Windows: Python 3.6 is no longer supported by core team & My fix to silence the noise

Intro


Hey there, You know what's been driving me crazy lately? That damn Python deprecation warning on Windows 10 after upgrading to OCI CLI 3.x. It's been going on for a month or two now, and at first, I gave up. But when my OCI CLI shell scripts prompts started to get ugly, I knew I had to take matters into my own hands. So I did some digging and came up with a fix that's gonna silence all the Python deprecation warning none-sense for good. This probably affects all windows OS’ not just Win 10.

I. How bad is it?

Let's just say it's not pretty. Every time you hit an OCI command on Windows, you're slapped in the face with a big, ugly warning, no matter which argument you use. It's enough to make even the most chill of us cringe.

Image


Impacted environment:

  • OS : Windows  32/64bit

  • OCI CLI Version: probably anything above 3.x

Reproduce the issue in Windows:

Run the following installation command in PowerShell as administrator - See installation guide

PS C:\> Set-ExecutionPolicy RemoteSigned
PS C:\> powershell -NoProfile -ExecutionPolicy Bypass -Command "iex ((New-Object System.Net.WebClient).DownloadString('https://raw.githubusercontent.com/oracle/oci-cli/master/scripts/install/install.ps1'))"

PS C:\> oci -v
c:\program files\lib\oracle\oci\lib\site-packages\oci\_vendor/httpsig_cffi/sign.py:10: CryptographyDeprecationWarning: Python 3.6 is no longer supported by the Python core team. Therefore, support for it is deprecated in cryptography and will be removed in a future release. from cryptography.hazmat.backends import default_backend # noqa: F401


II. Root cause


The Python package is clearly no longer supported, as mentioned on the DeprecationWarning message.
While browsing through OCI CLI issues on GitHub, I also found a user's report of the same warning on issue #639.
And as expected, It turns out Python 3.6 and anything below 3.10 was toast (soon end of life support).

You can check that out on the Lifetime Support time frames python.org:Image


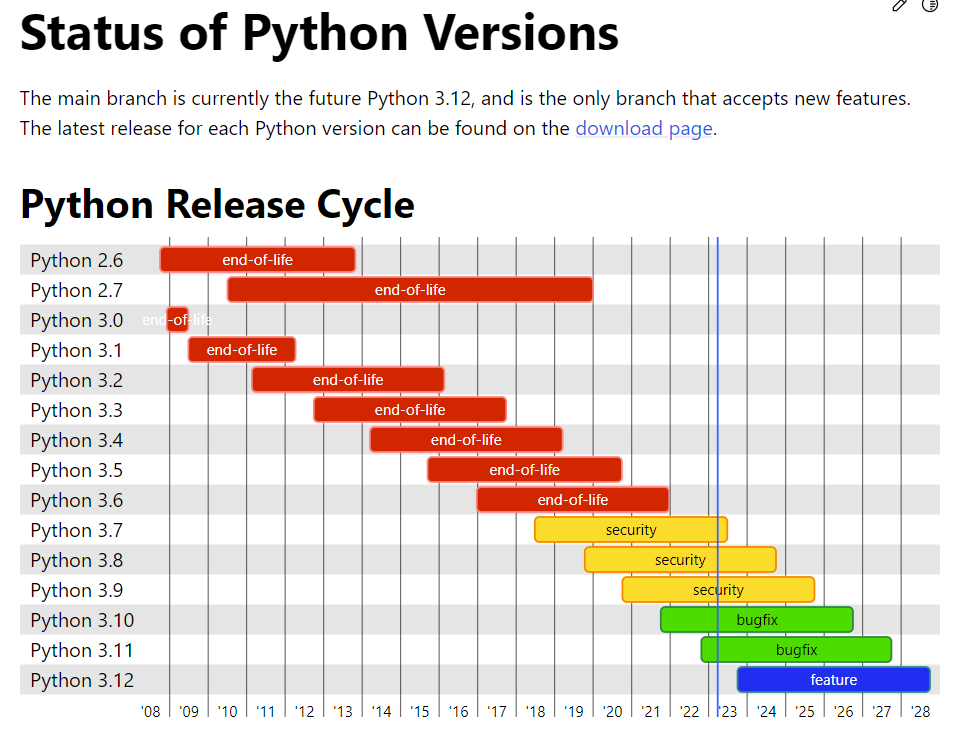
II. Why did OCI CLI Install a Deprecated Python version?


Despite installing the latest version of OCI CLI, the packaged Python version remained outdated (v3.6).
But why and how?
This led me to investigate further and discover an odd thing during the PowerShell install script run.  

  • The actual python installed by oci-cli is 3.8 which is enough to throw the deprecation warning

PS C:\> powershell -NoProfile -ExecutionPolicy Bypass -Command "iex ((New-Object System.Net.WebClient).DownloadString('https://raw.githubusercontent.com/oracle/oci-cli/master/scripts/install/install.ps1'))"

VERBOSE: No valid Python installation found.
Python is required to run the CLI.
Install Python now? (Entering "n" will exit the installation script)
[Y] Yes  [N] No  [?] Help (default is "Y"): Y
VERBOSE: Downloading Python...
VERBOSE: Download Complete! VERBOSE: Successfully installed Python! ...
-- Verifying Python version. -- Python version 3.8.5 okay.
  • From the python support chart , it’s clear that 3.10 is recommended to avoid deprecation issues.

  • With that in mind, we need to alter the official install.ps1 script to do what we ask  
                                                 The section below, explains how

III. Install script forensics & Solution

  • Open and inspect install.ps1 in PowerShell editor :
    Well, well, well, what do we have here? It seems that the Python release is hardcoded in the install.ps1 script, no matter what oci-cli version you're trying to install.

...
72 $PythonInstallScriptUrl = "https://raw.githubusercontent.com/oracle/oci-cli/v3.2.1/scripts/install/install.py"

73 $FallbackPythonInstallScriptUrl = "https://raw.githubusercontent.com/oracle/oci-cli/v2.22.0/scripts/install/install.py"

74 $PythonVersionToInstall = "3.8.5" # <<<- version of Python to install if none exists

75 $MinValidPython3Version = "3.6.0" # minimum required version of Python 3 on system

Solution

  • Apply the fix:  I’ll just assign 3.10.10 value to both $PythonVersionToInstall  & $MinValidPython3Version

  • Run the Install script again:
    You can see below that a most recent python release has been picked and installed

PS C:\> powershell -NoProfile -ExecutionPolicy Bypass -Command "install.ps1" <<updated ...
-- Verifying Python version. -- Python version 3.10.10 okay. <<<
...

===> In what directory would you like to place the install?  
===> In what directory would you like to place the 'oci.exe' executable?
===> In what directory would you like to place the OCI scripts?
...
━━━━━━━━━━━━━━━━━━━━━━━━━━━━━━━━━━━━━━━━━━━━━━━━━━━━━ 97.5/97.5 kB  ? eta 0:00:00
Collecting cryptography<40.0.0,>=3.2.1
  Downloading cryptography-39.0.2-cp36-abi3-win32.whl (2.1 MB)
━━━━━━━━━━━━━━━━━━━━━━━━━━━━━━━━━━━━━━━━━━━━━━━━━━━━━ 2.5/2.5 MB 31.3 MB/s eta 0:00:00
...
VERBOSE: Successfully installed OCI CLI!
  • After the change we can assume let’s check if this has fixed the problem get rid of the annoying error.
    and voila , nice and clean prompt on my windows 11 machine


PS C:\> oci -v
3.24.4


VI. PowerShell users beware


Believe it or not Powershell environment can easily mislead your oci-cli installation too.

  • How?  By mistakenly downloading the 32-bit version of Python instead of the 64-bit version.

  • And it all happens when you run the install script from the PowerShell x86 environment
    This image has an empty alt attribute; its file name is image-1.png

  • As result the below warning will pop each time you run an oci command .

This image has an empty alt attribute; its file name is image.png

  • The script relies on a environment variables that checks the OS architecture ( 64 or 32bit)

  • If you run the script from an x86 PowerShell terminal it’ll assume your OS is 32bit & install a 32bit Python.

    //// From a x86 prompt
    PS C:\WINDOWS\system32> Invoke-Expression [IntPtr]::Size
    4
    //// From a 64bit Prompt
    PS C:\WINDOWS\system32> Invoke-Expression [IntPtr]::Size
    8
    __________________________________________________________________________________

    //// the install.ps1 script checks the OS kernel architecture (line :200)

    # IntPtrSize == 8 on 64 bit machines

    $IntPtrSize = Invoke-Expression [IntPtr]::Size
    if ($IntPtrSize -eq 8) { $PythonInstallerUrl = "https://www.python.org/ftp/python/$Version/python-$Version-amd64.exe"

        }

                                   Wrong result (4 instead of 8) => wrong version instead (32bit)

Pro-tip

Always run this command first to make sure you're using the 64-bit PowerShell environment.

//// From a x86 prompt
PS C:\WINDOWS\system32> [Environment]::Is64BitProcess
False
//// From a 64bit Prompt
PS C:\WINDOWS\system32> [Environment]::Is64BitProcess
True


V. How to use my script until Oracle fixes the problem

Very easy. I've uploaded my modified script to my GitHub repo with a little tweak to download Python 3.10 instead. 

Run the same command but use my script URL instead

PS C:\> Set-ExecutionPolicy RemoteSigned

PS C:\> powershell -NoProfile -ExecutionPolicy Bypass -Command "iex ((New-Object System.Net.WebClient).DownloadString('https://raw.githubusercontent.com/brokedba/oci-cli-examples/master/installation_win64/install.ps1'))"

PS C:\> oci -v


CONCLUSION


  • This solution to the issue of deprecated Python warnings after installing/upgrading OCI CLI on Windows 10 will hopefully help those who still experience the problem.

  • my workaround can be used until oci cli maintainers get to tackle in a future pull request

  • The following Note:OCI SDK - Python 3.6 is No Longer Supported by the Python Core Team (Doc ID 2902080.1) acknowledges the issue but doesn’t provide a workaround.

  • If this happens on Linux you might want to use Python virtual environment to avoid messing with your server’s setup (see blog from S.Petrus)

Monday, April 17, 2023

Azure VM Selection Made Easy: A Script Identifying Best Constrained CPU VMs for High Memory/ Low CPU Workload

                                         Azure Constrained VCPU and how to list it
Intro

Are you struggling to find the most Cost-Effective Azure VMs for Database Workloads or any high memory low CPU workload? Look no further! In this blog post, we’ll introduce the concept of Azure constrained CPU along with cases where az cli displays misleading info, and finally a script that makes it easy to identify the best constrained CPU VM for your needs. This will help you to confidently select the cheapest/suitable Azure VM for your workload.

Here’s a link to my vmsize selector script az-cli-examples/check_az_vmsize.sh but first let’s dive into some notions. 

I. Constrained vCPU Vms

Not everyone needs the latest and greatest in CPU power! Some users are actually looking for VM sizes that offer ample memory, storage, and I/O bandwidth without breaking the bank. And when it comes to moving a database to Azure that's licensed for 8 cores (BOYL) but needs a whopping 200GB+ of RAM, you're in for a real treat. You'll have to fork over cash for a 16Core-level VM just to match the memory specs, and say goodbye to your budget while you're at it. That’s the kinda news that makes your boss happy ain’t it?


Azure’s response
To fix this, Azure created Constrained vCPU VMs which allow for constraining the vCPU count to 1/2 or 1/4 of the original VM size (i.e 16=>4), while keeping the same memory, storage, and I/O bandwidth. This makes it an excellent choice for workloads such as databases (SQL Server, Oracle) that are not CPU-intensive but require high memory, and IO bandwidth.
The VM series that support this feature are DS, ES, GS, and MS.

Licensing fees charged for SQL Server for example are based on the available vCPU count.
Constrained vCPUs will result in a 50% to 75% decrease in licensing fees & keep a high VM specs to VCPU ratio.

 
Example

These new VM sizes have a suffix that specifies the number of available vCPUs to make them easier to identify.
                     Naming convention: Standard_M8-2ms  => 8Core VM level specs with only 2 vCPUs 
Hence, each vm size with  -{digit} in its name supports vCPU constrained feature, the digit being the actual vCPU


II. list Problem with az cli


The option is nice, but finding the ones available to us using a simple az cli query is even better. However, while using the Azure CLI to list the available VM sizes using az vm list-sizes, you will not find the number of constrained cores in the output, making it challenging to filter out the VM sizes based on their requirements.

  • Example with a vm size with 4 constrained vCPus , here you can see that az cli is showing 8 cores which is wrong


$ az vm list-sizes -l eastus --query "sort_by(@,&memoryInMb)[?numberOfCores == \`8\` \
&& (contains(name,'Standard_E8-4ds_v5'))].{name:name,NumberOfCores:numberOfCores}”
Name      - NumberOfCores   
-------------------  --------------- 
Standard_E8-4ds_v5    8  <<— not the actual vCPu      

Several users have reported this issue on the Az CLI GitHub repo, but there has been no official solution to date. Even my shell script to list vm size based on Cpu cores never showed me the actual constrained vCPUs. Few customers started to show me E series sizes with 256GB of Ram + 8 vCPUs that I didn’t know about from my tool.


III. Trick to show actual vCPUs

After upvoting the GitHub issue, I ought to find a workaround to show the real vCPUs for these constrained Series

Since vm size name had a suffix specifying the number of available vCPUs I leveraged it in the below query 

az vm list-sizes -l eastus --query "sort_by(@,&memoryInMb)[?numberOfCores == \`32\` && (contains(name,'E') && contains(name,'-8'))].{name: name, numberOfCores: numberOfCores, memoryInMb: memoryInMb, ConstrainedNumberOfCores: '8'}"

Name                  NumberOfCores    MemoryInMb    ConstrainedNumberOfCores
--------------------  ---------------  ------------  --------------------------
Standard_E32-8s_v4    32 <- default    262144        8 <- actual
Standard_E32-8ds_v5   32               262144        8
Standard_E32-8s_v5    32               262144        8

...

I just added a virtual column that matches the filter I chose for the vm-size [name=> E series VM, with 32 original cores and 8 constrained vCPUs] “-8”. 


Version2: here I leveraged jquery to make the Constrained value dynamic no matter what is filtered

$ az vm list-sizes -l eastus --query "sort_by(@,&memoryInMb)[?contains(name,'E32') && contains(name,'-8')]" -o json| jq '.[] | . + {ConstrainedNumberOfCores: .name | capture("-(?\\d+)") | .digit}'

{ "maxDataDiskCount": 32, "memoryInMb": 262144, "name": "Standard_E32-8s_v4", "numberOfCores": 32, <<----- default number "osDiskSizeInMb": 1047552, "resourceDiskSizeInMb": 0, "ConstrainedNumberOfCores": "8" <<--- actual number }
...


IV. Cleaner solution (list-skus)


These tweaks weren't giving the clean output I wanted in my check_az_vmsize script. But then I spotted a second az cli query based on "az vm list-skus". It had all the metadata on VM size capabilities that I was looking for! And to top it off, I finally found that missing piece of information I had been searching for - the number of constrained vCPUs. It was so seamless, it was almost like finding a diamond in a pile of trash.


Here is the final query based on the same query filter (E32, 8 Constrained vCPU)

$ az vm list-skus -z --resource-type  virtualMachines --size "E32" -l eastus --query "[?capabilities[?name==\`vCPUsAvailable\`].value|[0] == '8'].{name:name,VCPU:capabilities[?name==\`vCPUs\`].value|[0],ActualVCPU:capabilities[?name==\`vCPUsAvailable\`].value|[0],MemoryGB:capabilities[?name==\`MemoryGB\`].value|[0]} | reverse(sort_by(@,&name))" -o table
Name VCPU ActualVCPU MemoryGB -------------------- ------ ------------ ---------- Standard_E32-8s_v5 32 8 256 Standard_E32-8s_v4 32 8 256 Standard_E32-8s_v3 32 8 256 Standard_E32-8ds_v5 32 8 256 Standard_E32-8ds_v4 32 8 256 Standard_E32-8as_v5 32 8 256 Standard_E32-8as_v4 32 8 256 Standard_E32-8ads_v5 32 8 256

 After checking the JSON construct of the source, I picked the info through
                    capabilities[vCPUsAvailable].Value


V. The Ultimate Bundle Script: Azure Constrained CPU VM Selector


We've finally reached the end of our quest to uncover the secrets of Constrained CPU VMs. But why stop there when we can take it one step further?

Here’s a shell-based tool that's so intuitive, you'll think it's reading your mind!  
Try it: Download the script here >> az-cli-examples/check_az_vmsize.sh 

  • See demo below

az_vmsize_final_lightOptimized2

With this tool, you'll have the ability to filter through:

  • Number of vCPU

  • VM compute series

The output has 2 sections:
a) VM sizes with exact vCPU count entered in the prompt

b) All VMs constrained or not containing the vCPU count matching the value entered in the prompt


   CONCLUSION 

    • This post helps better understand the concept of Azure constrained CPU and how it can be leveraged to save costs on high memory and low CPU workloads.

    • We have explored cases where az cli can display misleading information about it and track the metadata containing the actual vCPU value

    • By using my simple shell tool, you’ll be able to identify the best VM that meets your specific requirements, allowing you to save money without sacrificing performance.

    • It also saves you hours of searching through Azure website

    • With just 2 prompts, you'll have all the information you need to make an informed decision about your VM selection. 
      So, give it a try and see how much time and money you can save!

Thank you for reading, and happy cost-saving!

Tuesday, March 22, 2022

OCI Bastion Service Part II: Create Bastion service using OCI CLI & Terraform

This image has an empty alt attribute; its file name is image-6.pngIntro

In part II, and after demonstrating how to use OCI Bastion service using the Console (see part I ) we will cover how to create Bastion Service using automation tools like OCI CLI and terraform as I didn’t want all these approaches to be lumped in one post. 

Quick table of contents

- Create Bastion Service using OCI CLI
- Create Bastion Service using terraform

As described in part I The bastion service is linked to the target subnet and a bastion session will define the port forwarding to the target instance.
 Our environment :
  - VCN vcnterra has the private subnet db-sub with a CIDR of 192.168.78.0/24
 
-
DB instance IP is 192.168.78.10


I. Create Bastion Service from OCI CLI

     OCI CLI is perfect for quickly automate bastion service creation with many sessions/ports,.

  • Install and configure OCI CLI as described here . Assuming your default profile will be the target tenancy

1. Create the Bastion  

by specifying the compartment and subnet ids from the previous example.

$ export comp_id=ocid1.compartment.oc1..a***q 
$ export subnet_id=ocid1.subnet.oc1.ca-toronto-1.a**q

-- Create the Bastion --
$ oci bastion bastion create --bastion-type Standard --compartment-id $comp_id --target-subnet-id $subnet_id --client-cidr-list '["0.0.0.0/0"]'

-- describe the Bastion Service --
$ export bastion_id=$(oci bastion bastion list --compartment-id  $comp_id --all --query "data[0].id" --raw-output)

$ oci bastion bastion get --bastion-id $bastion_id  --query "data.{Name:name,bastion_type:\"bastion-type\",state:\"lifecycle-state\",allow_list:\"client-cidr-block-allow-list\",jump_ip:\"private-endpoint-ip-address\",timeout:\"max-session-ttl-in-seconds\"}"   --output table

+-----------+-------------+-------------+---------------+--------+---------+ | Name | allow_list |bastion_type | jump_ip | state | timeout | +-----------+-------------+-------------+---------------+--------+---------+ | bastion2* |['0.0.0.0/0']| STANDARD |192.168.78.127 | ACTIVE | 10800 | +-----------+-------------+-------------+---------------+--------+---------+


2. Create Port forwarding Bastion Session

We will use $bastion_id and other required attributes we inserted in the console earlier

$ oci bastion session create-port-forwarding  --display-name bastiontoDBSession --bastion-id $bastion_id --key-type PUB --ssh-public-key-file id_rsa_oci.pub --target-port 22 --target-private-ip 192.168.78.10 --wait-for-state SUCCEEDED 
  • export the bastion session OCID 
$ session_id=$(oci bastion session list --bastion-id $bastion_id --session-lifecycle-state ACTIVE --sort-order asc --all --query "data[0].id" --raw-output) 
  • Display the ssh proxy command details from the bastion session resource 
$ oci bastion session get --session-id $session_id --query "data.\"ssh-metadata\".command" --raw-output

ssh -i <privateKey> -N -L <localPort>:192.168.78.10:22 -p 22 ocid1.bastionsession.oc1.ca-toronto-1.ama**@host.bastion.ca-toronto-1.oci.oraclecloud.com


II. Create Bastion Service From terraform

This is also super cool to have, especially when  deploying a full stack and needing to connect to private resources right away.
The ssh command can even be extracted from the output (we’ll use the same environment).

3 x Configuration files

  • Bastion.tf for both Bastion and Bastion session
$ vi bastion.tf

resource "oci_bastion_bastion" "mybastion" { #Required bastion_type = "standard" compartment_id = var.compartment_ocid target_subnet_id = oci_core_subnet.terraDB.id #CHANGE ME name = var.bastion_name client_cidr_block_allow_list = [var.bastion_cidr_block_allow_list] } ################################## # Bastion Session ##################################
resource "oci_bastion_session" "mybastion_session" { #Required bastion_id = oci_bastion_bastion.mybastion.id key_details { public_key_content = var.ssh_public_key } target_resource_details { session_type = var.bastion_session_type target_resource_port = "22"
target_resource_private_ip_address = "192.168.78.10"
} display_name = var.bastion_session_name key_type = "PUB" session_ttl_in_seconds = "10800" }

  • variables.tf
$ vi variable.tf
variable "bastion_cidr_block_allow_list" { default= "0.0.0.0/0"} variable "bastion_name" { default = "BastionMyDB"} variable "bastion_session_type" {default = "PORT_FORWARDING"} variable "bastion_session_name" {default = "Session-Mybastion" }
variable "ssh_public_key" { default = "~/id_rsa_oci.pub"}

  • output.tf to extract all necessary information including the ssh command
$ vi output.tf
output "bastion_session_state" { value = oci_bastion_session.mybastion_session.state} output "bastion_session_target_resource_details" { value = oci_bastion_session.mybastion_session.target_resource_details} output "bastion_session_ssh_connection" { value = oci_bastion_session.mybastion_session.ssh_metadata.command}

  • After setting the subnet/compartment ids, terraform apply will create the bastion & display something like the below

This image has an empty alt attribute; its file name is image-13.png

    SSH connection Usage

  • Final result will  looks like this, notice I added & to run it in the background, so I won’t have to open another session to login to the private DB instance. 
    # ssh -i ~/.ssh/id_rsa_oci -N -L 22:192.168.78.10:22 -p 22 ocid1.bastionsession.oc1.ca-toronto-1.amaaaaaavr**a@host.bastion.ca-toronto-1.oci.oraclecloud.com &
  • Run the final ssh command to access the target resource using a sort of loopback where localhost is forwarded into the target instance IP through the opened proxy tunnel. 

    # ssh -i  ~/.ssh/id_rsa_dbcs opc@localhost
    [opc@hopsdb-oci ~]$ cat /etc/redhat-release --- target instance
    Red Hat Enterprise Linux Server release 7.9 (Maipo)
    [opc@hopsdb-oci ~]$ ifconfig  ens3
    ens3: flags=4163<UP,BROADCAST,RUNNING,MULTICAST>  mtu 9000
    inet 192.168.78.10  netmask 255.255.255.0  broadcast 192.168.78.255

     Warning:  Beware as It’s important to distinguish between :
    • ssh key pair used to used to build the Bastion session
    • ssh key pair used in the target vm (our db instance) upon creation
  • The first is used when we run the bastion command , the second is used when connecting as opc@locahost .


    Conclusion

           In this article we learned

    • How to create OCI Bastion service using  OCI CLI , and finally Terraform.
    • With the above there is no excuse not to try this super cool feature that is absolutely FREE.
    • Thanks for reading


    Tuesday, September 7, 2021

    Google SDK (CLI for GCP) installation and few CLI examples

    This image has an empty alt attribute; its file name is image-1.png

    Intro

    Google as most of the cloud providers today, offers a simple Cloud shell solution with all required tools to connect to their platform securely using APIs. However, If you still want to have it in your laptop along with other development tools, you can always install Google Cloud SDK (especially if it’s for educational purpose).

    Cloud SDK includes the gcloud, gsutil and bq command-line tool including few components that aren’t installed by default.  GCloud is the main command line used to manage cloud resources and enabling services.

    Requirement


    Whether on windows or Linux, the basic installation and use of Cloud SDK will require 2 elements:


      Note: To access the GCP APIs using a specific language (like C++, ruby etc), you can download the Cloud Client Libraries.

    I. Cloud SDK Installation

    • Windows

      1- Download and execute the following Cloud SDK installer(current version: 355)
      2- Follow the on-screen instructions (the installer is also used to upgrade existing installations) . 
      This image has an empty alt attribute; its file name is image-3.png
        

      3- Run the version command to confirm that Cloud SDK was installed correctly.
           

      C:\Users\brokedba gcloud --version
      Google Cloud SDK 355.0.0
      bq   2.0.71
      core 2021.08.27
      gsutil 4.67
      
      C:\Users\brokedba> where gcloud > C:\Program Files (x86)\Cloud SDK\google-cloud-sdk\bin\gcloud
      > C:\Program Files (x86)\Cloud SDK\google-cloud-sdk\bin\gcloud.cmd


    • Note: The installation can also be done through PowerShell in one liner command (gcloud,bq,gsutil commands can run from either Command Prompt or PowerShell).
      PS C:\Users\brokedba> (New-Object Net.WebClient).DownloadFile("https://dl.google.com/dl/cloudsdk/channels/rapid/GoogleCloudSDKInstaller.exe", "$env:Temp\GoogleCloudSDKInstaller.exe")

    • Linux
      There is either an all-in-one install using packages or using interactive shell script. Let’s start with the script
    • brokedba~$ curl -sL https://dl.google.com/dl/cloudsdk/channels/rapid/downloads/google-cloud-sdk-355.0.0-linux-x86_64.tar.gz| sudo tar -xz && sudo bash ./google-cloud-sdk/install.sh

      # Or more recent approach
      $ curl https://sdk.cloud.google.com | bash

      -- Workflow
      Modify profile to update your $PATH and enable shell command
      completion?

      Do you want to continue (Y/n)?  y

      The Google Cloud SDK installer will now prompt you to update an rc file to bring the Google Cloud CLIs into your environment.

      Enter a path to an rc file to update, or leave blank to use
      [/home/brokedba/.bashrc]:

      brokedba~$ gcloud --version
      Google Cloud SDK 355.0.0
      bq 2.0.71
      core 2021.08.27 gsutil 4.67


      Ubuntu
      Option A

      We can use apt-get and install it as a package:

      1. Add the Cloud SDK distribution URI as a package source

      brokedba~$ echo "deb https://packages.cloud.google.com/apt cloud-sdk main" | sudo tee -a /etc/apt/sources.list.d/google-cloud-sdk.list

      2. Import the GCP public key 

      brokedba~$ curl https://packages.cloud.google.com/apt/doc/apt-key.gpg | sudo apt-key add -

      3. Update and install the Cloud SDK

      brokedba~$ curl https://packages.cloud.google.com/apt/doc/apt-key.gpg | sudo apt-key add -

      Option B

      If you are fine with just the core components (gcloud,gsutil,bq, gsutil, kubectl, anthoscli, ..) you can install snap package which also handles the Autoupdate.

      brokedba~$ snap install google-cloud-sdk --classic


      ► REDHAT, Fedora, CENTOS, OLinux


      # RHEL/OL/CENTOS (7,8+), Fedora 24+
      # – Create a DNF repo with CLoud SDK information
      [@localhost]$ sudo tee -a /etc/yum.repos.d/google-cloud-sdk.repo << EOM
      name=Google Cloud SDK
      baseurl=https://packages.cloud.google.com/yum/repos/cloud-sdk-el8-x86_64
      enabled=1
      gpgcheck=1
      repo_gpgcheck=0
      gpgkey=
      https://packages.cloud.google.com/yum/doc/yum-key.gpg
      https://packages.cloud.google.com/yum/doc/rpm-package-key.gpg
      EOM

      # Install CLOUD SDK rpm package
      [r@localhost]# sudo yum install google-cloud-sdk


    II. Initialize gcloud


    Once your GCP Free Tier account is created and Cloud SDK installed. All you need is run gcloud init command to:

    1- Authorize Cloud SDK to access the GCP platform using your user account
    2- Set a new configuration including proper parameters like current project and default GCE region/zone etc..


    This image has an empty alt attribute; its file name is image-4.png


    If you don’t want browser’s auto launch for authorization you can use --console-only or --no-launch-browser 


      • The interactive workflow will ask you to hit the displayed link on a browser after entering your user credentials

    This image has an empty alt attribute; its file name is image-6.png

      • When you click allow, a code will be provided which you will past on your terminal to complete the authorizationThis image has an empty alt attribute; its file name is image-7.png
      • Once authenticated, you will be asked to create a project if none exists in your account. project_id is globally unique
      • Part 2
         Enter verification code: 4/1AX4XfWhnJLpVgMtjxxxx..
          You are logged in as: [bdba@gmail.com].
          This account has no projects. Would you like to create one? (Y/n)?  y   
        Enter a Project ID. Note that a Project ID CANNOT be changed later.Project IDs
        must be 6-30 characters in length and start with a lowercase letter. brokedba2000 Waiting for [operations/cp.9218677272527086685] to finish...done.
        Your current project has been set to: [brokedba2000].

      • If you have an error while creating the project because of error “Callers must accept Terms of Service” make sure you accepted the terms in the console.

        This image has an empty alt attribute; its file name is image-8.png
      • You can now verify your default configuration after the initialization
        $ gcloud config list
        [compute]
        region = us-east1
        zone = us-east1-b
        [core]
        account =
        bdba@gmail.com
        disable_usage_reporting = True
        project = brokedba2000
        Your active configuration is: [default]


      III.Test your first API request


      Command structure: is based on the below components

      gcloud <--global flags> [service|product] <group|area> <command> <--flags> <parameters >

      group
      may be
      access-approval | access-context-manager | active-directory | ai | ai-platform | anthos | api-gateway | apigee | app | artifacts | asset | assured | auth | bigtable | billing | builds | cloud-shell | components | composer | compute | config | container | data-catalog | database-migration | dataflow | dataproc | datastore | debug | deployment-manager | dns | domains | emulators | endpoints | essential-contacts | eventarc| filestore | firebase | firestore | functions | game | healthcare | iam | iap | identity | iot | kms | logging | memcache | metastore | ml | ml-engine | monitoring | network-management | network-security | notebooks | org-policies | organizations | policy-intelligence | policy-troubleshoot | privateca| projects | pubsub | recaptcha | recommender | redis | resource-manager | resource-settings | run | scc | scheduler | secrets | service-directory | services | source | spanner | sql | tasks | topic | workflows | workspace-add-ons
      command may be         cheat-sheet | docker | feedback | help | info | init|
      survey | version
      Optional flags --account | --billing-project | –configuration | –project |
      --flatten | --format | –filters | –quiet | --flags-file ..

      Topics: 
      `gcloud topic` provides supplementary help for topics not directly associated with individual commands.

      $ gcloud topic [TOPIC_NAME]
      Available commands for gcloud topic: accessibility Reference for `Accessibility` features. arg-files Supplementary help for arg-files to be used with *gcloud firebase test*. cli-trees CLI trees supplementary help. client-certificate Client certificate authorization supplementary help. command-conventions gcloud command conventions supplementary help. configurations Supplementary help for named configurations. datetimes Date/time input format supplementary help. escaping List/dictionary-type argument escaping supplementary help. filters Resource filters supplementary help. flags-file --flags-file=YAML_FILE supplementary help. formats Resource formats supplementary help. gcloudignore Reference for `.gcloudignore` files. projections Resource projections supplementary help. resource-keys Resource keys supplementary help. startup Supplementary help for gcloud startup options. uninstall Supplementary help for uninstalling Cloud SDK.[core]
    • Result related flags  :

      1- “--formats”: Will format gcloud output into Json, yaml, Table,raw value, or cvs including projections.
      2- “--filter”: Allows to pick the list of rows to return in the output in combination with formats.
      Example > list projects that were created after Jan 1st 2021 and only show 3 specific columns
    • $ gcloud projects list --format="table(projectNumber,projectId,createTime)"     --filter="createTime>2021-01-01"
      PROJECT_NUMBER  PROJECT_ID      CREATE_TIME
      260799562386    brokedba2000  2021-09-06T22:57:41.421Z
    • Command versions
      gcloud
      has different versions for its set of commands “alpha” and “beta”. Alpha means that the feature is typically not ready for production and might still be actively developed. Beta on the other hand is normally a completed feature, that is being tested to be production ready.
    • Examples 

      There are few requests that you can run to practice with gcloud. Below commands are good examples to start with.

    • list GCP regions in the US by selecting 3 fields on a tabular format and filtering the content on a specific pattern “us-

      $ gcloud compute regions list  --format="table[box](Name,CPUS,status)"    --filter="name~us-"

      +-----------------------------+
      ¦     NAME    ¦ CPUS ¦ STATUS ¦ ------------------------------- ¦ us-central1 ¦ 0/8  ¦ UP     ¦ ¦ us-east1    ¦ 0/8  ¦ UP     ¦ ¦ us-east4    ¦ 0/8  ¦ UP     ¦ ¦ us-west1    ¦ 0/8  ¦ UP     ¦ ¦ us-west2    ¦ 0/8  ¦ UP     ¦ ¦ us-west3    ¦ 0/8  ¦ UP     ¦
      ¦ us-west4    ¦ 0/8  ¦ UP     ¦ +-----------------------------+

    • Create a new project and assign it to the current configuration
    • $ gcloud projects create My-new-project --name="MY new LAB"  --labels=type=lab
      $ gcloud config set project My-new-project    
      -- Check project
      $ gcloud compute project-info describe –project My-new-project
    • Create and list Current vms in the current project :

      $ gcloud compute instances create myvm2 --machine-type=f1-micro --image-family debian-10 --image-project debian-cloud

      $ gcloud compute instances list  --filter="zone~ us-east1 OR -machineType:f1-micro"
      NAME   ZONE        MACHINE_TYPE  PREEMPTIBLE  INTERNAL_IP  EXTERNAL_IP    STATUS
      myvm   us-east1-b  f1-micro                   10.142.0.2   34.139.111.13  RUNNING|

    • Create and list a bucket in google storage :
    • $ gsutil mb -l us-east1 gs://omarlittle
      $ gsutil ls gs://omarlittle/**
      ..
    • Note: You can also display help on popular commands within a service or group/area which
    • $ gcloud help compute instances create

      NAME
          gcloud compute instances create - create Compute Engine virtual machine
         instances


        Enable APIs or install components
     
      Not all APIs are enabled by default and not all CLOUD SDK components are installed by default . Manual enabling is necessary.
      -- APIs
      $ gcloud services list available
      $ gcloud services enable  compute.googleapis.com

      -- components
      $ gcloud components list
      $ gcloud components update
      $ gcloud components install COMPONENT_ID


    Conclusion:


    In this tutorial we learned how to install and configure CLOUD SDK. We also described the command syntax and tried few requests using gcloud and gsutil. Feel free to consult Gcloud  Command Reference for more details and examples on gcloud requests.

    Thanks for reading