
Intro
The migration journey to the cloud for a business comes in different shapes and colors. Today, we’ll explore a quick comparison between Bare metal and VM platforms, which are two IaaS compute options available in Oracle Cloud infrastructure. Although specific to OCI, you might find similar benefits and trade-offs in other Cloud platforms.
In this short post, we will revisit what the VM platform has to offer compared to the Bare Metal Option and remind where Bare Metal offering still make sense.
Why Opt for Virtualized Platforms over Bare Metal?
At present, your organization might utilize bare metal servers to support your critical applications. While BM servers offer high performance and dedicated resources, there are several compelling advantages to migrating to VM-based machines within OCI.
Side note: Broadcom just acquired VMware and decided to split it, which brings a lot of uncertainty to its customers and partners. So you might as well consider your options.
Here’s a small list:
I. Enhanced Agility
With VM-based machines in OCI, you can dynamically scale resources up or down, ensuring optimal performance while maximizing cost-efficiency.
- High scale VM provisioning
Elastic compute shapes
No need to wait for a new physical host to deploy more resources as VMs can be created by thousands with a base CPU power up to 32 core for intel and 64 for AMD.
Only in VMs can you access flex shapes (intel/ADM) that allow for custom number of CPUs and memory size
to fit your specific application needs.Example: High memory but low CPU workloads (3CPU | 112GB).

You can change your VMs shape without having to rebuild your instances or redeploy your applications.
Extended Memory VMs
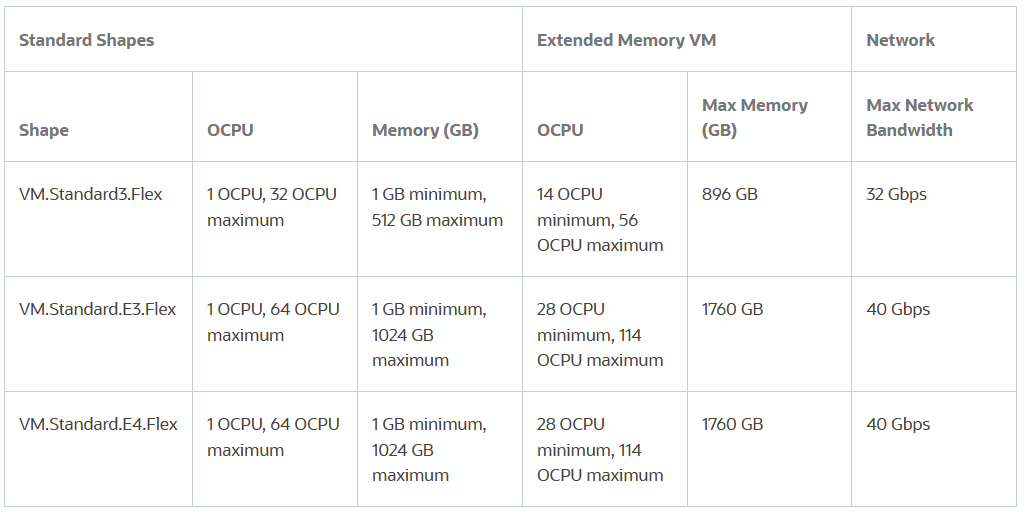
In May 2023, OCI launched Extended memory VM instances to provide more memory and CPU cores that exceed the amount a single physical socket carries (see table below).
Supported flex shapes:VM.Standard3.Flex , VM.Standard.E3.Flex & VM.Standard.E4.Flex
How does that work?
The extended VMs are given cores and memory across multiple physical sockets.However, you should remember to optimize your application layer to be NUMA aware.
Extended AMD flex example

Extended Intel flex example

Block volume performance auto tuning
Enables Block Volume to adjust the volume's performance between levels you specify, based on the actual monitored performance of a volume like CPU autos calling but for storage. learn more here.
How does that work?You set the min and max performance based on volume performance units per GB(VPUs/GB)
More VPUs will allocate more resources to a volume, increasing IOPS/GB and throughput/GB
Block Volume adjusts the performance to the min level as much as possible.
As volume load increases, the performance is scaled up as needed, on a best-effort basis.
The metrics used to trigger the tuning are
Volume throttled operations
Volume guaranteed VPUs/GB, IOPS, and throughput
Scale to 0 : Detached volume perf autotuning feature, it even enables to adjusts the performance level to Lower Cost (0 VPUs/GB), When the volume is detached.
II. Cost effectiveness
Turn off the light service
You can schedule shutdown of idle servers when not needed (after Hours/weekends..) & stop paying for compute to save up money (not possible in BM hosts that stay up even if underlying VMs are down)
Host and hypervisor overhead
Unlike on BM hosts,The physical and hypervisor layer is taken care by Oracle Cloud, which will leave lot more time for your Ops team to focus on the application performance and enable the developers.
License Compliance Simplified
Migrating to OCI VM-based machines eliminates the need to pin cores to comply with software license agreements. Oracle provides "Intellectual Property (IP) License Assurance" for VM instances, which means you no longer have to allocate dedicated cores for specific software licenses. This allows you to optimize resource utilization and reduce costs.Bring Your Own License (BYOL)
OCI VM-based machines offer the flexibility to leverage your existing licenses through the BYOL program. You can bring your current licenses for Oracle Database, WebLogic Server, and other Oracle products and enjoy cost savings by deploying them on VM instances in OCI. This way, you can maximize your existing investments and minimize licensing costs.
III. VM Infrastructure added value services
Optimized Network Virtualization

OCI's VM-based machines leverage a highly optimized KVM layer that takes full advantage of isolated network virtualization. The network virtualization is separated from the host and hypervisor, ensuring enhanced security and isolation for your applications and data. This architecture provides a robust and reliable foundation for your workloads.Simplified Management and Deployment
OCI's VM-based machines are fully integrated with Oracle's suite of management and automation tools. This includes all API based tooling; OCI Console, OCI CLI, and Terraform via Resource Manager.
These tools simplify provisioning, monitoring, and managing your VM instances, ensuring a seamless migration experience and easing Full stack DR implementation.
Enhanced Observability:
OCI's VM-based machines have native integration with comprehensive monitoring/observability tools through the Cloud Observability and Management Platform. This platform streamlines logging and offers specialized metrics and insights for WebLogic Server and Oracle DatabaseWebLogic Server Monitoring
Native monitoring allowing you to track critical metrics of your WebLogic Server instances, such as response times, throughput, JVM memory utilization, and thread pool usage.
You can set up alerts based on thresholds for these metrics to ensure that you are notified when any performance degradation occurs (i.e response times).Database
Monitor key database performance metrics, such as CPU usage, memory utilization, I/O latency, and query execution times from OCI console and offer proactive alerts and loggings . OEM is also supported for enterprise edition licenses.
Native Security Features: not out of the box in Bare metal
OS Management Service
Allows automation of patch management process through scheduled patching for your OCI VMs, which ensures that your VM instances are up to date with the latest OS security patches, reducing the risk of exploitation exposure.Vulnerability Scanning and Security (VSS):
Provides comprehensive visibility into the security posture of your VM-based instances.
VSS scans your instances regularly to identify and report all Common Vulnerabilities and Exposures (CVEs) not protected on the VMsAudit Capabilities
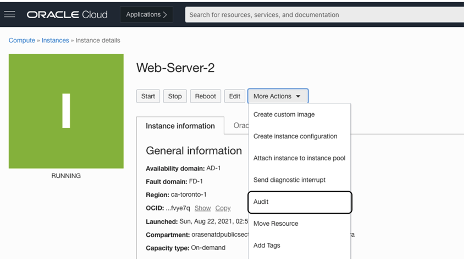
OCI offers built-in audit features that provide comprehensive visibility into the VMs and enable you to track and monitor changes, access, and activities within your environment.
You can generate audit logs that capture critical events, configuration changes, user authentication, and resource provisioning, allowing you to meet compliance requirements, detect unauthorized activities, and enhance the security of your infrastructure.
IV. How about Isolation, Compliance for my VMs?
Dedicated Virtual Machine Host (Mixed solution)
What if your company just can’t certify VMs in a multitenant infrastructure due to regulatory reasons, and must comply with isolation and licensing requirements for entire servers (host-based license)?
Bare metal might be the solution, but you still don’t want the overhead of maintaining the hypervisor layer.
OCI Dedicated VM hosts, answer that very issue by allowing to run VM instances on dedicated servers, which
are single tenant and not shared with other customers.
Advantages
Simplicity: the entire hypervisor layer is managed & supported by OCI (less overhead)
Most OCI VM features supported provisioning,managing VMs via the console, API,CLI
A range of dedicated VM host shapes to choose from like Intel/ADM & flexible ones
Shapes that support flexible hosted VMs billed based on OCPUs & RAM separately.
Caveats
You are still billed for the entire host upon creation like Bare Metal host
Some OCI compute VM features are not supported:
Autoscaling, Burstable instances, Capacity reservations
Instance shape change, Instance Pools
Reboot & live migrations (use manual migration instead)
No CPU overcommit possible and less control compared to classic Bare Metal option
V. BYOL considerations in the cloud
There are few things worth noting regarding BOYL licensing in OCI and in the cloud in general.
Scaling and partitioning:
BYOL licenses don’t align with dynamic or autoscaling compute model
In BM hosts, BYOL can work for Oracle products but customers have to take care of the Partitioning Policy. See Oracle Partitioning Policy doc and KVM hard partitioning on Oracle Enterprise Linux.
OCI License Manager
To simplify licensing management for both Oracle and 3rd-party software in OCI, Oracle has made a free License Manager service which allows to:
Eliminate overhead for software procurement and licensing
Enabling easy tracking and reporting of license utilization
Proactive monitoring and notifications for licensing needs
Flexible shapes recap
Here’s a sample of flexible shapes like E series (AMD) but there’s more in the OCI flex compute shape reference.

CONCLUSION
This brief overview captures key aspects/trade-offs of the Virtualized platform Vs the Bare Metal option.
While there's a plethora of capabilities to explore, this blog focused on the most relevant ones.
I strongly believe that besides few exceptions VMs are the best IaaS option for you out there
If your organization heavily dependent on hardware resources, private cloud is a better place for you.
Check with Eclipsys to help you with licensing
Sunday, November 5, 2023
Terraform for dummies part 6: Deploy a static website on Alibaba Cloud
Intro
3 years ago, I started the terraform for dummies series where I wanted to deploy a static website in any cloud provider there was (the dummy in question was me duh:)). But the mistake most of us make is to think AWS, Azure, GCP, Oracle Cloud are the only Hyperscalers out there.
Wrong!
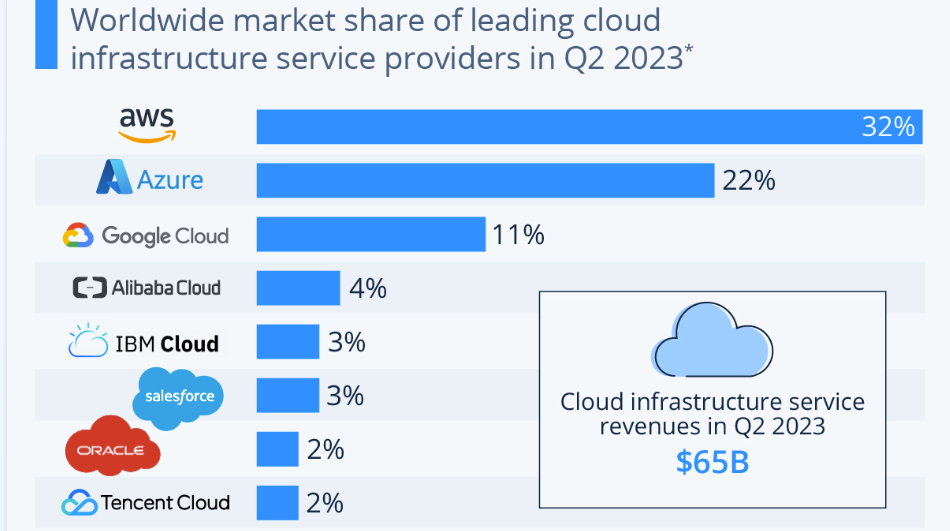
Alibaba Cloud market share even stole GCP’s 3rd place in 2021 (9.5% or $8.7 Billion). It has also moved from "Niche Players" to the "Visionaries" quadrant since in the Gartner Cloud infrastructure report.
You can learn more about AliCloud services, on my previous post > Intro to Alibaba Cloud
In this 6th tutorial (as done for AWS/Azure/GCP/OCI), we will deploy a webserver with a custom homepage.
We’ll cover 2 deployments (VPC + Instance) before ending with some thoughts on AliCloud experience/challenges.
Here’s a direct link to my GitHub repo linked to this lab => terraform-examples/terraform-provider-alicloud
Content :
I. Terraform setup
IV. Partial deployment (VPC)
V. Full deployment (instance)
Alibaba Cloud experience (hits and misses)
Overview
Topology
The below shows the layers involved between your workstation and AliCloud while provisioning through terraform.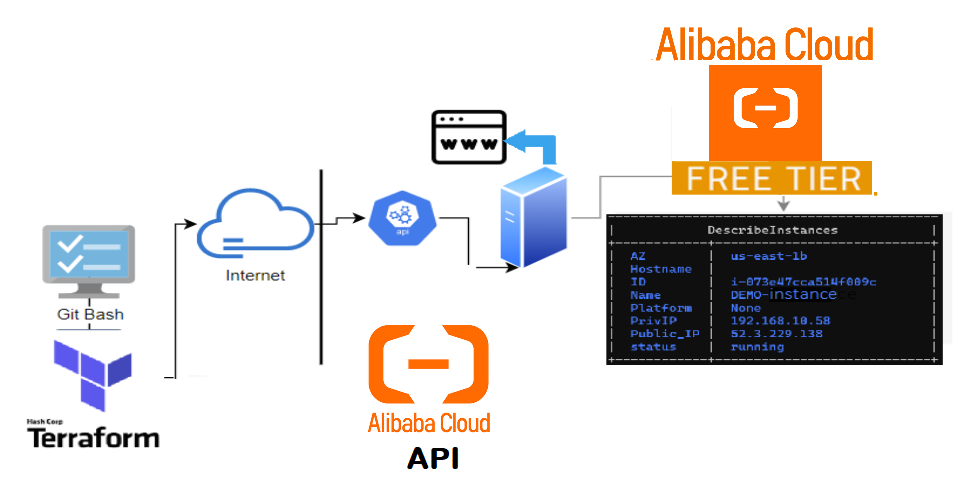
Where do I find a good AliCLoud deployment sample? You can either check the AliCloud registry, their GitgHub examples, or create a resource from the console then use the terraform import function to generate the deployment in HCL format (vpc,instance,subnet,etc..) based on their id.
Example for a VPC >>
1- Create a shell resource declaration for the vpc ina file called vpc.tf
2- Get the id of the VPC resource from your AliCloud Console
3- Run the Terraform import then Terraform show to load the vpc’s full declaration on the same file (vpc.tf)
4- Now you can remove the id and all non required attributes to create a vpc resource
1- $ vi vpc.tf

  provider "alicloud" {     region = "us-east-1"    }
  resource "alicloud_vpc" "terra_vpc" {
   }
2- $ terraform import alicloud_vpc.terra_vpc vpc-0xio5hkexl4c43jpqw5yw
3- $ terraform show -no-color > vpc.tf
Terraform lab content
VPC Deployment:To grasp the basics of a single network resource deployment.
Instance Deployment: includes the instance provisioning (with above vpc) with a nginx web sever.
I.Terraform setup
Windows: Download and run the installer from their website (32-bit ,64-bit)
Linux Download, unzip and move the binary to the local bin directory
$ wget https://releases.hashicorp.com/terraform/1.0.3/terraform_1.0.3_linux_amd64.zip
$ unzip terraform_1.0.3_linux_amd64.zip
$ mv terraform /usr/local/bin/
$ terraform --version
  Terraform v1.0.3
AliCloud authentication
Same as AWS, you will need to provide both access_key_id & secret_access_key. This can be done by Including them within environment variables (TF_VAR_*) or using terraform.tfvars
Assumptions
I’ll assume either of the two above options are present/configured in your workstation:
Example: using environment variablesEXPORT TF_VAR_access_key = "<my_access_key_id>"
EXPORT TF_VAR_secret_key = "<my_secret_key>"
I’ll also assume you have an ssh key pair to attach to your ecs instance. If not, here is a handy command
$ ssh-keygen -P "" -t rsa -b 2048 -m pem -f ~/.ssh/id_rsa_ali
Generating public/private rsa key pair.
II. Clone the repository
Pick an area on your file system to hold the terraform config and issue the following command.
$ git clone https://github.com/brokedba/terraform-examples.git
Note: You will find 2 directories inside the repository which will make things easier:
terraform-provider-alicloud/create-vpc/ Single VPC deploy.
terraform-provider-alicloud/launch-instance Web instance deploy.
III. Provider setup
Install and setup the alicloud provider for our VPC config
Cd Into terraform-provider-ali/create-vpc where our configurations resides
ubuntu $ cd ~/terraform-examples/terraform-provider-ali/create-vpc
Alicloud provider will be automatically installed by terraform init.
$ terraform init
Initializing provider plugins...
- Finding aliyun/alicloud versions matching "1.211.2"...
- Downloading plugin for provider "alicloud" (aliyun/alicloud) 1.211.2...
$ terraform --version
Terraform v1.0.3
+ provider.a v1.211.2 ---> the provider is now installed
Let's see what's in the create-vpc directory (click to see content)
$ tree
.
|-- outputs.tf ---> displays resources detail after the deploy
|-- variables.tf ---> Resource variables needed for the deploy
|-- vpc.tf ---> Our vpc terraform declaration
|—- terraform.tfvars ---> Our authentication variables to alicloud
IV. VPC Deployment
This will create several components including a resource group, VPC, Vswitch (subnet) and a security group
Once the authentication (access_key_id/secret) set, we can run terraform plan
$ terraform plan
Refreshing Terraform state in-memory prior to plan...
------------------------------------------------------------------------
An execution plan has been generated and is shown below.
Terraform will perform the following actions:
# alicloud_resource_manager_resource_group.rg will be created
+ "alicloud_resource_manager_resource_group" "rg"
{..}
# alicloud_security_group.terra_sg will be created
+ resource "alicloud_security_group" "terra_sg" {
+ display_name = "TerraDemo-rg"
{..}
# alicloud_security_group_rule.allow_http_80 will be created
+ resource "alicloud_security_group_rule" "allow_http_80"
+ cidr_ip = "0.0.0.0/0"
+ policy = "accept"
+ port_range = "80/80"
{..}
# alicloud_security_group_rule.allow_http_22 will be created
+ resource "alicloud_security_group_rule" "allow_http_22"
{..}
# alicloud_security_group_rule.allow_http_443 will be created
+ resource "alicloud_security_group_rule" "allow_http_443"
{..}
# alicloud_vpc.terra_vpc will be created
+ resource "alicloud_vpc" "terra_vpc" {
...
+ cidr_block = "192.168.10.0/16"
...}
# alicloud_vswitch.terra_sub will be created
+ resource "alicloud_vswitch" "terra_sub" {
...
+ cidr_block = "192.168.0.0/24"
...
+ zone_id = "us-east-1b"
{..}
Plan: 7 to add, 0 to change, 0 to destroy.
Note: I deliberately kept only relevant attributes for the VPC resource plan
Next, we can finally run terraform deploy to create a resource group , VPC, Vswitch and SG
$ terraform apply -auto-approve
alicloud_vpc.terra_vpc: Creating...
...
Apply complete! Resources: 6 added, 0 changed, 0 destroyed.
Subnet_CIDR = "192.168.10.0/24"
Subnet_Name = "terrasub"
vpc_CIDR = "192.168.0.0/16"
vpc_dedicated_security_group_Name = "terra-sg"
vpc_dedicated_security_ingress_rules = tolist([
"allow_https_22: 22/22 , CIDR: 0.0.0.0/0",
"allow_http_80: 80/80 , CIDR: 0.0.0.0/0",
"allow_https_443: 443/443 , CIDR: 0.0.0.0/0",
])
vpc_id = "vpc-0xi0eft7h4mq33yx7s0hn"
vpc_name = "Terravpc"

Observations:
When setting security groups, the nic_type parameter must be set to intranet when linked to a VPC, while registry doc says the default value is internet (this will fire an error).

Now let’s destroy the VPC as the next instance deploy contains the same VPC specs.
$ terraform destroy -auto-approve
Destroy complete! Resources: 7 destroyed.
V. Full deployment (Instance)
Let's launch a full instance deployment from scratch by switching to the second directory
terraform-provider-alicloud/launch-instance/
Here's the content:
$ tree ./terraform-provider-alicloud/launch-instance
.
|-- cloud-init ---> SubFolder
| `--> vm.cloud-config ---> script to config a webserver & add a HomePage
|-- compute.tf ---> Instance related terraform configuration
|-- outputs.tf ---> displays the resources detail at the end of the deploy
|-- variables.tf ---> Resource variables needed for the deploy
|-- vpc.tf ---> same vpc terraform declaration deployed earlier
compute.tf holds the ecs instance block. All the rest comes from the vpc example.
-- “ Cloud-init subfolder” --
Cloud-init: is a cloud instance initialization method that executes tasks upon instance Startup by providing the user_data entry in the aclicloud_instance resource definition (See below).
...variable "user_data" { default = "./cloud-init/vm.cloud-config"}
$ vi compute.tf
resource "alicloud_instance" "terra_inst" {
...
user_data = filebase64(var.user_data)
...
I used cloud-init to install nginx and load an html page that will be the server's HomePage.
Make sure you set the path for ssh public key accordingly in the variable (see variables.tf)
resource "alicloud_key_pair" "terra_key" {
key_name = var.key_name
public_key = file(var.ssh_public_key)}
LAUNCH THE INSTANCE
Cd in “launch-instance” directory, run the init , then plan command to validate the ecs instance info.
$ terraform plan
Refreshing Terraform state in-memory prior to plan...
------------------------------------------------------------------------
An execution plan has been generated and is shown below.
Terraform will perform the following actions:
... # VPC declaration <----------------- (see previous vpc deploy)
...
# alicloud_resource_manager_resource_group.rg will be created
+ resource "alicloud_resource_manager_resource_group" "rg" {
+ display_name = "TerraDemo-rg")
...}
# alicloud_instance.terra_inst will be created
+ resource "alicloud_instance" "terra_inst" {
+ ...
+ image_id = "centos_7_9_uefi_x64_20G_alibase_20230816.vhd"
+ availability_zone = "us-east-1a"
+ instance_name = "ecs.c5.large"
+ host_name = "TerraHost"
+ instance_type = "ecs.c5.large"
+ key_name = "demo_ali_KeyPair"
+ private_ip = "192.168.10.51"
+ instance_charge_type = "PostPaid"
+ internet_charge_type = "PayByTraffic"
+ user_data = "c8c701575f9c76db131ccf77cf352da……"
+ system_disk_size = 20
+ stopped_mode = "StopCharging"
+ ...
+ ...}
# alicloud_key_pair.key_pair will be created
+ resource "alicloud_key_pair" "key_pair" {
{...}
...
}
Plan: 9 to add, 0 to change, 0 to destroy.
Let’s launch our instance using terraform apply (I left a map of different OS images in the variables.tf)
$ terraform apply -auto-approve
...
alicloud_vpc.terra_vpc: Creating...
alicloud_key_pair.key_pair: Creation complete after 2s [id=demo_ali_KeyPair]
alicloud_vpc.terra_vpc: Creation complete after 11s [id=vpc-0xiug9rc5utxaj3wl39a4]
alicloud_security_group.terra_sg: Creation complete after 1s [id=sg-0xiis3c92f51bgmybx4c]
alicloud_vswitch.terra_sub: Creation complete after 7s [id=vsw-0xi6lj5g2hvlaleytf54a]
alicloud_instance.terra_inst: Creating... [10s elapsed]
alicloud_instance.terra_inst: Creating... 17s [id=i-0xi6p7buqfj6902i8ul5]
...
Apply complete! Resources: 9 added, 0 changed, 0 destroyed.
Outputs:
...
vpc_Name = Terravpc
vpc_CIDR = 192.168.0.0/16
Subnet_CIDR = 192.168.10.0/24
private_ip = "192.168.10.51"
public_ip = "47.89.159.135"
vpc_dedicated_security_ingress_rules = [
"allow_https_80 : 80/80 , CIDR: 0.0.0.0/0",
"allow_https_443: 443/443 , CIDR: 0.0.0.0/0",
"allow_https_22: 22/22 , CIDR: 0.0.0.0/0",
]
SSH_Connection = ssh connection to instance TerraCompute ==> ssh -i ~/id_rsa_ali root@47.89.159.135
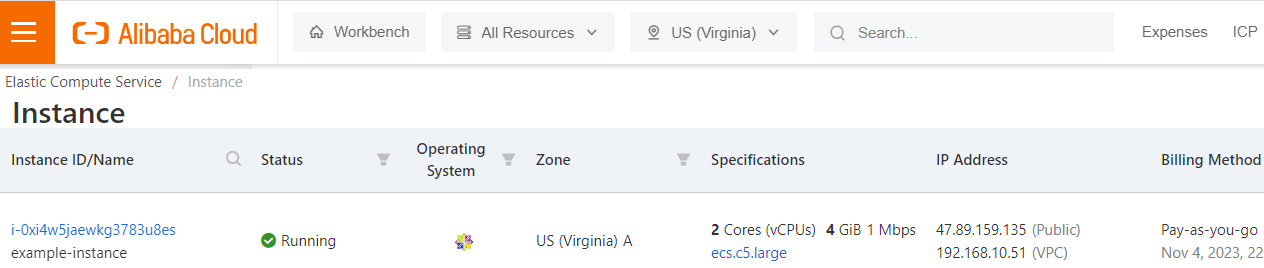
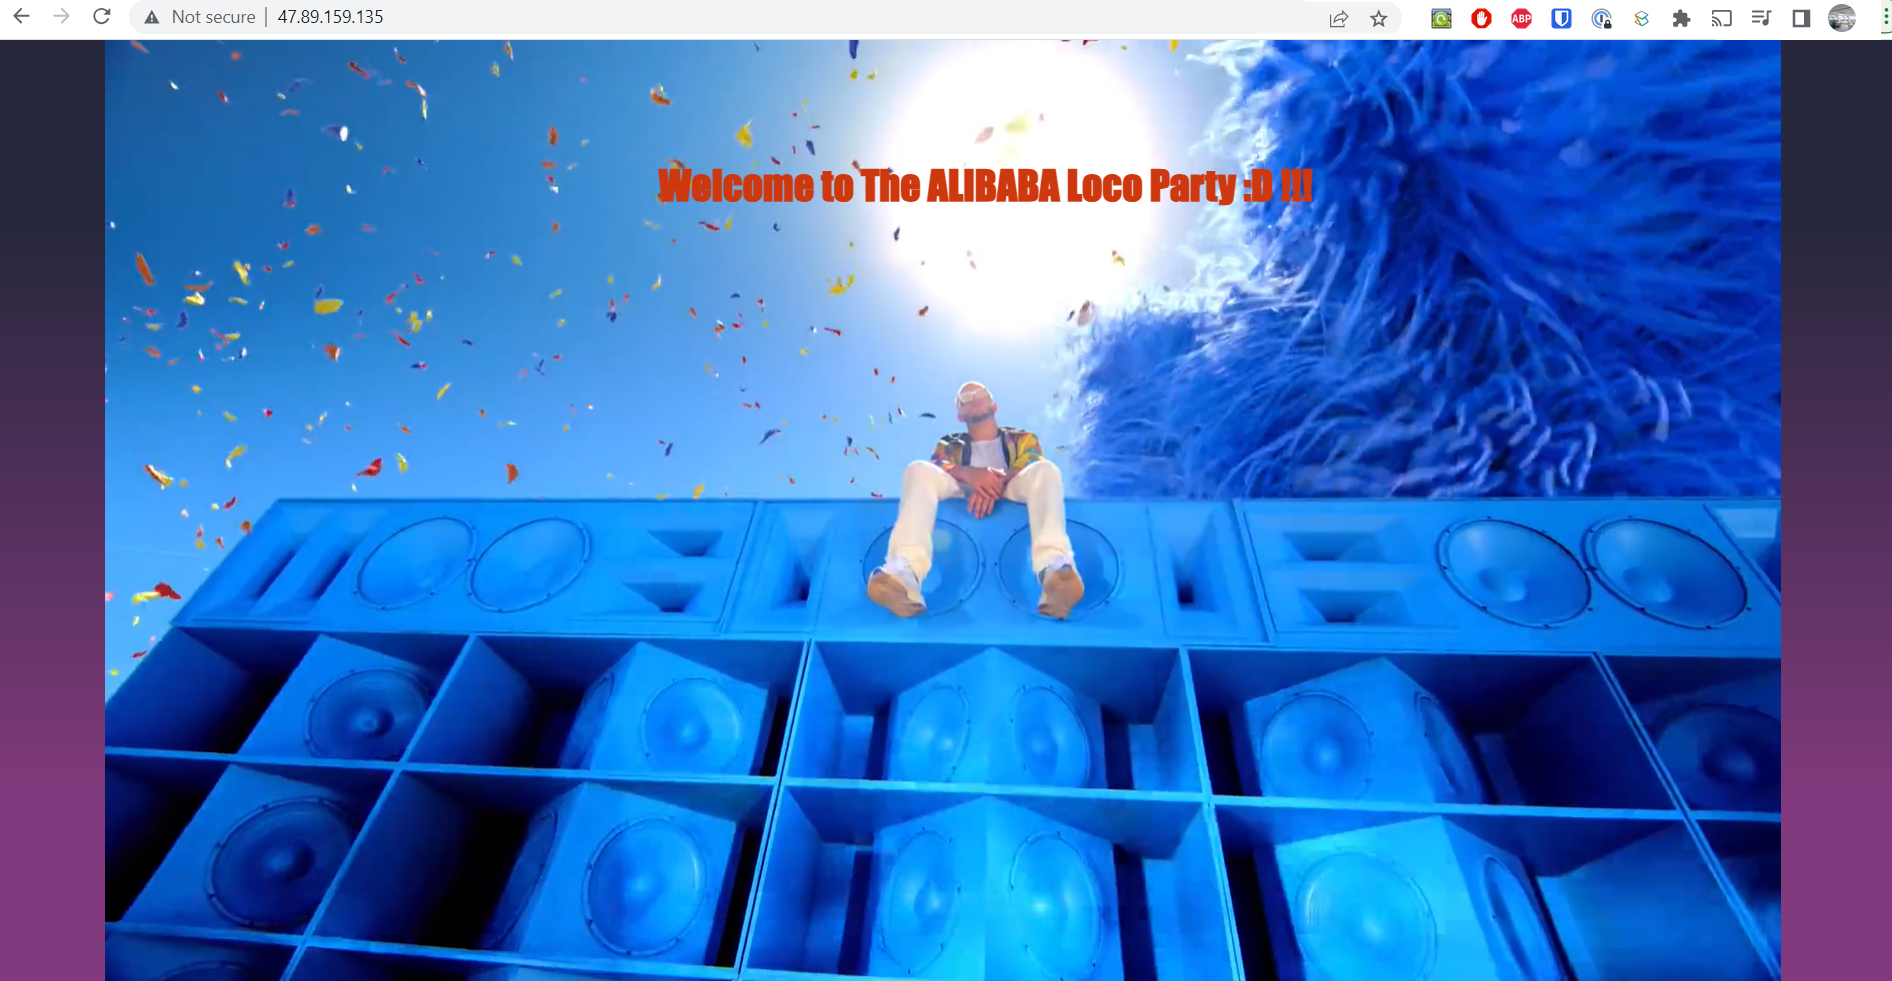
Once the instance is provisioned, juts hit the public IP address in your browser and Voila!
Here I just embedded a video clip into the webpage but you can adapt the cloud-init file to your own liking.
You can also tear down this configuration with a terraform destroy
Tips
You can fetch any of the specified attributes in outputs.tf using terraform output command i.e:
$ terraform output SSH_Connection
ssh connection to instance TerraCompute ==> ssh -i ~/.ssh/id_rsa_ali root@47.89.159.135
Sometimes an instance type is not available in the specified region/AZ, you’d have to switch the zones
$ terraform apply
Error: [ERROR]
│ StatusCode: 403
│ Code: Zone.NotOnSale
│ Message: code: 403, The resource in the specified zone is no longer available
for sale
------------>fix: switch from us-east-1b to us-east-b
Alibaba Cloud Hits and Misses
Pros
I was really impressed by the speed at which the compute instances were spun (17seconds)
No brainer for those who have the majority of their business and customers in south Asian region
High availability option in China regions is insane.i.e Beijing region has a whooping 12 Availability zones
Different billing types like Prepaid/Postpaid, By traffic/By Bandwidth, even via Paypal.
Cons
AliCloud lacks popularity & support in the community (fewer blogs/articles) or maybe most of it is Chinese.
It can be a headache to find Zones supporting the service you want to deploy especially out of Asia.
The learning curve is a bit stiff once you go beyond the simple sandbox, The doc alone won’t cut it.
Customers Should Choose Regions, Zones out of choice not because it’s the only one that’s not sold out.
There is no way to extract a Zone id based on it’s region in the alicloud_zones Data block:

CONCLUSION
We just demonstrated how to quickly deploy an instance using terraform in AliCloud
Alibaba Cloud presents impressive strengths, especially for businesses operating in specific regions
However, it does come with challenges, such as limited global community support &potential complexities.
This is probably the last chapter of this Series unless I decide to add Kubenetes to the party
Time will tell :)
Thank you for reading!
Subscribe to:
Posts (Atom)
CONCLUSION
This brief overview captures key aspects/trade-offs of the Virtualized platform Vs the Bare Metal option.
While there's a plethora of capabilities to explore, this blog focused on the most relevant ones.
I strongly believe that besides few exceptions VMs are the best IaaS option for you out there
If your organization heavily dependent on hardware resources, private cloud is a better place for you.
Sunday, November 5, 2023
Terraform for dummies part 6: Deploy a static website on Alibaba Cloud
Intro
3 years ago, I started the terraform for dummies series where I wanted to deploy a static website in any cloud provider there was (the dummy in question was me duh:)). But the mistake most of us make is to think AWS, Azure, GCP, Oracle Cloud are the only Hyperscalers out there.
Wrong!
Alibaba Cloud market share even stole GCP’s 3rd place in 2021 (9.5% or $8.7 Billion). It has also moved from "Niche Players" to the "Visionaries" quadrant since in the Gartner Cloud infrastructure report.
You can learn more about AliCloud services, on my previous post > Intro to Alibaba Cloud
In this 6th tutorial (as done for AWS/Azure/GCP/OCI), we will deploy a webserver with a custom homepage.
We’ll cover 2 deployments (VPC + Instance) before ending with some thoughts on AliCloud experience/challenges.
Here’s a direct link to my GitHub repo linked to this lab => terraform-examples/terraform-provider-alicloud
Content :
I. Terraform setup
IV. Partial deployment (VPC)
V. Full deployment (instance)
Alibaba Cloud experience (hits and misses)
Overview
Topology
The below shows the layers involved between your workstation and AliCloud while provisioning through terraform.
You can either check the AliCloud registry, their GitgHub examples, or create a resource from the console then use the terraform import function to generate the deployment in HCL format (vpc,instance,subnet,etc..) based on their id.
Example for a VPC >>
1- Create a shell resource declaration for the vpc ina file called vpc.tf
2- Get the id of the VPC resource from your AliCloud Console
3- Run the Terraform import then Terraform show to load the vpc’s full declaration on the same file (vpc.tf)
4- Now you can remove the id and all non required attributes to create a vpc resource
1- $ vi vpc.tf
provider "alicloud" { region = "us-east-1" }
resource "alicloud_vpc" "terra_vpc" {
}
2- $ terraform import alicloud_vpc.terra_vpc vpc-0xio5hkexl4c43jpqw5yw
3- $ terraform show -no-color > vpc.tf Terraform lab content
VPC Deployment:To grasp the basics of a single network resource deployment.
Instance Deployment: includes the instance provisioning (with above vpc) with a nginx web sever.
I.Terraform setup
Windows: Download and run the installer from their website (32-bit ,64-bit)
Linux Download, unzip and move the binary to the local bin directory
$ wget https://releases.hashicorp.com/terraform/1.0.3/terraform_1.0.3_linux_amd64.zip
$ unzip terraform_1.0.3_linux_amd64.zip
$ mv terraform /usr/local/bin/
$ terraform --version
Terraform v1.0.3AliCloud authentication
Same as AWS, you will need to provide both access_key_id & secret_access_key. This can be done by Including them within environment variables (TF_VAR_*) or using terraform.tfvars
Assumptions
I’ll assume either of the two above options are present/configured in your workstation:
Example: using environment variablesEXPORT TF_VAR_access_key = "<my_access_key_id>"
EXPORT TF_VAR_secret_key = "<my_secret_key>"
EXPORT TF_VAR_access_key = "<my_access_key_id>"
EXPORT TF_VAR_secret_key = "<my_secret_key>"
I’ll also assume you have an ssh key pair to attach to your ecs instance. If not, here is a handy command
$  ssh-keygen -P "" -t rsa -b 2048 -m pem -f ~/.ssh/id_rsa_ali
     Generating public/private rsa key pair.
$ ssh-keygen -P "" -t rsa -b 2048 -m pem -f ~/.ssh/id_rsa_ali
Generating public/private rsa key pair.
II. Clone the repository
Pick an area on your file system to hold the terraform config and issue the following command.
$ git clone https://github.com/brokedba/terraform-examples.gitNote: You will find 2 directories inside the repository which will make things easier:
terraform-provider-alicloud/create-vpc/ Single VPC deploy.terraform-provider-alicloud/launch-instance Web instance deploy.
III. Provider setup
Install and setup the alicloud provider for our VPC config
Cd Into
terraform-provider-ali/create-vpcwhere our configurations resides
ubuntu $ cd ~/terraform-examples/terraform-provider-ali/create-vpc Alicloud provider will be automatically installed by
terraform init.
$ terraform init
  Initializing provider plugins...
  - Finding aliyun/alicloud versions matching "1.211.2"...
  - Downloading plugin for provider "alicloud" (aliyun/alicloud) 1.211.2...


$ terraform --version
  Terraform v1.0.3
  + provider.a v1.211.2   ---> the provider is now installed
Let's see what's in the
create-vpcdirectory (click to see content)
$ tree
  .
  |-- outputs.tf        ---> displays resources detail after the deploy
  |-- variables.tf      ---> Resource variables needed for the deploy
  |-- vpc.tf            ---> Our vpc terraform declaration
  |—- terraform.tfvars  ---> Our authentication variables to alicloud
IV. VPC Deployment
This will create several components including a resource group, VPC, Vswitch (subnet) and a security group
Once the authentication (access_key_id/secret) set, we can run
terraform plan
$ terraform plan
   Refreshing Terraform state in-memory prior to plan...
  ------------------------------------------------------------------------
  An execution plan has been generated and is shown below.
    Terraform will perform the following actions:

    # alicloud_resource_manager_resource_group.rg will be created
    + "alicloud_resource_manager_resource_group" "rg"
    {..}
    # alicloud_security_group.terra_sg will be created
    + resource "alicloud_security_group" "terra_sg" {
    + display_name        = "TerraDemo-rg"
    {..}
    # alicloud_security_group_rule.allow_http_80 will be created
    + resource "alicloud_security_group_rule"  "allow_http_80"
    + cidr_ip           = "0.0.0.0/0"
    + policy            = "accept"
    + port_range        = "80/80"
    {..}
    # alicloud_security_group_rule.allow_http_22 will be created
    + resource "alicloud_security_group_rule"  "allow_http_22"
    {..}
    # alicloud_security_group_rule.allow_http_443 will be created
    + resource "alicloud_security_group_rule"  "allow_http_443"
    {..}
    # alicloud_vpc.terra_vpc will be created
    + resource "alicloud_vpc" "terra_vpc" {
    ...
    + cidr_block             = "192.168.10.0/16"
   ...}
    # alicloud_vswitch.terra_sub will be created
    + resource "alicloud_vswitch" "terra_sub" {
    ...
    + cidr_block             = "192.168.0.0/24"
    ...
    + zone_id              = "us-east-1b"
    {..}

  Plan: 7 to add, 0 to change, 0 to destroy.
Note: I deliberately kept only relevant attributes for the VPC resource plan
Next, we can finally run
terraform deployto create a resource group , VPC, Vswitch and SG
$ terraform apply -auto-approve
alicloud_vpc.terra_vpc: Creating...
...
Apply complete! Resources: 6 added, 0 changed, 0 destroyed.
Subnet_CIDR = "192.168.10.0/24"
Subnet_Name = "terrasub"
vpc_CIDR = "192.168.0.0/16"
vpc_dedicated_security_group_Name = "terra-sg"
vpc_dedicated_security_ingress_rules = tolist([
  "allow_https_22:  22/22 , CIDR: 0.0.0.0/0",
  "allow_http_80:   80/80 , CIDR: 0.0.0.0/0",
  "allow_https_443: 443/443 , CIDR: 0.0.0.0/0",
])
vpc_id = "vpc-0xi0eft7h4mq33yx7s0hn"
vpc_name = "Terravpc"
Observations:
When setting security groups, the nic_type parameter must be set to intranet when linked to a VPC, while registry doc says the default value is internet (this will fire an error).
Now let’s destroy the VPC as the next instance deploy contains the same VPC specs.
$ terraform destroy -auto-approve

Destroy complete! Resources: 7 destroyed.
V. Full deployment (Instance)
Let's launch a full instance deployment from scratch by switching to the second directory
terraform-provider-alicloud/launch-instance/
Here's the content:
$ tree ./terraform-provider-alicloud/launch-instance
.
|-- cloud-init           ---> SubFolder
|   `--> vm.cloud-config ---> script to config a webserver & add a HomePage
|-- compute.tf    ---> Instance related terraform configuration
|-- outputs.tf    ---> displays the resources detail at the end of the deploy
|-- variables.tf  ---> Resource variables needed for the deploy
|-- vpc.tf        ---> same vpc terraform declaration deployed earlier
compute.tf holds the ecs instance block. All the rest comes from the vpc example.
-- “ Cloud-init subfolder” --
Cloud-init: is a cloud instance initialization method that executes tasks upon instance Startup by providing the user_data entry in the aclicloud_instance resource definition (See below).
...variable "user_data" { default = "./cloud-init/vm.cloud-config"}

 $ vi compute.tf
resource "alicloud_instance" "terra_inst" {
...
user_data                    = filebase64(var.user_data)
...
I used cloud-init to install nginx and load an html page that will be the server's HomePage.
Make sure you set the path for ssh public key accordingly in the variable (see variables.tf)
resource "alicloud_key_pair" "terra_key" {   key_name   = var.key_name
   public_key = file(var.ssh_public_key)}
LAUNCH THE INSTANCE
Cd in “
launch-instance”directory, run the init , then plan command to validate the ecs instance info.
$ terraform plan
   Refreshing Terraform state in-memory prior to plan...
  ------------------------------------------------------------------------
  An execution plan has been generated and is shown below.
    Terraform will perform the following actions:

  ... # VPC declaration <----------------- (see previous vpc deploy)
  ...
  # alicloud_resource_manager_resource_group.rg will be created
   + resource "alicloud_resource_manager_resource_group" "rg" {
      + display_name  = "TerraDemo-rg")
      ...}

 # alicloud_instance.terra_inst will be created
  + resource "alicloud_instance" "terra_inst" {
    + ...
    + image_id                 = "centos_7_9_uefi_x64_20G_alibase_20230816.vhd"
    + availability_zone        = "us-east-1a"
    + instance_name            = "ecs.c5.large"
    + host_name            = "TerraHost"
    + instance_type            = "ecs.c5.large"
    + key_name                 = "demo_ali_KeyPair"
    + private_ip              = "192.168.10.51"
    + instance_charge_type     = "PostPaid"
    + internet_charge_type     = "PayByTraffic"
    + user_data                = "c8c701575f9c76db131ccf77cf352da……"
    + system_disk_size         = 20
    + stopped_mode             = "StopCharging"
    + ...
    + ...}

  # alicloud_key_pair.key_pair will be created
  + resource "alicloud_key_pair" "key_pair" {
    {...}
   ...
  }
  Plan: 9 to add, 0 to change, 0 to destroy.
Let’s launch our instance using terraform apply (I left a map of different OS images in the variables.tf)
$ terraform apply -auto-approve
...
alicloud_vpc.terra_vpc: Creating...
alicloud_key_pair.key_pair: Creation complete after 2s [id=demo_ali_KeyPair]
alicloud_vpc.terra_vpc: Creation complete after 11s [id=vpc-0xiug9rc5utxaj3wl39a4]
alicloud_security_group.terra_sg: Creation complete after 1s [id=sg-0xiis3c92f51bgmybx4c]
alicloud_vswitch.terra_sub: Creation complete after 7s [id=vsw-0xi6lj5g2hvlaleytf54a]
alicloud_instance.terra_inst: Creating... [10s elapsed]
alicloud_instance.terra_inst: Creating... 17s [id=i-0xi6p7buqfj6902i8ul5]

...
Apply complete! Resources: 9 added, 0 changed, 0 destroyed.

Outputs:
...
vpc_Name    = Terravpc
vpc_CIDR    = 192.168.0.0/16
Subnet_CIDR = 192.168.10.0/24
private_ip  = "192.168.10.51"
public_ip   = "47.89.159.135"
vpc_dedicated_security_ingress_rules = [
  "allow_https_80 :  80/80   , CIDR: 0.0.0.0/0",
  "allow_https_443:  443/443 , CIDR: 0.0.0.0/0",
  "allow_https_22:  22/22   , CIDR: 0.0.0.0/0",
]
SSH_Connection = ssh connection to instance TerraCompute ==>  ssh -i ~/id_rsa_ali root@47.89.159.135
Once the instance is provisioned, juts hit the public IP address in your browser and Voila!
Here I just embedded a video clip into the webpage but you can adapt the cloud-init file to your own liking.
You can also tear down this configuration with a terraform destroy
Tips
You can fetch any of the specified attributes in outputs.tf using terraform output command i.e:
$ terraform output SSH_Connection
ssh connection to instance TerraCompute ==> ssh -i ~/.ssh/id_rsa_ali root@47.89.159.135
Sometimes an instance type is not available in the specified region/AZ, you’d have to switch the zones
$ terraform apply
Error: [ERROR]
│    StatusCode: 403
│    Code: Zone.NotOnSale
│  Message: code: 403, The resource in the specified zone is no longer available
 for sale
------------>fix: switch from us-east-1b to us-east-b
Alibaba Cloud Hits and Misses
Pros
I was really impressed by the speed at which the compute instances were spun (17seconds)
No brainer for those who have the majority of their business and customers in south Asian region
High availability option in China regions is insane.i.e Beijing region has a whooping 12 Availability zones
Different billing types like Prepaid/Postpaid, By traffic/By Bandwidth, even via Paypal.
Cons
AliCloud lacks popularity & support in the community (fewer blogs/articles) or maybe most of it is Chinese.
It can be a headache to find Zones supporting the service you want to deploy especially out of Asia.
The learning curve is a bit stiff once you go beyond the simple sandbox, The doc alone won’t cut it.
Customers Should Choose Regions, Zones out of choice not because it’s the only one that’s not sold out.
There is no way to extract a Zone id based on it’s region in the alicloud_zones Data block:
CONCLUSION
We just demonstrated how to quickly deploy an instance using terraform in AliCloud
Alibaba Cloud presents impressive strengths, especially for businesses operating in specific regions
However, it does come with challenges, such as limited global community support &potential complexities.
This is probably the last chapter of this Series unless I decide to add Kubenetes to the party
Time will tell :)
Thank you for reading!
Subscribe to:
Posts (Atom)