Friday, December 31, 2021

☁☁ My Terraform labs 2021– Cloud recap ☁☁

This image has an empty alt attribute; its file name is image-10.png

Intro

The first time I had seen a glimpse of this Infrastructure as Code artifact in 2018 (presented by Roopesh Ramklass at our TOUG meetup), I found the it ugly as hell and sworn to never touch it (probably confused it with Json ;)).

Today I am happy to admit that I was totally wrong and it was stupid of me to judge it by it’s cover . Terraform is written in Go but you don’t need to know it to understand how to run it. It is purely declarative and HashiCorp made it so easy to understand by centralizing the documentation for each cloud provider in their Terraform Registry that you probably don’t need to read  much to run your first  demo.    
 
Right after my Oracle Cloud operation associate exam, my interest started to spike. It was bumpy at times but worth the bother as there is so much to learn. That’s why I started the terraform for dummies series where I wanted to deploy a static website in any cloud provider there was. The dummy in question was me in case you didn’t figure :).

Although my journey has just started, It’s always good to summarize what we have achieved up till now. Which is the purpose of this article.

Cloud deployments

So if you want to learn how to provision with Terraform  in all  4 cloud providers !!!
Below are simple deployments of a static website n (Including Github repos )

✅ Terraform for dummies Part 1 OCI

Blog  https://bit.ly/3Ia3lqr      

GitHub Repo:
https://github.com/brokedba/terraform-examples/tree/master/terraform-provider-oci


✅ Terraform for dummies Part 2 AWS 

Blog https://bit.ly/3D7vSJM  

GitHub Repo:
https://github.com/brokedba/terraform-examples/tree/master/terraform-provider-aws


✅ Terraform for dummies Part 3 Azure

Blog https://bit.ly/3n6J2AK  

GitHub Repo :
https://github.com/brokedba/terraform-examples/tree/master/terraform-provider-azure


✅ Terraform for dummies Part 4 GCP 

Blog https://bit.ly/3pCch14    

GitHub Repo:
https://github.com/brokedba/terraform-examples/tree/master/terraform-provider-gcp


On-Premises deployments

✅ Terraform for dummies Part 5: Libvirt (KVM)

Blog   https://bit.ly/3mA0azh


Master GitHub Repo for all above labs:

Repository: https://lnkd.in/gzrJ6MP6


Terraform tips


✅  Nested variable substitution using maps and locals

     Blog   https://bit.ly/3mA0azh


What’s Next

Probably a terraform associate certification as I slacked a bit lately and another deployment on ALICLOUD

Compare OCI, AWS, Azure, GCP application services


Intro

Common trend for cloud providers is to compare their services/offers with AWS (even AWS itself does it when releasing new features). But it seems that the top 3 reached a sort of agreement where they only acknowledge their respective direct competition & dismiss any player outside this oligopoly. Oracle Cloud or AliCloud being more than underdogs deserve a bit more respect when comparing options available out there in the Cloud. That’s why I decided to extend an application services comparison to Oracle Cloud so we can have a broader view of what each one offers today.

Why compare application platforms

There are so many ways of designing, building and deploying an application in the cloud nowadays. Whether it’s  cloud native like docker container services,K8, and Faas or just shift and lift migrations. I almost feel bad for the software developers because it’s way too many options that can generate a huge tech debt. Instead of asking which fancy technology to use next, the real question is which one fits company’s requirements.
today, I chose to Zoom in on the app services which are here to ease the life of dev teams .

What’s in the comparison

  •  I took the full list of services from gcp service comparison page and selected the ones related to apps
  • Then tried to cross reference the tools and services with what’s available in Oracle Cloud (OCI)
  • This might need updates in the future but it’s a good start

The below table can help visualize which service is available and its equivalent in each of the 4 major Cloud providers.

Enjoy !


This image has an empty alt attribute; its file name is image-8.png


Text version 

Compare OCI, AWS, Azure, Google Cloud app services

Service type

Description

GCP Offering

AWS Offering

Azure Offering

Oracle Cloud Offering

PaaS

Build highly scalable applications on a fully managed serverless platform.

App Engine

AWS Elastic Beanstalk

Azure App Service

Oracle Application Container Cloud Service, Java Cloud Service

Containers without infrastructure

Develop deploy scalable containerized apps on a fully managed serverless platform.

Cloud Run

AWS Fargate, AWS Lambda, AWS App Runner

Azure Container Instances

Oracle Application Container Cloud Service

Multi-cloud

app platform that extends GCP to on-prem or other cloud assets so you can modernize applications faster and keep consistency

Anthos

AWS Outposts

App Modernization with Microsoft Azure, Azure Arc

Oracle Exadata Cloud@Customer, Oracle Roving Edge Infrastructure

CI/CD

Build, test, deploy on GCP serverless CI/CD platform

Cloud Build

AWS CodeBuild, AWS CodeDeploy, AWS CodePipeline

Azure DevOps, GitHub Enterprise

OCI Devops , Oracle Visual Builder Studio

FaaS (function as a Service)

Run code on scalable serverless platform (Pay Per 100ms)

Cloud Functions

AWS Lambda

Azure Functions Serverless Compute

Oracle Functions

Containers orchestration

managed Kubernetes service

Google Kubernetes Engine (GKE)

Elastic Kubernetes Service (EKS)

Azure Kubernetes Service

OKE


Conclusion

Although having a lot of choice is generally good, it is important for developers and practitioners how every product compares to the competition including Top 5 players. Especially when the company has already adopted the Multi-cloud strategy . Hope this small table helped.  

Thanks for reading

RMAN, INCARNATIONS, and ME part II: Recovery ignoring backups / ORA-19563: datafile copy header validation failed for file

ImageIntro

In an ideal world, I believe, every backup script should be matched by 2 recovery scenarios. As this swiss OUC figure reminds us, having a backup that works means nothing without a tested restore and recovery. Today I’ll try to depict the don’t do’s after an recovery of a controlfile with open resetlogs using RMAN. Although some scenarios were a bit extreme, I still found out some weird behaviour from RMAN as I had to figure out a workaround on my own to complete the database recovery after a new incarnation was created. 

The Backup

  • Before heading to the recovery scenarios, I’ll describe how & what kind of backups were running before this exercise.  
  • Configuration:
    Oracle 19c CDB with 2 user PDBs and archive logging enabled . OS: Windows server
  • The backup Script:
    It’s a 19c CDB backed up using Image copies and incremental  backups  that will be merged with the copies every 4 days (recover copy Until time sysdate-3 days).
  • Below is a sample of the script with dummy paths & shorter retention (sysdate-1) but it’s very similar.

    Image

2. The recovery scenarios

    • Remember to always record the DBID of the database 
    • Ensure VALIDATE DATABASE/RESTORE, RESTORE ARCHIVELOG ALL VALIDATE are successful
    • In order to fully assess my backups, I first choose to try the easy recovery scenarios
  • Easy recoveries (all successful)
    • Data File Recovery PDB level ✔
      • User datafile Drop and recover 
      • PDB System tablespace drop and recover  (CDB needs to be in mount state).
    • Data File Recovery CDB level ✔
      • ROOT container system tablespace drop and recover
    • Loss of spfile in CDB ✔
      • Startup NoMount> Recover Spfile from Autobackup> shutdown immediate> startup
      • Note: PDBs don’t have spfiles, it’s all stored in PDB_SPFILE$.

2.2 Control file recovery issues

  • Restoring/recovering the Controlfile will requires an Open resetlogs no matter if the redo logs or datafiles are still valid. Open Resetlogs means a new Incarnation which brings me to the following questions

      Incarnation Questions

  • Will the backup cycle be broken after a recovery of a controlfile and a new incarnation ?
  • What happens when the subsequent incremental backup is merged with the db copies in 4 days ?
  • The copy pointing to the old incarnation number will be merged with an incremental pointing to the new one, does that make the backup invalid ?
  • Could we switch back to the previous incarnation after recovery and trick RMAN by still runing daily incremental backups and old image copies merged with new incremental backups ?


3. First Controlfile recovery

  • I found out that the recovery of the control file was already complaining. A valid system datafile had to be restored and DB recovered so it can be opened in resetlogs mode, which was odd.

    D\**\CONTROLFILE>:> del \f O1_MF_HSN45YNX_.CTL
    RMAN> STARTUP FORCE NOMOUNT; RMAN>SET DBID 670048894;
    RUN
    { SET CONTROLFILE AUTOBACKUP FORMAT
    FOR DEVICE TYPE DISK TO '\\backup$\D_controlfile_%F';
    RESTORE CONTROLFILE FROM AUTOBACKUP;
    }
    RMAN> ALTER DATABASE MOUNT; RMAN> ALTER DATABASE OPEN RESETLOGS; ----------------------- bug ??--------------------------------
    ORA-01194: file 1 needs more recovery to be consistent
    ORA-01110: data file 1: 'D:\ORACLE\CDB\CDBDEV02\ORADATA\SYSTEM01.DBF'

    RMAN> restore datafile 1;
    Finished restore
    RMAN> recover datafile 1;
    RMAN-03002: failure of recover command at 09/20/2021 14:32:55
    RMAN-06067: RECOVER DATABASE required with a backup or created control file
    I did a recover database :
    RMAN> RECOVER DATABASE;
    Finished recover

    RMAN> alter database open resetlogs;
    Statement processed
    ------------------------------------------------------------------------------
    RMAN> list incarnation ;

    DB Key  Inc Key DB Name  DB ID        STATUS  Reset SCN  Reset Time
    ------- ------- -------- ------------ ------- ---------- ---------------------
    1       1       CDBDEV2 670048894    PARENT  1           28-oct-2020 20:45:50
    2       2       CDBDEV2 670048894    CURRENT 17463165117 20-sep-2021 14:51:59

Now we have a new incarnation after resetlogs startup.I know anytime a resetlogs happens, a new backup is required but I still can’t answer my questions about the impact on the backup cycle & the next database copies merge.
So I came up with a bold theory where reverting to incarnation 1 will allow to keep merging copies with the backups. It was stupid but I wanted to try since it was a clone environment. “can’t learn if you don’t break” 

My crazy scenario (don’t do this at home)

1.  Incarnation was reverted to 1 right before the the evening backup .

2. Next morning I dropped the tablespace system datafile and wanted to recover it =“Epic fail”.

RMAN> run { restore tablespace system; recover tablespace system;}
Finished recover at 21-sep-2021 14:52:17

RMAN> alter database open;
ORA-01589: must use RESETLOGS or NORESETLOGS option for database open

RMAN> alter database open noresetlogs;
ORA-01588: must use RESETLOGS option for database open

RMAN> alter database open resetlogs;
ORA-01190: control file or data file 3 is from before the last RESETLOGS
ORA-01110: data file 3: 'D:\ORACLE\CDB\**\ORADATA\SYSAUX01.DBF'

RMAN> validate database root;
List of Datafiles
=================
File Status Marked Corrupt Empty Blocks Blocks Examined High SCN
---- ------ -------------- ------------ --------------- ----------
1 OK 0 6788 68480 17463164895 File Name: D:\ORACLE\CDB\**\SYSTEM01.DBF --
Same with all CDB files

RMAN> restore datafile 3;
RMAN> recover datafile 3;
channel ORA_DISK_1: restore complete, elapsed time: 00:00:03
RMAN-06067: RECOVER DATABASE required with a backup or created control file

-- Try full Database Recovery

RMAN> recover database;
ORA-00283: recovery session canceled due to errors
ORA-19912: cannot recover to target incarnation 2

RMAN> reset database to incarnation 1;
RMAN> run {
set until SCN 17463165116; # last RESETLOG SCN -1
restore database;
recover database;
}

RMAN-03002: failure of recover command at 09/22/2021 10:50:50
ORA-00283: recovery session canceled due to errors
RMAN-11003: failure during parse/execution of SQL statement:
alter database recover if needed start until cancel
ORA-16433: The database or pluggable database must be opened in read/write mode.
Error from the alert.log:
…ORA-01190: control file or data file 1745 is from before the last RESETLOGS
ORA-01110: data file 1745: 'K:\ORACLE\DATA\PTRPTS_DF_3.DBF'

        I checked the header value of the data files and confirmed some files weren’t completely recovered

SELECT FHTHR Thread, FHRBA_SEQ Sequence, count(1) --,fhsta STATUS
FROM X$KCVFH group by FHTHR, FHRBA_SEQ –, fhsta STATUS
order by FHTHR, FHRBA_SEQ;
THREAD SEQUENCE   COUNT(1) ------- ---------- --------        
1    26          4       
1    5724        803

SQL> SELECT 'ROOT' con_name,status,checkpoint_change#,checkpoint_time,
resetlogs_change#, resetlogs_time, count(*), fuzzy,h.con_id
from v$datafile_header h
  where h.con_id=1
  Group by status,checkpoint_change#,checkpoint_time,
resetlogs_change#,resetlogs_time, fuzzy,h.con_id
UNION
SELECT p.name,status,checkpoint_change#,checkpoint_time,
resetlogs_change#, resetlogs_time, count(*), fuzzy,h.con_id
from v$datafile_header h, v$pdbs p
   where h.con_id=p.con_id
   Group by p.name, status,checkpoint_change#,checkpoint_time,
resetlogs_change# ,resetlogs_time, fuzzy,h.con_id
   order by con_id;

Con_name STATUS CHECKPOINT_CHANGE# CHECKPOINT_TIME RESET_CHANGE# RESETLOGS_TIME     COUNT(*) FUZ  CON_ID  ERROR
---------- ------- ------------------- -------------------- ----------------- -------------------- -------- ---- ------- --------------
ROOT       ONLINE       17463165116    20-SEP-2021 14:09:03  1                28-OCT-2020 20:45:50  4        NO   1
PDB$SEED   ONLINE           1630255    29-OCT-2020 19:06:11  1                28-OCT-2020 20:45:50  4        NO   2
FSDEMO     ONLINE       17463165116    20-SEP-2021 14:09:03  1                28-OCT-2020 20:45:50  194      NO   3
FS_PDB     OFFLINE      17463164868    20-SEP-2021 14:07:51  1                28-OCT-2020 20:45:50  605      No   4

Down the rabbit hole

Things went from bad to worse the more I tried to recover the DB an RPO prior to last resetlogs.
I want to just remind few points before I end this long end endless scourge.

  • Controlfile recovery from Sep 19th autobackup corresponding to last resetlogs has   
    • New Incarnation key: 2
    • SCN 17463165117   -     Seq 5727
    • Time 20-sep-2021 14:51:59
  • Previous Incarnation  key: 1
    • Time 28-oct-2020 20:45:50
  • I reverted the incarnation to key 1 which was absurd on a hindsight
    • Incremental backup kept running 


Solution

Case 1: Recover from a new incarnation via manual Controlfile copy

luckily a copy of the initial controlfile was kept aside so I decided to reuse it and try recovering

  • Restore the control file using a manual copy 

RMAN> startup nomount force;
RMAN> restore controlfile from 'D:\Backup\19c\O1_MF_HSN45YNX_.CTL';
Starting restore at 23-sep-2021 17:11:09
output file name=D:\ORACLE\CDB\CDBDEV2\REDO\CONTROLFILE\O1_MF_HSN45YNX_.CTL
Finished restore at 23-sep-2021 17:11:11

RECOVER the database
RMAN> alter database mount;

1. Using sequence before the LAST RESETLOGS
SQL> recover database until logseq 5728; -- Resetlogs seq +1
Starting recover at 23-sep-2021 17:26:35
Finished recover at 23-sep-2021 17:29:25
OR
2. Using SCN before the LAST RESETLOGS
run {
  set until scn 17463165116; -- Resetlogs SCN -1
  recover database;
  }

--- Check the new incarnation

RMAN> list incarnation;                                              
List of Database Incarnations                                        
DB Key  Inc Key DB Name  DB ID     STATUS  Reset SCN Reset Time      
------- ------- -------- -------- -------- --------- -----------------
1       1       CDBDEV2 670048894 CURRENT     1     28-oct-2020 20:45

RMAN> alter database open resetlogs;


Case 2: Recover from a new incarnation via autobackup

  • I was’nt happy with the first/above recovery because in real life you will never have a controlfile handy during a disaster. So I wiped out all the datafiles of the CDB and decided to recover all from scratch 
  • That’s where RMAN started to ignore image copies which can't even be cataloged (ghosted)

--- We need to recover the last controlfile: From September 21st
Piece Name: \\BACKUP$\.._C-670048894-20210920-01  21-sep-2021 19:38

RMAN> Startup nomount
CDBDEV2_CONTROLFILE_C-670048894-20210920-01

RMAN> Restore controlfile from '\\BACKUP$\CDBDEV2_CONTROLFILE_C-670048894-20210920-01';
Finished restore at 23-sep-2021 17:11:11

ORA-19563:  Recovery ERROR (ghosted backups)

Then a weird error “ORA-19563: datafile copy header validation failed” appeared upon recovery for several backup pieces as RMAN went blind ignoring image copies.

--- Recover database execution
channel ORA_DISK_1: restoring datafile 00053                     
Input datafile copy RECID=110503 STAMP=1083697667
file name=\\BACKUP$\CDB_DATA_D-CDBDEV2_I-670048894_TS-DPWORK_FNO-53_0VVU1DED 
destination for restore of datafile 00053:
D:\ORACLE\CDB\CDBDEV2\ORADATA\PDB\FSDEMO\DPWORK.DBF                                                    
ORA-19563: datafile copy header validation failed for file
\\BACKUP$\CDB_DATA_D-CDBDEV2_I-670048894_TS-DPWORK_FNO-53_0VVU1DED   
…                                                  

-->> Image copies are not visible to RMAN and can't even be cataloged.

RMAN> catalog start with '\\BACKUP$\CDB_DATA_D-CDBDEV2_I-670048894_TS-DPWORK_FNO-53_0VVU1DED';                        
searching for all files that match the pattern ..**FNO-53_0VVU1DED     
No files found to be unknown to the database                                   

Workaround

  • Created a subfolder 21_backups in the backup location and copy all backups 
  • Uncatalogued the old backup location and delete the files
  • Cataloged the new location (subfolder) containing the copy of all backups.  
  • Launched a  recovery of the database (target RPO Sep 21 14:51:59 )

move backup files to \\BACKUP$\21_backups 
-- Catalog old backup location
RMAN> CHANGE BACKUP OF ARCHIVELOG ALL UNCATALOG;
RMAN> CHANGE BACKUP OF DATABASE UNCATALOG;

-
- catalog new backup location
RMAN> CATALOG START WITH '\\BACKUP$\21_backups'
915 files found

=== RECOVERY ====
RMAN> alter database mount;           
RMAN> run                      
   {      set until logseq 5728;   -- last resetlogs seq +1
    restore database ;       
    recover database ;      
    }                       

... applying incremental backups restore
starting media recovery 
media recovery failed  

===> incarnation 1 recovery is complete oracle wants more
RMAN-00571: ===========================================================
RMAN-00569: =============== ERROR MESSAGE STACK FOLLOWS ===============
RMAN-00571: ===========================================================     

RMAN-03002: failure of recover command at 09/24/2021 17:51:34  
ORA-00283: recovery session canceled due to errors
RMAN-11003: failure during parse/execution of SQL statement:
alter database recover if needed start until cancel using backup controlfile
ORA-00283:
recovery session canceled due to errors
ORA-19912: cannot recover to target incarnation 1                             
RMAN> list incarnation;                                                       
DB Key Inc Key DB Name  DB ID    STATUS  Reset SCN    Reset Time         
------- ------- ------ --------- ------- ------------ -------------------  
1     1     CDBDEV2 670048894 CURRENT  1           28-oct-2020 20:45:50  
3 3     CDBDEV2 670048894 ORPHAN   17463165117 23-sep-2021 17:50:38 2     2     CDBDEV2 670048894 ORPHAN   17463165117 20-sep-2021 14:51:59
–> target RPO = Inc key 2 

  • ORA-19912 just confirms all is recovered up to incarnation #1, 
    Solution
    Now we can just roll forward to Target RPO From incarnation key # 2 

RMAN> reset database to incarnation 2;   

RMAN> recover database ; 
Finished recover at 24-sep-2021 18:18:34
RMAN> alter database open resetlogs;
Statement processed


Conclusion

The Rman lesson of the day can be taken off of a quote from THE WIRE “Omar :
"You come at the King ? you best not miss”
That is,  don’t mess with the Incarnation after a new resetlogs. Reverting to previous Incarnation will just make things worse and new incarnation rhymes with new backup cycle .

Thanks for reading

Wednesday, December 29, 2021

RMAN, Incarnation, & ME part I: “ORA-19906”: Recovery target incarnation changed during recovery

This image has an empty alt attribute; its file name is image-6.pngIntro

If there is something I honestly always struggled with as a DBA, it’s RMAN incarnation. Both mystical like its name suggests and vital, ensuring absolute consistency of your database and backups. But deep down, you always know it’ll back fire one day out of the shadows. Because that’s where it hides, lurking until a human  error happens as one messes up with archive logs or RMAN retentions. It’s no surprise that my skin starts  crawling whenever I see that word show up in an RMAN Horror error. Today we’ll just explore one of the many cases leading to this ORA-19906 error as it can be anything.   

Use case and Configuration (RMAN Refresh)

  • This didn’t occur during a proper Database restore but rather during a refresh from production.
  • I was asked to replace the client’s legacy procedure to refresh 12c databases from production by a time effective alternative which is why I picked RMAN duplicate method (more popular for creating standby DBs). let’s describe the course of events prior to the incident

  • Configuration:
    Source: Oracle 12c NonCDB with enabled archive logging and backup. OS: Windows server
    Test: Similar setup than the production where databases used to be refreshed using a simple restore
    procedure by-weekly.

2. The steps

  • Drop the old refreshed database to be replaced and keep a copy of he pfile
  • Import the password file from source instance to destination DB and rename it to fit the target instance
  • Add appropriate entry into "tnsnames.ora" to allow connections to target DB from the duplicate server.

    ProDB-source =
        (DESCRIPTION =
          (ADDRESS = (PROTOCOL = TCP)(HOST = Prodserver)(PORT = 1521))
          (SEND_BUF_SIZE = 65535)
          (RECV_BUF_SIZE = 65535)
          (CONNECT_DATA =    (SERVER = DEDICATED)
            (SERVICE_NAME = ProDB)))

  • Directories for data and logs as some system parameters will be adjusted in RMAN duplicate script.
  • Directories necessary for starting the duplicate database are already there (.i.e audit)
  • Make the backup files from the source database available to the destination server(\\Share\PBKUP$\)
  • Start the duplicate instance in NoMount mode using the pfile copy saved earlier 
  • RMAN Connect to the duplicate database as (AUXILIARY) and source DB as TARGET

    $ set ORACLE_SID=testDB
    SQL> STARTUP NOMOUNT PFILE='**\initTargetDB.ora';
    C:> rman TARGET sys@ProdDB-SOURCE AUXILIARY /   msglog=targetDB_duplicate.log

  • Run Rman duplicate script (make sure the last controlfile backup is older than last archivelog backup)

    @rman_duplicate.rman

    Run {
    DUPLICATE DATABASE TO testDB
    until SCN XXXXXXXXX; # to be checked in prod
    SPFILE # params to adjust
    parameter_value_convert ('ProDB','targetDB')
    set db_file_name_convert='D:\ORACLE\ORADATA\ProDB\','D:\ORACLE\ORADATA\targetDB\'
    'F:\ORACLE\ORADATA\ProDB\TEMP\','F:\ORACLE\ORADATA\targetDB\TEMP\
    set log_file_name_convert='F:\ORACLE\ORADATA\ProDB\','F:\ORACLE\ORADATA\targetDB\'
    set db_name='testDB'
    set db_unique_name='testDB'
    set db_recovery_file_dest_size='xx'
    set sga_target='xx'
    set pga_aggregate_target='xx'
    BACKUP LOCATION '\\Share\PBKUP$\'
    NOFILENAMECHECK;
      }


Error New incarnation created

The duplicate command completes a restore but fails when the recovery fails  

Oracle instance shut down
RMAN-00569: =============== ERROR MESSAGE STACK FOLLOWS ===============
RMAN-00571: ===========================================================
RMAN-03002: failure of Duplicate Db command at 05/28/2020 12:45:11
RMAN-05501: aborting duplication of target database
RMAN-03015: error occurred in stored script Memory Script
ORA-00283: recovery session canceled due to errors
RMAN-11003: failure during parse/execution of SQL statement: alter database recover logfile
'F:\ORACLE\TesttDB\ARCHIVELOG\2020_05_28\O1_MF_1_16380_HDZTLDHN_.ARC'

ORA-00283: recovery session canceled due to errors
ORA-19906: recovery target incarnation changed during recovery

 Alert log message:

alter database recover if needed
start until change 15446103440 using backup controlfile
Media Recovery Start Started logmerger process
Thu May 28 05:13:23 2020   Parallel Media Recovery started with 4 slaves
Setting recovery target incarnation to 3 # What the heck ?????
ORA-279 signalled during: alter database recover if needed
... alter database recover logfile
'F:\ORACLE\testDB\ARCHIVELOG\2020_05_28\O1_MF_1_16380_HDZ05NW3_.ARC'
Thu May 28 05:13:50 2020 Errors with log O1_MF_1_16380_HDZ05NW3_.ARC
Thu May 28 05:13:50 2020   Media Recovery failed with error 19906
Recovery interrupted!
ORA-00283: recovery session canceled due to errors
ORA-19906: recovery target incarnation changed during recovery

Investigation:

== DUPLICATE target

RMAN> list incarnation;
List of Database Incarnations
DB Key  IncKey DB Name  DB ID     STATUS  Reset SCN  Reset Time
------- ------ ------- ---------- ------- ---------- ----------
1       1      ProDB   1322653252 ORPHAN  1          03-NOV-11
2       2      ProDB   1322653252 ORPHAN  994063     18-JAN-13
3       3      ProDB   1322653252 CURRENT 14331907298 25-APR-19 == Ghost incarnation

>>> Incarnation 3 on production that doesn’t exist

== PROD source

RMAN> list incarnation;
List of Database Incarnations
DB Key Inc Key DB Name  DB ID     STATUS  Reset SCN  Reset Time
------ ------- ------- ---------- ------- --------- -----------
1       1      ProDB    1322653252 PARENT  1         03-nov-2011
2       2      ProDB    1322653252 CURRENT 994063    18-jan-2013 == valid Incarnation

Incarnation 3 on production doesn’t exist but is visible in the duplicate Database.
Let’s try to c
heck and clean any leftover in the backup location '\\Share\PBKUP$\'

RMAN> crosscheck  backupset;
Crosschecked 6 objects

There was 13 files in that directory among which 7 where outdated and not even spotted by RMAN crosscheck . Cleaning them and crosschecking didn’t fix the problem so

Real Root cause

  • I was so obsessed with the source backup location that I forgot to read the full path of the archive involved in the error.   
  • In fact, this happened because the FRA directory on the duplicate server wasn’t cleaned before running the RMAN duplicate script. Hence RMAN will implicitly catalog all old files including the Archive logs and add them to the media recovery after the restore is done (triggering new incarnation that actually belonged to the past) .     

'F:\ORACLE\testDB\ARCHIVELOG\2020_05_28\O1_MF_1_16380_HDZ05NW3_.ARC'

Solution I removed all old Archive logs and the duplicate finished with no errors after that.

This image has an empty alt attribute; its file name is image-7.png


Conclusion

The Rman lesson of the day to remember is: "Always clean up the house before moving in..".
That is clean the existing  FRA folders on the duplicate destination before the refresh ;).

PS: You’d be surprise to know that this error popped up for other users a decade ago on RMAN 10g

Sunday, December 26, 2021

19c PDB Refreshable clones

This image has an empty alt attribute; its file name is image-2.pngIntro

Beside Long term release benefits, upgrading to a multitenant 19c Database will allow to completely ease the way test environments are refreshed from production servers. Say Goodbye to complex & lengthy RMAN duplicate scripts and hello to remote cloning. Even better with refreshable clones, production data is now automatically updated. Many blogs were written about it like the one from Tim Hall, Franck Pachot(Poor man’s standby), or Oracle ACE peer Diana Robete. But I still found a little thing to add, as I used Oracle scheduler to automate the refreshes unlike the default available option (EVERY X Minutes). 

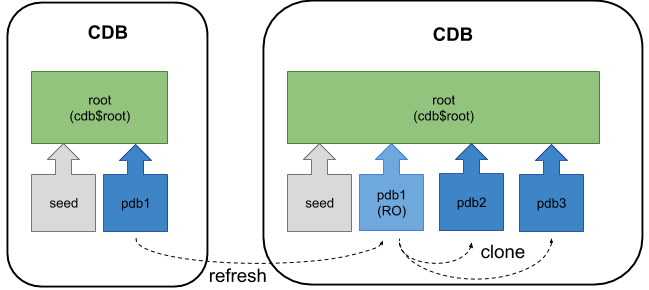
Options to refresh Test PDB from prod

1. Snapshot carousel

  • A PDB snapshot is a point-in-time copy of a PDB. Source PDB can be open read-only or read/write during snapshot creation. Copies can be sparse or full depending if storage system supports sparse clones or not.
  • Snapshots are created manually via SNAPSHOT clause or automatically using ‘EVERY interval’.
  • There’s a very handy article from my colleague on how to create a snapshot using carousel technique.

  • Restrictions:
    Snapshot carousel requires ASM and ACFS filesystems which in my case is not present so I’ll pass.


2. Refreshable Clone PDBs

  • This is valid approach for non ASM DBs and doesn’t require additional prerequisites besides a CDB.
  • Below graphic from Tim Hall’s blog explains simply how the refresh mechanism works

    This image has an empty alt attribute; its file name is image-3.png
  • The underlying filesystem structure doesn’t need to be similar

Prerequisites 
Similar to those of a hot, remote clone, here are the most common (19c) prerequisites.

  • User in the target database must have CREATE PLUGGABLE DATABASE privilege in root container.
  • Remote CDB uses local undo mode. Otherwise remote PDB must be opened in read-only mode.
  • Remote DB is in archivelog mode. Otherwise remote PDB must be opened in read-only mode.
  • If remote database is a PDB, the database link can point to the remote CDB using a common user, the PDB using a local or common user.
  • The user in remote database that the database link connects to must have the CREATE PLUGGABLE DATABASE privilege.
  • Target & remote databases must have same endianness.
  • Target & remote databases either have the same options installed, or the remote database must have a subset of those of the target database.
  • If the character set of the target CDB is AL32UTF8, remote DB can be any character set. If target CDB does not use AL32UTF8, the character sets of remote/local databases must match.
  • If the remote database uses TDE, the target CDB must be configured appropriately before attempting the clone. If not, the new PDB will only open in restricted mode.


Refresh Considerations

  • Refreshable Clone PDB must be closed during refresh
  • It must, also, be kept open Read Only the rest of the time to prevent out-of-sync changes
  • Other
    • A refreshable PDB can be changed to a non-refreshable PDB, but not vice versa.
    • If source PDB is not available over DB link, archived redo logs can be read from the optional REMOTE_RECOVERY_FILE_DEST location parameter.
    • New datafiles added to the source PDB are automatically created on the destination PDB. PDB_FILE_NAME_CONVERT parameter must be specified for the conversion to happen.

Refreshable PDB demo

This scenario assumes db file parameters are not defined in the target environment. OS: Windows

NAME VALUE
-------------------- --------------------

db_file_name_convert
pdb_file_name_convert
db_create_file_dest

1- Create a common user in the source CDB with the required privileges where source pdb is “PSPROD”

SQL> Create user c##psprod_clone identified by welcome1 container=all;
SQL> Grant create session, create pluggable database to c##psprod_clone container=all;

2- Create a database link at the Target CDB using source TNS alias ‘SourceCDB

SQL> create database link psprod_clone_link connect to c##psprod_clone
identified by welcome1 using 'SourceCDB';

3- Create a refreshable PDB clone using a manual refresh, plus few automatic refresh syntax examples.

-- Manual refresh mode.

CREATE PLUGGABLE DATABASE PSPDB_RO FROM PSPROD@psprod_clone_link 
file_name_convert=('D:\ORACLE\DATA\','K:\ORACLE\CDB\PSPDB_RO\DATA\',
'H:\ORACLE\TEMP\','K:\ORACLE\PSPDB_RO\TEMP\')
  REFRESH MODE MANUAL;

-- Automatically refresh every 60 minutes.
CREATE PLUGGABLE DATABASE PSPDB_RO FROM PSPROD@psprod_clone_link
  REFRESH MODE EVERY 60 MINUTES;

-- Non-refreshable PDB.
-- Both below commands are functionally equivalent.
CREATE PLUGGABLE DATABASE PSPDB_RO FROM PSPROD@psprod_clone_link
  REFRESH MODE NONE;

CREATE PLUGGABLE DATABASE PSPDB_RO FROM PSPROD@psprod_clone_link;

4- Perform a manual refresh . Syntax works for  Post 12.2  from the root container

SQL> CONN / AS SYSDBA
ALTER PLUGGABLE DATABASE PSPDB_ro CLOSE IMMEDIATE;
ALTER PLUGGABLE DATABASE PSPDB_ro REFRESH;
ALTER PLUGGABLE DATABASE PSPDB_ro OPEN READ ONLY;

5- Check the last refresh time and SCN

SQL> SELECT last_refresh_scn,
cast(scn_to_timestamp(last_refresh_scn) as date) refresh_Time
FROM dba_pdbs WHERE pdb_name = 'PSPDB_RO' ;

LAST_REFRESH_SCN REFRESH_TIME
---------------- --------------------
     17635452014 17-Dec-2021 16:48:17


Schedule a nightly refresh (4AM)

1- Create The refresh procedure

CREATE OR REPLACE PROCEDURE sys.psprod_refresh AS BEGIN EXECUTE IMMEDIATE 'ALTER PLUGGABLE DATABASE PSPDB_RO CLOSE IMMEDIATE'; EXECUTE IMMEDIATE 'ALTER PLUGGABLE DATABASE PSPDB_RO REFRESH'; EXECUTE IMMEDIATE 'ALTER PLUGGABLE DATABASE PSPDB_RO OPEN READ ONLY'; END; /

2- Create the refresh JOB

BEGIN
DBMS_SCHEDULER.CREATE_JOB (
job_name => 'PSPROD_REFRESH_JOB',
job_type => 'STORED_PROCEDURE',
job_action => 'sys.psprod_refresh',
repeat_interval => 'freq=daily;byday=mon,tue,wed,thu,fri;BYHOUR=4; BYMINUTE=1',
auto_drop => FALSE,
enabled => TRUE,
comments => 'Automatic refresh of the prod PDB clone');
END;
/

SQL>@check_job PSPROD_REFRESH_JOB
JOB_NAME     REPEAT_INTERVAL     
------------------ --------------------------------------------------------
PSPROD_REFRESH_JOB freq=daily;byday
=mon,tue,wed,thu,fri;BYHOUR=4; BYMINUTE


CREATE A CLONE FROM A REFRESHABLE PDB

You can see that File_name_convert works the same when creating a clone from a refreshable one

SQL> CREATE PLUGGABLE DATABASE PSDEV01 FROM PSPDB_RO
File_Name_convert=('K:\ORACLE\CDB\PSPDB_RO\DATA\','I:\ORACLE\CDB\PSDEV01\DATA\',
'K:\ORACLE\CDB\PSPDB_RO\TEMP\','I:\ORACLE\CDB\PSDEV01\TEMP\');


Conclusion

This was an example on how to automate the refresh of a PDB clone using a DBMS scheduler job that gives a better control on the frequency, instead of relying on the minutely refresh. Handy if you don’t like keeping an automatic refresh every X minutes and rather have it run once a day like a backup to avoid any unexpected maintenance. 

Note: If you have the ORA-65345 error, "cannot refresh pluggable database". That means remote archive logs have been wiped from the source server and refresh should be adjusted to match the source backup retention.

Thank you for reading

Friday, December 24, 2021

How to run Datapump from a PDB as SYS when ORACLE_PDB_SID can’t work

Intro

Wallet strangeness follow up

In Oracle multitenant architecture, default database container upon connection is CDB$ROOT. But as of 18c, a new environment variable appeared to ease the direct access to a specific PDB (given a defined ORACLE_SID). The variable in question is ORACLE_PDB_SID. 

As explained in Mike Dietrich’s Blog, this variable is checked by a small AFTER EVENT LOGON trigger called DBMS_SET_PDB and runs an alter session set container if ORACLE_PDB_SID is defined.

However, the variable only works in Linux/Unix environments. So if ORACLE_PDB_SID can’t be used in windows, what’s the alternative?  

How do I do it in Windows

DataPump on a PDB as sysdba

  • In my case the best alternative was creating a wallet store and put the PDB sys credentials in it

Secure External Password Store (Wallet)

  • Both mkstore and orapki tools can create wallets to store credentials & a same wallet can be opened by either one. But what’s the difference then?
  • mkstore is older and doesn’t achieves all PKI(Public Key Infrastructure) features required in Fusion middleware for example, that’s why okapi is recommended in middle-tier environments.
  • Now let’s create a wallet to store a 19c PDB sys password with mkstore

1- Create a (local) wallet using mkstore and a wallet password which will allow us to manage it later

C:\ORACLE_HOME\admin>mkstore -wrl . -create
Oracle Secret Store Tool Release 19.0.0.0.0 - Production
Version 19.4.0 Copyright(c)2004, 2019, Oracle and/or its affiliates.
All rights reserved.
Enter password:
Enter password again:

Syntax:
mkstore -wrl wallet_location -create

Default location is local directory

2- Create PDB sys Credentials, here MYPDB is a TNS alias and wallet location is set to local dir

C:\ORACLE_HOME\network\admin> mkstore -wrl . -createCredential MYPDB sys
Enter your secret/Password: === your sys password
Re-enter your secret/Password:
Enter wallet password: === Walletpass


Syntax:
mkstore -wrl <wallet_location> -createCredential <TNS_Alias> <username> <pass>

Default location is local directory

3- Check the files generated after this operation

C:\ORACLE_HOME\network\admin> dir
12/22/2021 06:38 PM 581 cwallet.sso
12/22/2020 06:37 PM 0 cwallet.sso.lck
12/22/2020 06:38 PM 536 ewallet.p12
12/22/2020 06:37 PM 0 ewallet.p12.lck

  • A configured Wallet consists of two files, cwallet.sso and ewallet.p12
  • sso refers to the autologin wallet that does not need a password => not really encrypted
  • p12 refers to the PKCS12 wallet (Certificate file)=> original encrypted wallet
  • lck files are there once the wallet is open

4- Check the credentials created for the PDB . If we had 3 credentails they will all be listed

C:\ORACLE_HOME\network\admin> mkstore -wrl . -listCredential

Enter wallet password:
List credential (index: connect_string username)

1: MYPDB sys

5- Add the Wallet location in SQLNET.ora

WALLET_LOCATION=
(SOURCE=(METHOD=file)
(METHOD_DATA=(DIRECTORY=C:\Oracle\product\19.0.0\db_home1\network\admin)))
SQLNET.WALLET_OVERRIDE=TRUE

5- Verify the connection

C:\Oracle\> sqlplus /@MYPDB as sysdba
sys@MYCDB.MYPDB> show con_name
CON_NAME
---------
MYPDB


Datapump Import Into the PDB

1- Prepare the impdb par file impdp_nonCDBToPDB.par. In my case I imported a 12c Database into a PDB 

USERID="/ as sysdba"
DUMPFILE=expdp.MyNonCDB12c.122021_%U.dmp
LOGFILE=expdp.MyNonCDB12c.122021.log
DIRECTORY=STAGING_DIR

2- Set the ORACLE_SID to the desired CDB  (MYCDB) and the import into the target PDB as sysdba

C:> set ORACLE_SID=MYCDB
C:> impdp parfile=impdp_nonCDBToPDB.par
Job "SYS"."SYS_IMPORT_FULL_01" completed with 3 error(s) at Fri Dec 24
02:19:14 2021 elapsed 0 12:27:18


Conclusion

This was an example on how to migrate a non CDB database into PDB using a wallet store and DataPump.
It’s the only way in Windows and if you plan on migrating small DBs to multiple PDBs of the same CDB it’s very useful. you can have as many credentials as you need for each PDB .

Thank you for reading

Thursday, December 23, 2021

Terraform for dummies part 5: Terraform deployment On-premises (KVM)

This image has an empty alt attribute; its file name is image.pngIntro

For a long time, Terraform was associated with deploying resources in the cloud. But what many people don’t know is that terraform already had private and community based providers that worked perfectly on non cloud environments. Today, we will discover how to deploy a compute vm in a KVM host. Not only that, but we will also do it on top of VirtualBox in a nested virtualization environment. As always, I will provide the vagrant build to allow you to launch the lab for a front-row experience. It is indeed the cheapest way to use terraform on-prem on your laptop.

Terraform on-prem


Libvirtd provider is a community based project built by Duncan Mac-Vicar. There is no difference between using terraform on cloud platforms and doing it with Libvirtd provider. In this lab I had to enable nested virtualization in my VBox to make it easier to run the demo.The resulting hypervision is qemu-kvm, a non bare-metal KVM environment also known as type 2 hypervisor (virtual hardware emulation).     


How to get started


No need to subscribe to a cloud Free-tier using credit cards to play with terraform. You can start this lab right now on your laptop with my vagrant build. The environment comes with all necessary modules & packages to deploy vms using terraform.

Lab Content:
- KVM
- KCLI (wrapper tool for managing vms)
- Terraform 1.0
- Libvirt terraform provider
- Terraform configuration samples to get started (ubuntu.tf , kvm-compute.tf)

GitHub repo
: https://github.com/brokedba/KVM-on-virtualbox 

  • Clone the repo
  • C:\Users\brokedba> git clone https://github.com/brokedba/KVM-on-virtualbox.git
    C:\Users\brokedba> cd KVM-on-virtualbox

  • Start the vm (make sure you have 2Cores and 4GB RAM to spare before the launch)
  • C:\Users\*\KVM-on-virtualbox> vagrant up
    C:\Users\*\KVM-on-virtualbox> vagrant ssh ---- access to KVM host

    Now you have a new virtual machine shipped with kvm and terraform which will help us complete the lab.
    Note: Terraform files will be located under   /root/projects/terraform/


What you should know 

  • Libvirt provider in Terraform registry 


    Up until terraform version 0.12, Hashicorp didn’t officially recognize this libvirt provider, you could still run config files if the plugin was in a local plugin folder (i.e. /root/.terraform.d/plugins/)
    But after version 0.13,  terraform enforced Explicit Provider Source Locations. As result, you’ll need few tweaks to make it run in terraform. Everything is documented in GitHub issue1 & 2 but I’ll summarize it below.   


    The steps to run libvirt provider in terraform v1.0 (Already done in my build)

    - Download the Binary (current vers: 0.6.12). For my part I used an older version for fedora (0.6.2)

    [root@localhost]# wget URL
    [root@localhost]# tar xvf terraform-provider-libvirt-**.tar.gz

    - Add the plugin in a local registry

    [root@localhost]# mkdir –p ~/.local/share/terraform/plugins/registry.terraform.io/dmacvicar/libvirt/0.6.2/linux_amd64
    [root@localhost]# mv terraform-provider-libvirt ~/.local/share/terraform/plugins/registry.terraform.io/dmacvicar/libvirt/0.6.2/linux_amd64

    - Add the below code block to the main.tf file to map libvirt references with the actual provider

    [root@localhost]# vi libvirt.tf
    ...
    terraform { required_version = ">= 0.13" required_providers { libvirt = { source = "dmacvicar/libvirt" version = "0.6.2" } } }
    ... REST of the Config

    - Initialize and validate by running terraform init which will detect and add libvirt plugin in the local registry  

    [root@localhost]# terraform init

     Initializing the backend...
     Initializing provider plugins...
    - Finding dmacvicar/libvirt versions matching "0.6.2"...
    - Installing dmacvicar/libvirt v0.6.2...
    - Installed dmacvicar/libvirt v0.6.2 (unauthenticated)


Terraform deployment  

  • Deploy basic ubuntu vm 


    Let’s first provision a simple ubuntu vm on our KVM environment . Again in a nested virtualization mode we are using hardware emulated hypervision “Qemu”, and this will require a small hack by setting a special variable. Will
    explain why further down.  Just bear with me for now.

[root@localhost]# export TERRAFORM_LIBVIRT_TEST_DOMAIN_TYPE="qemu"

  • Next  we need to find our configuration file, let’s check declared resource behind that  ubuntu.tf
  • [root@/*/ubuntu/]# ls /root/projects/terraform/ubuntu/
    .. ubuntu.tf --- you can click to download or read content

    [root@/*/ubuntu/]# vi ubuntu.tf

    provider "libvirt" {
    uri = "qemu:///system"}
    terraform {
      required_providers {
        libvirt = {
          source  = "dmacvicar/libvirt"
          version = "0.6.2"
        }
      }
    } ## 1. --------> Section that declares the provider in Terraform registry

    # 2. ----> We fetch the smallest ubuntu image from the cloud image repo
    resource "libvirt_volume" "ubuntu-disk" {
    name   = "ubuntu-qcow2"
    pool   = "default" ## ---> This should be same as your disk pool name
    source = https://cloud-images.ubuntu.com/releases/xenial/release/ubuntu-16.04-server-cloudimg-amd64-disk1.img
    format = "qcow2"
    }

    # 3. -----> Create the compute vm
    resource "libvirt_domain" "ubuntu-vm" {
    name   = "ubuntu-vm"
    memory = "512"
    vcpu   = 1

    network_interface {
       network_name = "
    default" ## ---> This should be the same as your network name
      }

    console { # ----> define a console for the domain.
       type        = "pty"
       target_port = "0"
       target_type = "serial" }

    disk {   volume_id = libvirt_volume.ubuntu-disk.id } # ----> map/attach the disk
    graphics { ## ---> graphics settings
       type        = "spice"
       listen_type = "address"
       autoport    = "true"}
    }


  • Run terraform init to initialize the setup and fetch the called providers in the tf file, like we did earlier.
  • [root@localhost]# terraform init

  • Run terraform plan
  • [root@localhost]# terraform plan
    Terraform will perform the following actions:

      # libvirt_domain.ubuntu-vm will be created
      + resource "libvirt_domain" "ubuntu-vm" {
          + arch        = (known after apply)
          + disk        = [
              + {
                  + block_device = null
                  + file         = null
                  + scsi         = null
                  + url          = null
                  + volume_id    = (known after apply)
                  + wwn          = null
                },
            ]
          + emulator    = (known after apply)
          + fw_cfg_name = "opt/com.coreos/config"
          + id          = (known after apply)
          + machine     = (known after apply)
          + memory      = 512
          + name        = "ubuntu-vm"
          + qemu_agent  = false
          + running     = true
          + vcpu        = 1

          + console {
              + source_host    = "127.0.0.1"
              + source_service = "0"
              + target_port    = "0"
              + target_type    = "serial"
              + type           = "pty"
            }

          + graphics {
              + autoport       = true
              + listen_address = "127.0.0.1"
              + listen_type    = "address"
              + type           = "spice"
            }

          + network_interface {
              + addresses    = (known after apply)
              + hostname     = (known after apply)
              + mac          = (known after apply)
              + network_id   = (known after apply)
              + network_name = "default"
            }
        }

      # libvirt_volume.ubuntu-disk will be created
      + resource "libvirt_volume" "ubuntu-disk" {
          + format = "qcow2"
          + id     = (known after apply)
          + name   = "ubuntu-qcow2"
          + pool   = "default"
          + size   = (known after apply)

          + source = https://cloud-images.ubuntu.com/releases/xenial/release/ubuntu-16.04-server-cloudimg-amd64-disk1.img
        }

    Plan: 2 to add, 0 to change, 0 to destroy.

  • Run terraform apply to deploy the vm which was declared in the plan command output 
  • [root@localhost]# terraform apply -auto-approve
    Plan: 2 to add, 0 to change, 0 to destroy.
    libvirt_volume.ubuntu-disk: Creating...
    libvirt_volume.ubuntu-disk: Creation complete after 17s [id=/u01/guest_images/ubuntu-qcow2]
    libvirt_domain.ubuntu-vm: Creating...
    libvirt_domain.ubuntu-vm: Creation complete after 0s [id=29735a37-ef91-4c26-b194-05887b1fb264]

    Apply complete! Resources: 2 added, 0 changed, 0 destroyed.

  • Wait a little a bit and run kcli command or virsh list
  • [root@localhost ubuntu]# kcli list vm
    +-----------+--------+----------------+--------+------+---------+
    |    Name   | Status |      Ips       | Source | Plan | Profile |
    +-----------+--------+----------------+--------+------+---------+
    | ubuntu-vm |   up   | 192.168.122.74 |        |      |         |
    +-----------+--------+----------------+--------+------+---------+

  • Cool, we have a vm with an IP address but you still need to login to it. Cloud images just don’t come with root passwords so let’s destroy it now and jump into our second example.
  • [root@localhost]# terraform destroy -auto-approve
    Destroy complete! Resources: 2 destroyed.


  • Deploy a vm with CloudInit 

Same way as with Cloud vms we can also call startup scripts to do anything we want during the bootstrap.
I chose Centos in this example where CloudInit bootstrap actions were:

- Set a new password to root user

- Add an SSH key to root user

- Change the hostname 

  • Create a CloudInit config file: please careful with the indentation. It can also be downloaded here cloud_init.cfg.

# cd ~/projects/terraform
[root@~/projects/terraform]# cat cloud_init.cfg
#cloud-config
disable_root: 0
users:
  - name: root
    ssh-authorized-keys: ### –> add a public SSH key
      - ${file("~/.ssh/id_rsa.pub")}
ssh_pwauth: True
chpasswd: ### –> change the password
  list: |
     root:unix1234
  expire: False

runcmd:
  - hostnamectl set-hostname terracentos

  • I will only display the part where CloudInit is involved but you can read the full content here kvm-compute.tf

# cd ~/projects/terraform
[root@~/projects/terraform]# cat kvm_compute.tf
provider "libvirt" {

resource "libvirt_volume" "centos7-qcow2" {


## 1. ----> Instantiate cloudinit as a media drive to add our startup tasks
resource "libvirt_cloudinit_disk" "commoninit" {
name           = "commoninit.iso"
pool           = "default" ## ---> This should be same as your disk pool name
user_data      = data.template_file.user_data.rendered
}
## 2. ----> Data source converting the cloudinit file into a userdata format
data "template_file" "user_data" { template = file("${path.module}/cloud_init.cfg")}


resource "libvirt_domain" "centovm" {

  name   = "centovm"
  memory = "1024"
  vcpu   = 1

cloudinit = libvirt_cloudinit_disk.commoninit.id ## 3. ----> map CloudInit

...---> Rest of the usual domain declaration

  • We can now run a terraform INIT then PLAN (don’t forget to set TERRAFORM_LIBVIRT_TEST_DOMAIN_TYPE variable)

    [root@~/projects/terraform]# terraform init

    [root@~/projects/terraform]# terraform plan
    ... Other resources declaration
    # libvirt_cloudinit_disk.commoninit will be created
    + resource "libvirt_cloudinit_disk" "commoninit" {
      
    + id        = (known after apply)
        + name      = "commoninit.iso"
        + pool      = "default"
        + user_data = <<-EOT
              #cloud-config
              disable_root: 0
              users:
                - name: root
                  ssh-authorized-keys:
                    - ssh-rsa AAAAB3NzaC1yc2EAAAADAQABAAABAQ** root@localhost.localdomain

              ssh_pwauth: True
              chpasswd:
                list: |
                   root:unix1234
                expire: False

              runcmd:
                - hostnamectl set-hostname terracentos
          EOT

      }
    ... Remaining declaration

  • Run the Apply

    [root@~/projects/terraform]# terraform apply -auto-approve
    Plan: 3 to add, 0 to change, 0 to destroy.
    libvirt_cloudinit_disk.commoninit: Creation complete after 1m22s [id=/u01/guest_images/commoninit.iso;61c50cfc-**]
    ...

    Apply complete! Resources: 3 added, 0 changed, 0 destroyed.

  • Wait a little a bit after completion and run kcli command to confirm an IP is allocated.

    [root@~/projects/terraform]# kcli list vm
    +-----------+--------+----------------+--------+------+---------+
    |    Name   | Status |      Ips       | Source | Plan | Profile |
    +-----------+--------+----------------+--------+------+---------+
    | centovm |   up   | 192.168.122.68 |        |      |         |
    +-----------+--------+----------------+--------+------+---------+

  • Login into the vm using ssh and password authentication

    -- 1. SSH
    [root@~/projects/terraform]#
    ssh -i ~/.ssh/id_rsa root@192.168.122.68

    Warning: Permanently added '192.168.122.68' (RSA) to the list of known hosts.

    [root@terracentos ~]# cat /etc/centos-release
    CentOS Linux release 7.8.2003 (Core)

    -- 2. Password

    [root@~/projects/terraform]# virsh console centovm
    Connected to domain centovm Escape character is ^]
    CentOS Linux 7 (Core)
    Kernel 3.10.0-1127.el7.x86_64 on an x86_64

    terracentos login: root
    Password:
    [root@terracentos ~]#

And here you go, your local terraform vm was changed during startup using a simple config file just like the ones on AWS ;) .

Undocumented QEMU tip on Terraform

    • I can now explain why we needed to set the environment variable to “qemu” in order to have your deployment working. In fact, the vm will never start-up without this trick. Let’s find why

      • Nested virtualization doesn't seem to support kvm domain type.
      • This issue is similar to what openstak and miniduke encounter when they use kvm within vbox "could not find capabilities for domaintype=kvm"
      • I needed to make libvirt provider chose qemu instead of kvm during the provisioning
      • With the help of @titogarrido we found out that the logic inside its code “domain_def.go
        implied kvm was the only supported virtualization but checked a mysterious variable first
      • Finally found the workaround by setting the variable to qemu which is an old hack from days when authors were testing travis 
    I asked them to replace that variable by an attribute inside terraform code but the bug is still there, see more in my issue

    --- Workaround for non BareMetal hosts (nested)
    export TERRAFORM_LIBVIRT_TEST_DOMAIN_TYPE="qemu"

    --- Below Go check happens where qemu is selected (domain_def.go)

    if v := os.Getenv("TERRAFORM_LIBVIRT_TEST_DOMAIN_TYPE"); v != "" {
    		domainDef.Type = v
    	} else {domainDef.Type = "kvm"}
     

Conclusion

  • We have seen in this lab just how easy it was to deploy resources using terraform on-promises
         (no more credit card needed :) 
  • I am very happy to make this little contribution via my vagrant build shipped with KVM on VirtualBox
  • I hope you’ll give this lab a try as it’s super easy and fun !! :)
  • I would like to thank @titogarrido, who has accepted to dig deeper with me so we can find the bug and
  • I love pair programming tools like tmate that allowed us to live collaborate while he was in Brazil and me in Canada.  
  • If you want to know about my vagrant build check my previous blog post 
  • Learn more about libvirt provider usage in the official terraform registry for libvirt provider dmacvicar/libvirt
  • Thank you for reading !