Monday, August 30, 2021

GCP Short lab: launch an instance, Startup script & test logging via CloudShell

                                         This image has an empty alt attribute; its file name is BlogHeader_Set2_D.png
Intro

GCP Cloud Shell not only allows to execute and automate tasks around your Cloud resources, but It can help you understand what happens behind the scene when a vm is provisioned for example. That’s also a good way to prepare for the GCP Cloud engineer certification. Although it normally takes a subscription to ACloudGuru to follow the course behind this quick lab, they still made the startup script available for free in their GitHub. That’s all we need to demonstrate how to complete the task using google GCloud commands which was not covered in the original course.

Here’s a direct link to the shell script in their GitHub repo: gcp-cloud-engineer/compute-labs/worker-startup-script.sh

I. Lab purpose

In this exercise, we want to learn what a compute engine requires in order to run a script at launch that will install a logging agent, do a stress test, and write all the syslog events into a Google logging and output feedback into a bucket. You’ll realize that there are underlying service accounts and permission scopes that allow a machine to interact with other cloud services and APIs to get the job done. To sum it up :  

  • We want a new project,
  • Launch a new GCE instance that runs a specific script
  • System logs shipped to Stackdriver (Cloud logging) logs.
  • We want to have a new GCS bucket for resulting log file.
  • We want the log file (status feedback) to appear in that new bucket after the instance finishes starting up.
  • All this with No SSH access to the instance itself. Vm should handle everything on its own.

Google CLI setup

I used Cloud Shell to complete this lab. However, you can also run GCloud commands from your workstation via Google SDK.

Main steps

  • Retrieve the Startup script
  • Create a new project
  • Create logs destination bucket
  • Enable GCE API
  • Create new GCE instance
    • Enable Scope to write to GCS
    • Set startup script
    • Set metadata to point to logs destination bucket
  • Monitoring Progress
    • Check stack driver logs
    • Check CPU graph
    • Check logs bucket


1. Create a New Project


  • From your Cloud Shell terminal.
    $ gcloud projects create gcs-gce-project-lab --name="GCS & GCE LAB" --labels=type=lab
    $ cloud config set project gcs-gce-project-lab
    Link the new project with a billing account
  • There are 2 ways to link a project to a billing account. One through alpha and another through beta gcloud command
  • $ gcloud beta billing accounts list

    ACCOUNT_ID NAME OPEN MASTER_ACCOUNT_ID
    -------------------- ---------------------------- ------ ------------------
    0X0X0X-0X0X0X-0X0X0X Brokedba Billing account True ** link the project to a billing account **

    $ gcloud alpha billing accounts projects link gcs-gce-project-lab \
    --billing-account=
    0X0X0X-0X0X0X-0X0X0X

    ** OR **
    $ gcloud beta billing projects link gcs-gce-project-lab --billing-account=0X0X0X-0X0X0X-0X0X0X


2. Enable GCE API

  • By default, Most of the APIs are disabled in a project upon creation unlike other Cloud platforms.
  • In our case we need to enable the GCE APIs in order to create and launch vms.
  • GCE APIs

    $ gcloud services enable compute.googleapis.com
    $ gcloud services enable computescanning.googleapis.com


3. Set default region/zone

  • This can be done within the current GCloud configuration level or at project level
  • Active Config in Cloud Shell

    $ gcloud config set compute/region us-east1
    $ gcloud config set compute/zone us-east1-b

    Project level

    $ gcloud compute project-info add-metadata --metadata google-compute-default-region=us-east1,google-compute-default-zone=us-east1-b --project gcs-gce-project-lab


4. Service account

  • In GCP, a default service account is attached to projects upon creation that all future vms can use to interact with the rest of the platform through IAM permissions and scopes. We’ll use it and add more privileges for our vm.  
  • The FORMAT is: PROJECT_NUMBER-compute@developer.gserviceaccount.com
  • We just run the below commands to retrieve the Service account name:
  • PROJECT number

    $ gcloud projects describe gcs-gce-project-lab | grep projectNumber

    projectNumber: '521829558627'

    Derived Service Account name

    => 221829558627-compute@developer.gserviceaccount.com


5. Download the Startup script from github 

  • This script is responsible for updating Linux packages, install a logging agent, do a stress test, and write all the syslog events into a GCS bucket. `lab-logs-bucket` is the metadata name matching the bucket we’ll be creating.

    This image has an empty alt attribute; its file name is image-21.png
  • But first, we need to download it locally so we can edit it and call it when creating the compute instance later on.
  • PROJECT number

    $ wget https://raw.githubusercontent.com/ACloudGuru/gcp-cloud-engineer/master/compute-labs/worker-startup-script.sh

    VM metadata

    Every compute instance stores its metadata on a metadata server. Your VM automatically has access to the metadata server API without any additional authorization. Metadata is stored as key:value pairs and there are two types; default and custom. In our example the bucket name `gs://gcs-gce-bucket` is stored in the instance metadata name `lab-logs-bucket` that our script will query during the startup. 


6. Create the GCS bucket

  •   The bucket name must match the log_bucket_metadata_name called in our worker-startup-script. Choose a unique one
  • logs bucket

    $ gsutil mb -l us-east1 -p gcs-gce-project-lab gs://gcs-gce-bucket


7. Create GCE instance and run Startup script

  • We are finally ready to give this test a go and monitor the progress of each task including metadata and startup script.
  •  You should run the command in one line as my display is truncated for better readability 
  • Instance creation

    $ gcloud compute instances create gcs-gce-vm --metadata lab-logs-bucket=gs://gcs-gce-bucket --metadata-from-file startup-script=./worker-startup-script.sh --machine-type=f1-micro --image-family debian-10 --image-project debian-cloud --service-account 521829558627-compute@developer.gserviceaccount.com --scopes storage-rw,logging-write,monitoring-write,logging-write,pubsub,service-management,service-control,trace

    NAME          ZONE      MACHINE_TYPE  INTERNAL_IP  EXTERNAL_IP    STATUS
    ---------------------- ------------- ------------- -------------- ---------
    gcs-gce-vm us-east1-b f1-micro 10.100.0.1 34.72.95.120 RUNNING
     Notice the write privilege into GCS (storage-rw)  that will allow our vm to write the logs into the logs bucket.

Final results

  • System logs available in Stackdriver Logs

  • GCS bucket created  and log File appears in bucket after instance finishes starting up

  • No SSH access needed to the instance


This image has an empty alt attribute; its file name is image-25.pngThis image has an empty alt attribute; its file name is image-26.pngThis image has an empty alt attribute; its file name is image-27.png 


CONCLUSION 

    • We learned that we can automate startup and shutdown scripts without ever needing to ssh to the instance   
    • We learned more about the scopes needed from a vm to interact with google storage through its service account
    • Using default or custom service accounts can efficiently streamline the tasks done by vms or services without human intervention
    • Feel free to try the lab yourself and remember to change the name of the bucket since they are globally unique      

Thanks for reading!

Monday, August 23, 2021

GCP Associate Cloud engineer certification takeaways


Intro

I have been asked lately to share some prep tips after I passed the GCP Associate Cloud Engineer Certification. 

Although there are tons of articles online describing the exam content and many resource materials to help prepare for the exam, I decided to share my thoughts around the preparation journey along with my feedback on the courses I followed. It’s worth noting that I was initially looking for an entry level exam like those I’ve taken for other Cloud platforms (AWS CCP, Azure fundamentals, OCI foundations) but at that time it didn’t exist yet. Luckily, Google finally made Cloud Digital Leader exam available (May 2021) for those who seek a foundational / lighter version.
 

The exam summary 

All you need to know about the exam layout can be found in the official Page, Including the exam guide. The important points to remember however are the below:

Length: 2 hours.
Questions:  50
Exam format: Multiple choice and multiple select
Recommended experience: Officially, 6 months+ hands-on experience, but this can be offset by the labs you’re willing to do.
Pass/actual Score: Never disclosed, which is crazy, but it’s fair to assume it’s around 80%.
Score per topic: Not available.
Exam center:  Kryterion Webassesor
Retake Policy: 14 days after the 1st fail, 60 days after the 2nd, and finally 1 year after the 3rd failure (but don’t worry :)).
Pass confirmation: It took 10 days for me to get it. 
Preparation time:
Some say 1-2 month, I had only used my weekends, so it  took me around 50 days + labs spread across 6 months.

Impressions 

I can say now that I had no idea what I was embarking on back in January. What was supposed to be a mere fling became an everlasting learning journey. By the way, If you’re too broke for ACloudGuru, jump right to the 100% FREE section 

Depth & breadth of GCP services

This is exactly what made the preparation tedious for me as you not only have to know the specific details about one product  in particular but you also have to cover all the breadth of Google platform services which fed me up at some point, as there is no way to keep all that two-dimensional knowledge across GCP in your head on exam day. I say this because even if there are myriads of online trainings, no course can fully prepare you to the exam. However, there is at least a strategy that students can follow in order to ace this exam. Keep in mind that GCP is a developer focused cloud so it’s more code oriented platform than typical IT ops one like AWS.   

Exam guide 

Again the content is available in the official Google certification page and you will see a lot of versions online     

  • 1. Setting up a cloud solution environment
    • Setting up cloud projects and accounts
    • Managing billing configuration.
    • Installing and configuring the CLI (Cloud SDK)
  • 2. Planning and configuring a cloud solution
    • Planning / estimating GCP product use using the Pricing Calculator
    • Planning / configuring compute resources
    • Planning / configuring data storage options
    • Planning / configuring network resources
  • 3. Deploying and implementing a cloud solution
    • Deploying / implementing Compute Engine resources
    • Deploying / implementing Google Kubernetes Engine resources
    • Deploying / implementing App Engine, Cloud Run, and Cloud Functions resources.
    • Deploying / implementing data solutions.
    • Deploying / implementing networking resources
    • Deploying a solution using Cloud Marketplace
    • Deploying application infrastructure using Cloud Deployment Manager
  • 4. Ensuring successful operation of a cloud solution
    • Managing Compute Engine resources
    • Managing Google Kubernetes Engine resources
    • Managing App Engine and Cloud Run resources
    • Managing storage and database solutions
    • Managing networking resources
    • Monitoring and logging.
  • 5. Configuring access and security
    • Managing identity and access management (IAM)
    • Managing service accounts.
    • Viewing audit logs for project and managed services

I know these titles aren’t helpful at first sight, but the key words are:

Setup your account–> Plan –> Deploy –> Monitor –> Organize and secure  on all the below resources

  • Cloud Billing (Billing API)
  • Cloud SDK & Cloud shell (gcloud , gsutil)
  • Network Services(VPC, subnets, firewalls, Load Balancers,Cloud DNS, Cloud Router, Private Google access,VPN)
  • Compute Services (GKE/ Kubernetes, GCE; AppEngine, Cloud functions, Cloud run)
  • Storage services (local SSDs, Persistent disks, Cloud filestore, Cold Storage> nearline/coldline etc..)
  • Databases (Cloud SQL, Cloud Spanner, BigQuery, Cloud BigTable,Cloud DataStore, Firebase, MemoryStore)  
  • Data transfer (Storage Cloud Transfer service ,Cloud Transfer  Appliance)
  • Big data & ETLs (Cloud Pub/Sub, Dataprep, Dataproc, DataFlow, Composer, Fusion, DataLab, DataStudio)
  • IAM(Policies,members,bindings, primitive/predefined roles, Service accounts,Resource management,Cloud Identity)
  • Security management  (Security scanner, Cloud DLP API, Event Thread Detection or ETD)
  • Operations & management (Deployment Manager, Cloud monitoring/ Logging/ Error reporting/ Trace/ Debugger)

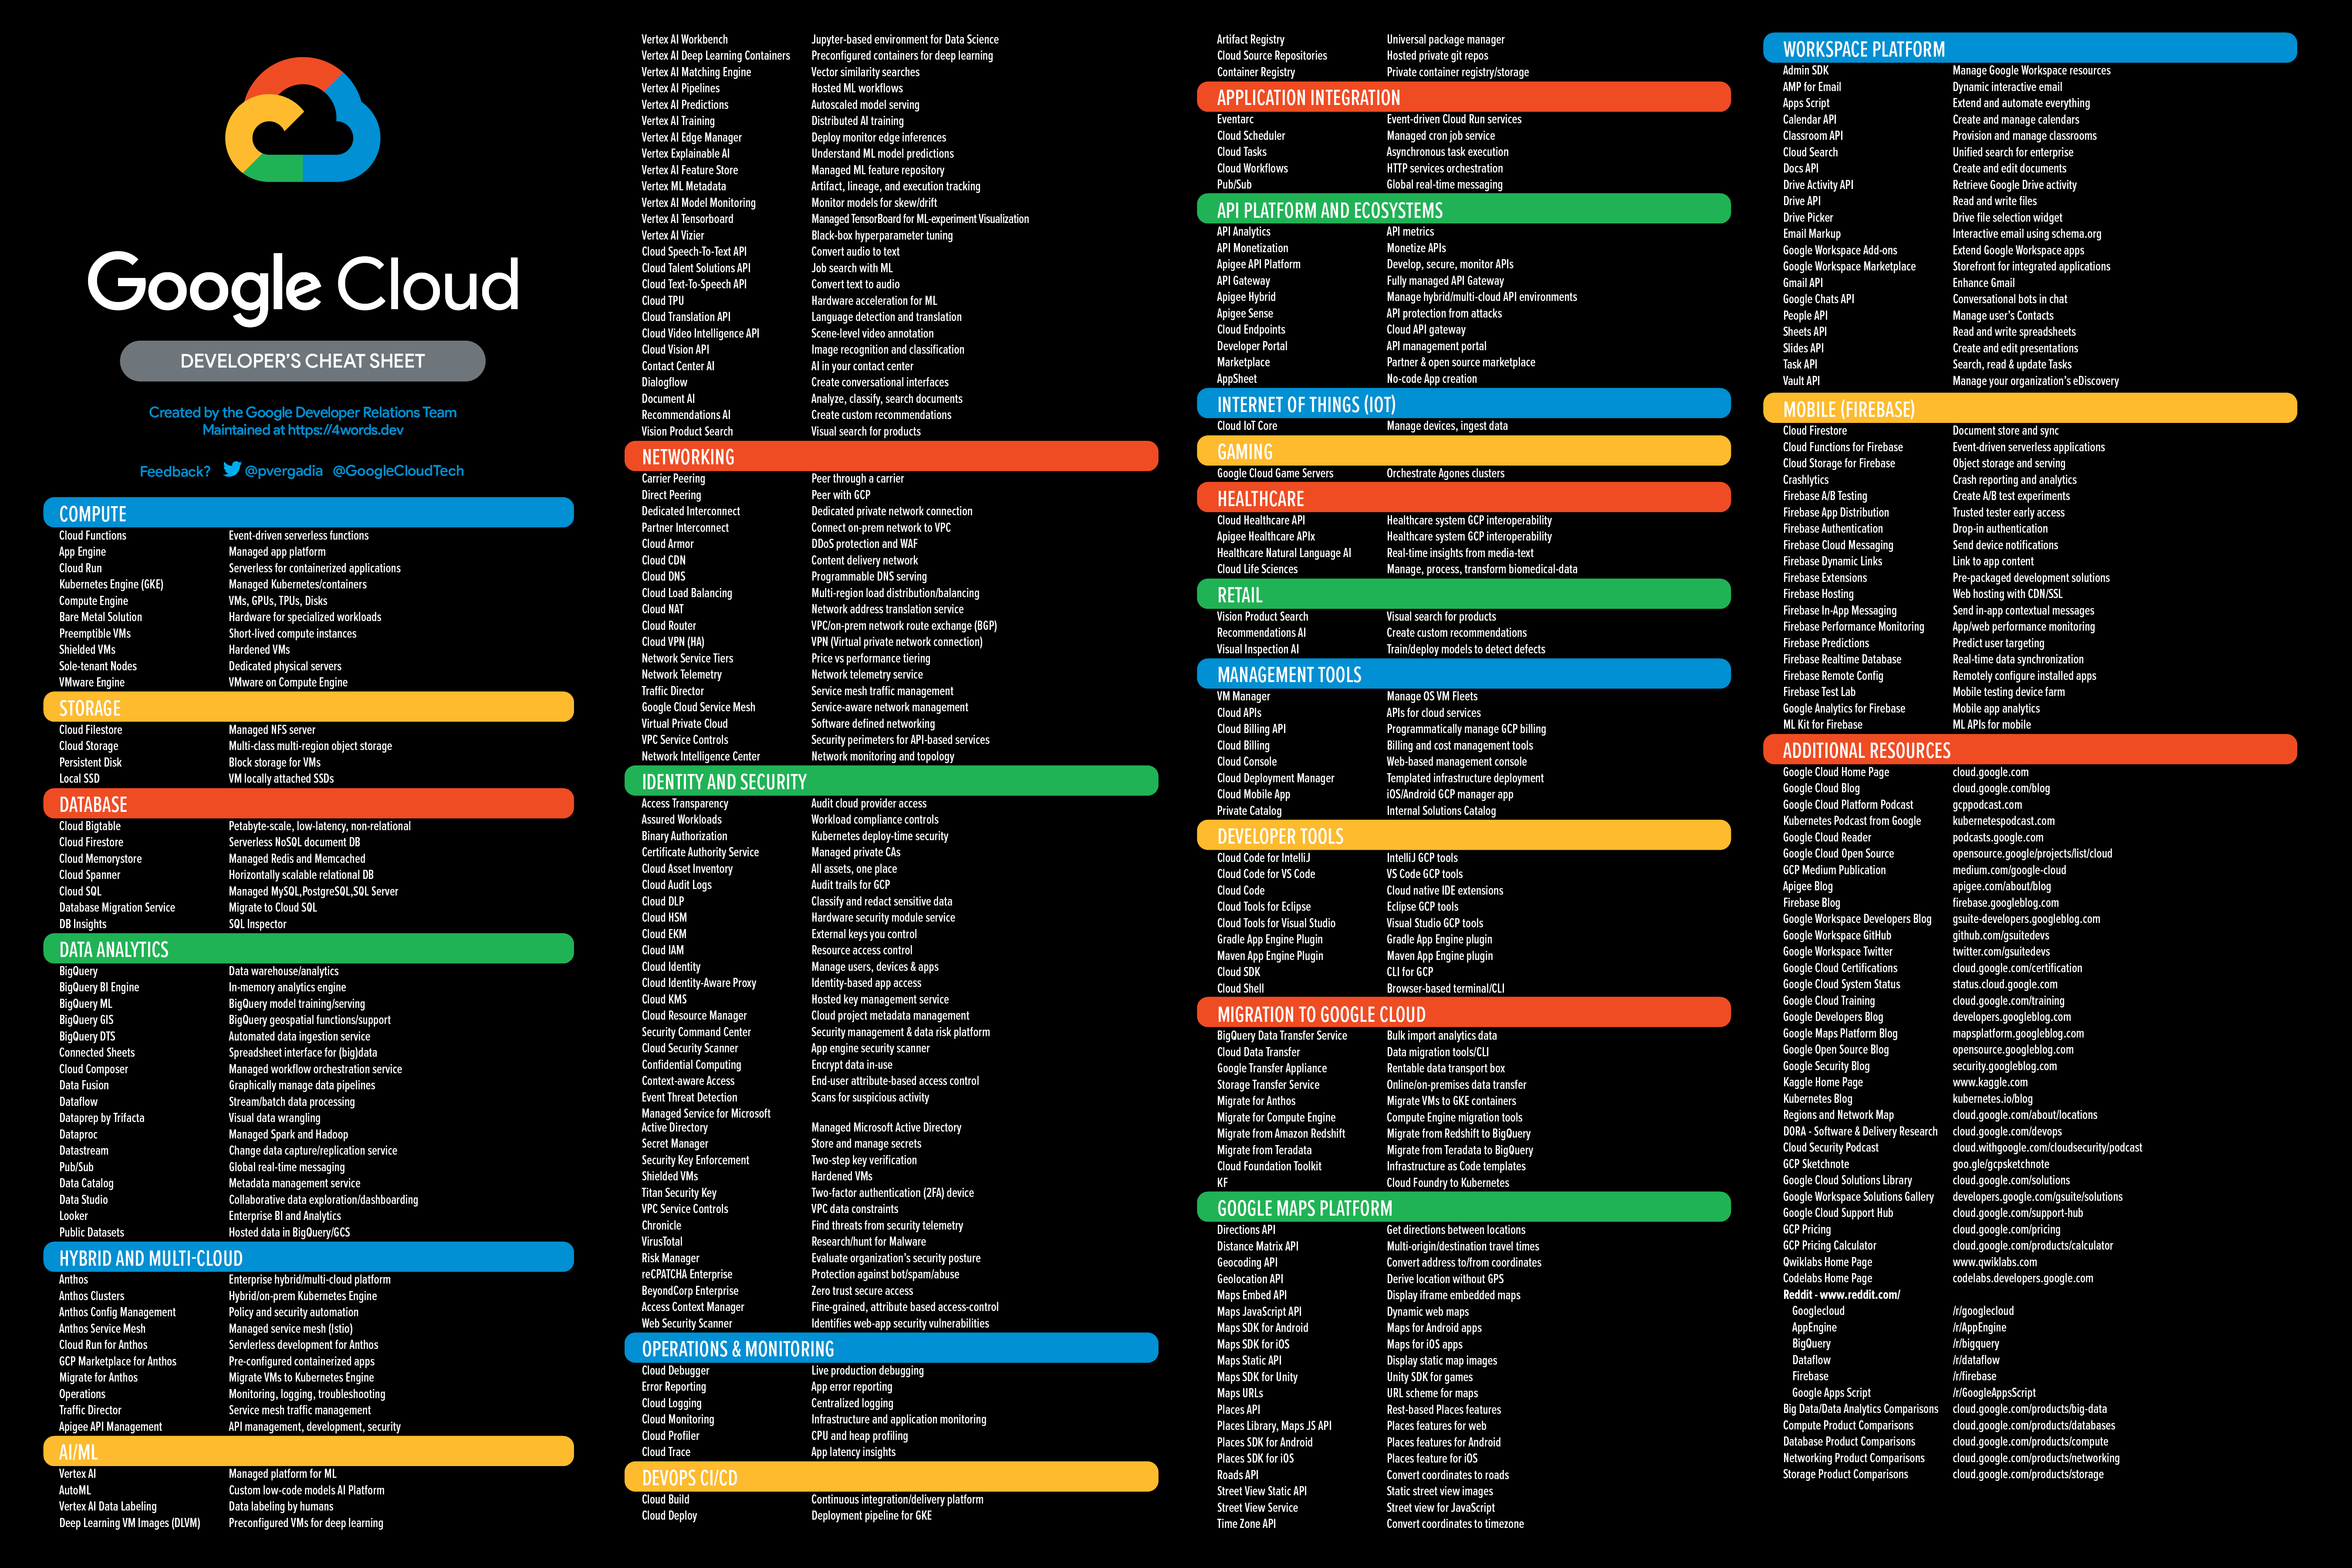
GCP product cheat-sheet: Can also help you quickly describe GCP services grouped by domain.

DarkPoster-medres.png

  • Another Google resource is a YouTube playlist called Cloud Bytes, where products are described in less than 2min
  • GoogleTech team also shared a series of simple Sketchnotes that depicts GCP services including videos. I found the below example very useful when preparing for the exam.     

Where should I run my stuff on Google Cloud


Courses I followed

As many test-takers, first thing I did was to shop online for the best training material and possibly free. But unlike AWS and Azure, there was no decent (comprehensive) free course for the exam so I decided to enroll in the below two courses

I. A Cloud Guru:
Google Certified Associate Cloud Engineer 2020

This required paying a yearly subscription for which I thank my company for sponsoring this learning path.

This image has an empty alt attribute; its file name is image-19.png

  • Pros
    • This is by far the best learning platform I ever tried, not just for preparing certs but also to follow tailored paths where you can learn by practicing through 100s of labs available
    • You can even play in their multi-cloud (AZ, AWS, GCP)  sandboxes for up to 4hrs each time
    • The labs in this course can even allow you to skip the theory sometimes (i.e VPC/firewall lab)
  • Cons
    • Mattias’ voice ( no I’m kidding :p )
    • 19 hrs, is a lot of time especially for me as I like to take notes of everything to reuse them after my exam
    • Oh and they also forgot to tell about the hidden 8hrs Kubernetes course in Chapter 12 ( 19+8= 27Hrs)
    • The pace is super slow in the beginning with redundant videos (VPCs) where it should have been rather later in the course (.i.e security and services breadth)
    • He had tendency to rely too much on the student’s initiative,when he’s basically payed to teach you stuff  
    • The theory behind Cloud run and filestore wasn’t well covered which I found in Alan Sullivan's course
  • Pro Tip don’t waste your time trying to figure out the firewall challenge, just skip to the final lab and do the job     


I was totally ignorant to Kubernetes before this course, which was a redirection from the main course, but I have to say this was the most refreshing part of all the GCP engineer course. Nigel (@nigelpoulton) did a great job in demystifying the architecture and sharing simple use cases. He based all his labs on yaml config files, but you’ll still need to know the kubctl commands to scale up (as via GCloud container clusters) and other tasks by the way.    

II.  Dan Sullivan Class and exam practice on Udemy:

This is provided by the author of the Official Google Cloud Professional Cloud engineer/Data Engineer Study Guide. This image has an empty alt attribute; its file name is image-20.png
I really enjoyed rediscovering the architecture behind some services that I couldn’t grasp in the ACG course like; Cloud run; Cloud Pub/sub or stackdriver. He really pin pointed the theoretical concepts that brought the pieces together in my head.  


My notes

It’s more a messy than fancy documentation, but it’s still a nice mix of all the above and more. Chapters contains deeper descriptions to each product’s feature, and I still use it today to refresh my memory on what I learned across my GCP journey. 

  Link: http://bit.ly/3BBe368
Another way to learn about GCP networking service and what makes it special is to read my last blog post.

Last tip (Practice Practice Practice!)

Anyone who tells you that he passed the exam without taking any exam practice is either a genius or a liar.
The online courses won’t help you get the real vibe of the exam questions, so you better train as much as possible.
Here are some links I used but you’ll probably need to look for other sources.

100% Free resources  


Conclusion

In retrospect, I can say that I am glad I held on for months until I was ready to take and pass the exam, but I am a bit disappointed of the associate/architect learning path that cloud providers are publishing so far, because at the end of the day, it’s 40% of the track that you won’t use and only promotes services the Cloud shops want to grow.  This isn’t necessarily use cases that your current customers will get to benefit from. Hence, I would suggest learning something you like in the cloud ecosystem and get better at it through labs and blogs, don’t focus exclusively on which certification you should take. As a friend once said, even Cloud provider’s employees might not be able list 10 of their own Cloud services :).


Monday, August 16, 2021

What makes GCP networking service different from other Cloud providers


Intro

During my preparation for the GCP Associate Cloud Engineer exam, I first got myself a free tier account which usually lasts 3 months. This allowed me to play with the Cloud Console as it’s the fastest way to get to know a cloud provider’s  services & offering. Being already familiar with AWS, Azure, and Oracle Cloud, I didn’t expect to see much difference on the core infrastructure services. That’s where I was actually wrong, because I found something very peculiar that didn’t take long to notice. The service in question was GCP networking, the VPC to be precise. Today, we will see what makes this network resource so special when coming from another Cloud provider along with some features that are specific to Google's VPC.     
 

GCP VPC contains no CIDR block

Unlike any other Cloud platform, there is no VPC level CIDR block range in GCP.The only level where the CIDR block range is defined is in a subnet. If, like me, you come from AWS or Azure, this will first confuse you and it will take you a moment to process this curiosity :). Here’s why!

First GCP Networking takeaways

  • VPCs are global resources; routing traffic between regions is automatic(no manual peering needed between regions)
  • Subnets are regional resources (not within availability zones); traffic transparently moves across zones
  • Routes are associated with the VPC. They can be restricted to instances via instance tags or service accounts
  • VPC Can enable private (internal IP) access to some GCP services (eg BQ, GCS)
  • GCP assigns regional internal IP addresses for VM instances, LBs, GKE pods/nodes, and services

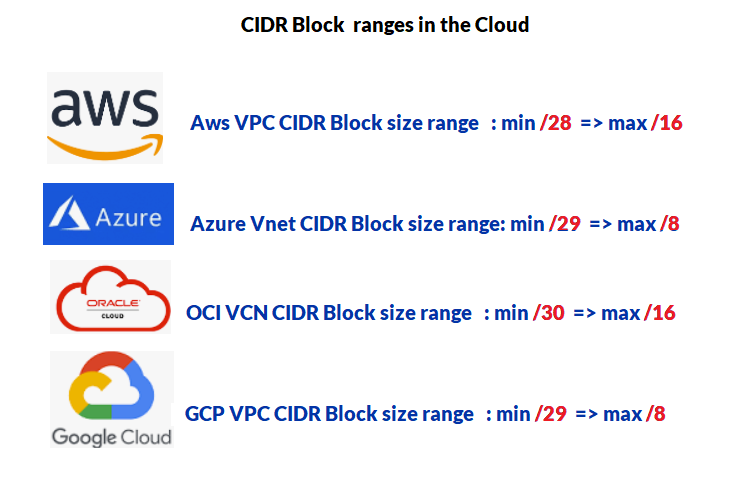
The below table can help visualize at which level the networking resources are defined for each Cloud platform.       

This image has an empty alt attribute; its file name is image-2.png

  • CIDR block size: The range is similar to Azure’s Vnet  (min /29,  max /8)

CIDR Block size difference between Cloud providers

Subnets

In GCP the subnet is the only resource where a CIDR block range is defined. Each subnet is dedicated to a region and can contain different IP ranges as long as they don't overlap. Global by nature, a VPC can even have multiple subnets within different regions with the same CIDR block range which makes it unique in the cloud networking space.

  • Let’s rather see how it works in practice by jumping right into the console and navigating to the VPC network section.

This image has an empty alt attribute; its file name is image-5.png

Each new project starts with a default network including 28 subnets in 28 regions worldwide and 4 default firewall rules.
My first reaction was obviously why?”, but the short answer is because of the benefits of having multiregional subnets seamlessly routed with each other allowing their resources to communicate across regions.    

Subnet creation mode: There are two 

  • Automatic mode *
    With Auto mode, one subnet from each region is automatically created within it. These subnets (28) use a set of predefined IP ranges that fit inside 10.128.0.0/9 CIDR block. New subnets are automatically added for new regions to auto mode VPCs (inside same CIDR block)

  • Custom mode   
    This mode allows you to create custom subnets in specific regions with multiple CIDR block ranges 

   * No VPC peering is allowed between auto mode VPCs due to their IP range overlap

Example  

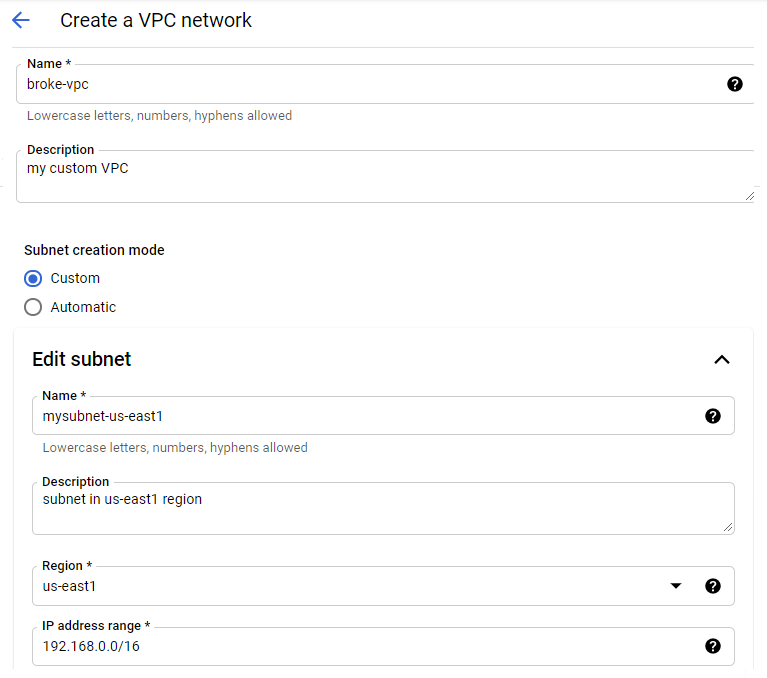
  • Let’s create a custom mode VPC and explore the flexibility of its options (aka how far can we go).  

    This image has an empty alt attribute; its file name is image-12.png 
  • Starting simple, I created a subnet with a /16 range in us-east1 region. I also added another subnet with the same IP range on a different region (us-west1).

    This image has an empty alt attribute; its file name is image-8.png
  • Now If I enter another subnet in us-east1 that overlaps with the first subnet, the Console will never warn me about it until I click create. In other cloud platforms, checks are done before creation hence are more intuitive. 
    This image has an empty alt attribute; its file name is image-9.png 

 Secondary IP Range

     A subnet may have a secondary CIDR range, from which a secondary IP range of a VM may be allocated(alias IP).

This image has an empty alt attribute; its file name is image-10.png

The range must not overlap with any already defined subnet primary/secondary range in the region, or else you get an error.This image has an empty alt attribute; its file name is image-11.png


Expendable IP range

You can always expand the IP range of an instance’s subnet even after creation. This will allow you to avoid headaches when all your IPs run out and you have new instances to provision in the same subnet. See CLI command below

expand-ip-range command

$  gcloud compute networks subnets expand-ip-range MYSUBNET --region=us-central1  --prefix-length=16
  • Here we reduced the prefix length from /17 to /16 which will make more addresses available for devices within this subnet.
  • You can edit a subnet CIDR range as long as the new range can contain the old subnet's CIDR range. A broader prefix will create conflict and trigger an error. 


GCP Firewall

Firewall rules are global resources akin to security groups that filter instance based data flow and can be applied via Instances/ network tags, service accounts, and Instance Groups.

FIREWALL RULES

  • Firewall rules are stateful and can have both allow and deny rules but is not sharable between VPC networks
  • Firewall rules can be automatically applied to all instances. Default rules allow all egress traffic to all destinations while denying all ingress traffic from all sources
  • Priority can be 0 – 65535, the default being 1000

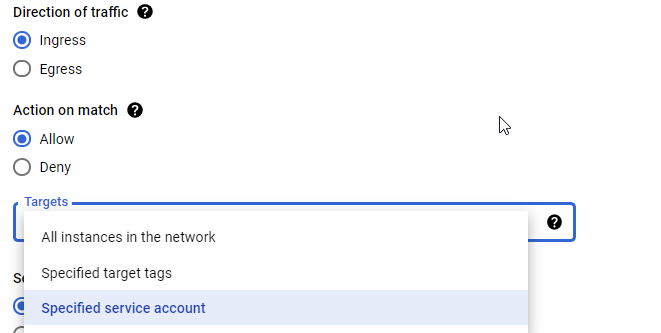
  • Firewall Targets: Every firewall rule in GCP must have a target which defines the instances to which it applies
    • All instances : All instances in the VPC network which is the default target tag
    • Network tags: Are added to an instance or a template for Instance Groups at/after creation in order for a firewall rule to be applied to these instances
    • Service account

      This image has an empty alt attribute; its file name is image-13.png

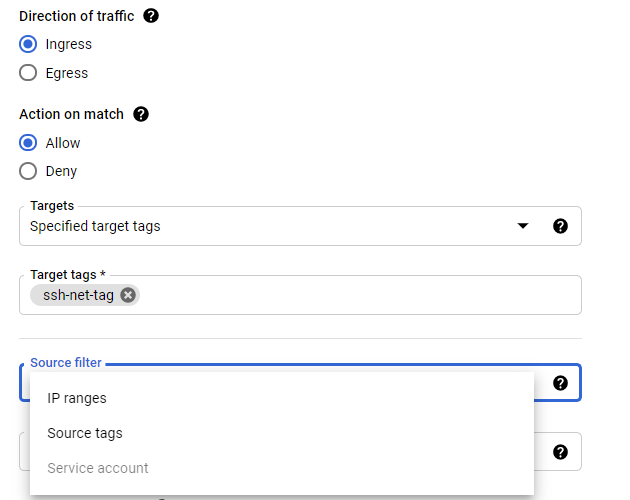
           Ingress Rules
          
Source can be either IP range, service accounts or network tag depending on the target type.You can use a combination
           of
IP ranges + tags or IP ranges + service accounts but not both tags and service accounts in the same rule.

This image has an empty alt attribute; its file name is image-15.png

         Egress Rules
         Destination is always an IP range no matter the type of the target chosen.

  • Firewall Rules Logging:
    Similar to AWS VPC Flow Log, it  logs traffic to and from GCEs for each rule. Each time the rule is applied to allow or deny traffic, a connection record is created. Connection records can be viewed in Cloud Logging.


Shared VPC

Within an Organization, VPCs can be shared among multiple projects and paired with other VPCs so a centralized team can manage network security.

Components

  1. Host Project: will own the Shared VPC (enabled by Shared VPC admin)
  2. Service Projects: will be attached/granted access to the Shared VPC in the host project within a same org (enabled by Shared VPC admin)

Consideration and limits

  1. A service project can only be attached to a single host project.
  2. Service project can't be a host project and standalone VPC network is an unshared VPC network
  3. Shared VPC Admin for a given host project is typically its project owner as well.
  4. If linked projects are in different folders, the admin must have Shared VPC Admin rights on both folders
  5. Two options for sharing networks:
    • All host project subnets
    • Individual subnets to share

Unicast vs Anycast

Both are addressing methods that allow packets to reach the destination across the internet but only one is using google private network(anycast).The other difference between these two is the overall effectiveness and latency of route traffic.

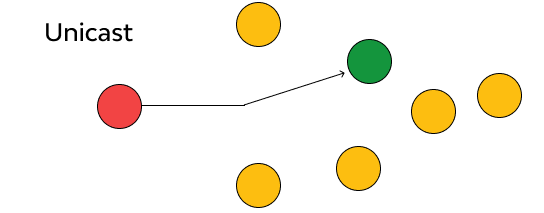
  • Unicast:
    Traditional routing where only one unique device in the world can be the next hop (one-to-one association)
      This image has an empty alt attribute; its file name is image-16.png
  • GCP Anycast:
    Where multiple devices can be the next hop but the closest is the most ideal target.
    In Anycast IP network, the IP request is routed to the nearest Google server region/location. Once the traffic is inside the Google Cloud network, it is routed through the Google private network infrastructure to minimize latency. This is found on GCP load balancers that have Anycast IP defined.
    This image has an empty alt attribute; its file name is image-17.png

Internet access in a VPC

As for Azure, as soon as you enable an external IP address to an instance; It’ll immediately have internet access or NAT gateway if exists. No concept of public subnet like we find in AWS.


CONCLUSION

  • Knowing the breadth of the networking features in GCP, this is just a drop in the ocean but you get enough to start.
  • I hope that the above write-up could help you grasp more about network characteristics that are unique to GCP
  • I probably also wrote this concentrated cheat sheet for me in case I need a refresh :)
  • If you want to learn more about the networking differences between GCP and AWS or Azure here are two excellent articles on the matter:

Monday, August 9, 2021

OVM Series part 3: Backup and recovery with ovm-Bkp (plus scripts)

Intro

This is the last part of the OVM series where I will describe the backup package provided by oracle called ovm-bkp . Even if the Premier Support period has already ended (March, 2021) and OLVM is supposed to be the replacement, a lot of workloads are still running on OVM including new PCAs (Private Cloud Appliances).

The part that was lacking until recently was a comprehensive solution to backup and restore the vms in the OVM platform. I am not saying it’s perfect nor equivalent to the GUI based service on vmware but it does the job at least, especially since OVM has zero license cost


ovm-bkp utilities

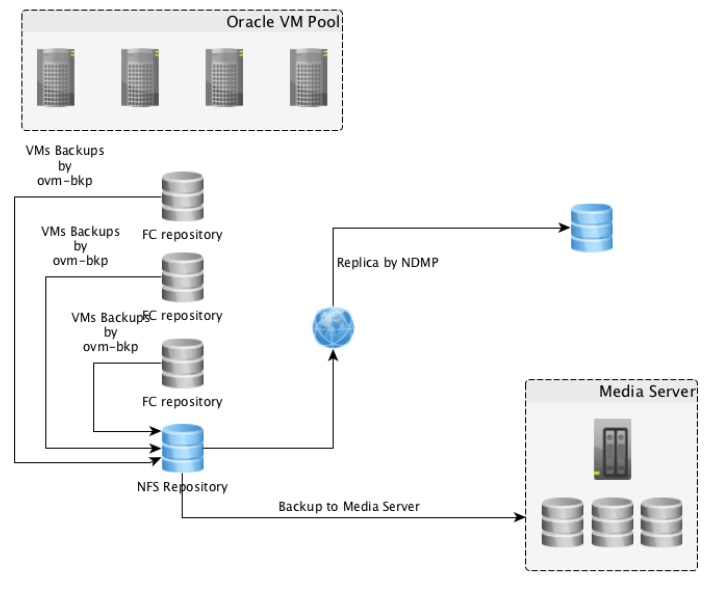
Is a package allowing to get a crash-consistent backup of a running Virtual Machine and share it to external systems like Storages (NFS) or Media Server. Below figure depicts the backup options provided by ovm-bkp utility 
This image has an empty alt attribute; its file name is image-11.png

All the backup operations will be executed starting from OVM Manager server managing the OVM Pool; the entire solution is based on scripts and OVMMCLI interface.

What you need to know

Requirements

  • "ovm-bkp" supports OVM 3.4 and must be installed on OVM Manager machine to function
  • OVM Resources (OVM Pools, VMs, Repositories ) must not contain a space in their name (must be renamed if so)
  • Online backups of a Running VM can be taken only if vdisks reside on OCFS2 repositories (iSCSI or Fiber Channel links)
  • Backup of running VMs with disks on NFS repositories won’t be possible without the vm being shut down first which ovm-bkp will do silently (without warning).
    • Reason: hot-clone feature relies on ocfs2 ref-link option that only works with iSCSI/ FC storage links
    • Destination repository however can be either NFS or OCFS2
    • To make a backup work on a vm hosted in an NFS repo a little tweak must done for the backup script 
  • Backups will contain only virtual-disks. Physical disks are out of scope and must be handled separately    


Installation and configuration

rpm package

[root@em1 ~]# yum -y localinstall ovm-bkp-1.1.0e-20201012.noarch.rpm

Configure the Oracle VM Manager access for "ovm-bkp" utilitie

This script will generate an ovm backup configuration file that contains OVM metadata like the UUID and OVMCLI access info

[root@em1~]# /opt/ovm-bkp/bin/ovm-setup-ovmm.sh
       log as OVM admin user /password
       New configuration file /opt/ovm-bkp/conf/ovmm/ovmm34.conf created:
------------------------
# Oracle VM Manager Command Line Interface User
ovmmuser=admin
# Oracle VM Manager Command Line Interface Password - Encrypted
ovmmpassenc=U2FooGVkX1/OvXXXXXXXXXXXXXX
# Oracle VM Manager Host
ovmmhost=em1
# Oracle VM Manager CLI Port
ovmmport=10000
# Oracle VM Manager UUID
ovmmuuid=0004fb000001XXXXXXXXXXXXXXX 


Configure virtual  machine backup

  • Syntax

./ovm-setup-vm.sh VMname (d=days| c=counts) [target_Repository]  disktoexlude(X,X)

  • Example

[root@ovm-manager01 bin]#  /opt/ovm-bkp/bin/ovm-setup-vm.sh  My_VM c1 vmdata_Repo   --- Target repository where the vm is stored and the backup will be saved
    New configuration file for VM My_VM has been created at
/opt/ovm-bkp/conf/vm/My_VM-0004fb000006000030121f9302f49f44.conf:
   
# Oracle VM Pool
    ovmpool=OVM-Lab
    # VM Details
    vmname=My_VM
    vmuuid=0004fb000006000030121f9302f49f44
    vdiskstoexclude=
    # Retention to Apply
    retention=c1
    # Target Repository
    targetrepo=vmdata_repo

Backup steps

  1. Collect required information (VM name, id and configuration).
  2. Create a dedicated "Clone Customizer" based on the info of the VM.
  3. Create a clone of the VM on the same OCFS2 repository (using ocfs2-reference-link)
    • If  "backup type" = "SNAP", it goes to step (4).
    • If  "backup type" = "FULL", it moves the cloned vm to target Repo (NFS/OCFS2) defined in the config file.
    • If "backup type" = "OVA" , it creates an OVA file – based on the clone and saves it to the target Repo defined in the config file (under Assembly folder).
  4. Move the cloned VM under folder "Unassigned Virtual Machine" on OVM Manager
        o All "SNAP" and "FULL" backups will be displayed under "Unassigned Virtual Machines"
        o Retention policy is applied and all backups that don’t satisfy it are deleted (unless they are flagged preserved)

Backup script

  • Syntax   -- "ovm-backup.sh"

[root@em1]# /opt/ovm-bkp/bin/ovm-backup.sh <Vm name> <backup type> <preserve>

<backup_type> :
        - FULL => will create a full vdisk backup on a further repository
        - SNAP => will create an ocfs2 reference-link snapshot of the vm on the same Repo
        - OVA => will create a packaged OVA file on a further repository

<preserve> "preserve": preserved backup will be ignored by the retention policy applied.

  • Example

Below is a full backup that will not be preserved (checked by the retention policy on the next backup)

[root@em1]# /opt/ovm-bkp/bin/ovm-backup.sh My_VM  FULL n        
=================
Oracle VM 3.4 CLI
=================
=====================================================    
Adding VM My_VM information to bkpinfo file /opt/ovm-bkp/bkpinfo/info-backup-My_VM-FULL-20210728-1316.txt =====================================================  
================================================     
Creating Clone-Customizer to get VM snapshot....   <--1 
================================================ 
=======================
Getting VM snapshot....            <--2
=======================        
=====================     
Backup Type: FULL....  
=====================  
=======================================================
Moving cloned VM to target repository ....   <--3  
=======================================================                                
=======================================================                                
Waiting for Vm moving to complete......10 seconds
...

Waiting for Vm moving to complete......800 seconds                                     
=======================================================                                
=================================================                                       
Renaming VM backup to gcclub.0-FULL-20210728-1316....                               
=================================================                                       
===================================                                                    
Adding proper TAG to backup VM....                                                    
===================================
Guest Machine My_VM has cloned and moved to My_VM-FULL-20210728-1316 on repository vmdata_Repo     <-- 4
Guest Machine My_VM-FULL-20210728-1316 resides under 'Unassigned Virtual Machine Folder' Retention type is Redundancy-Based
Actual reference is: 20210728-1316                                                    
Latest 2 backup images will be retained while other backup images will be deleted!!!
======================================================                                 
=======>> GUEST BACKUP EXPIRED AND REMOVED: <<========                                 
======================================================                                 
=============================================================                          
Based on retention policy any guest backup will be deleted!!!
=============================================================
====================================================================================   
=====> Backup available for guest My_VM (sorted by date) : <====================    
========================================================================================
= BACKUP TYPE == BACKUP  DATE == BACKUP  TIME == BACKUP  NAME             == PRESERVED ==
========================================================================================
=    FULL     ==   20210718   ==     0423     == My_VM-FULL-20210718-0423 ==  NO    
=    FULL     ==   20210725   ==     0451     == My_VM-FULL-20210725-0451 ==  NO        

Other commands

There are few other operations that can list, delete, and preserve backups. We will talk about the restore script separately

  •  ovm-listbackup.sh

[root@em1]# /opt/ovm-bkp/bin/ovm-listbackup.sh vbox-bi       
===============================================================================
         =====> Backup available for guest vbox-bi (sorted by date) :       
===============================================================================       
= BACKUP TYPE == BACKUP DATE == BACKUP TIME == BACKUP NAME == PRESERVED ==       
===============================================================================       
= FULL == 20170829 == 1159 == vbox-bi-FULL-20170829-1159 == YES       
= SNAP == 20180207 == 2030 == vbox-bi-SNAP-20180207-2030 == YES       
= SNAP == 20180207 == 2031 == vbox-bi-SNAP-20180207-2031 == NO 

  • ovm-delete.sh 

Use ovm-delete.sh <backup name>
[root@em1]# /opt/ovm-bkp/bin/ovm-delete.sh My_VM-FULL-20210725-0451

  • ovm-preserve.sh 

Use ovm-preserve.sh <backup name> Y

[root@em1]# /opt/ovm-bkp/bin/ovm-preserve.sh vmdb01-SNAP-20210824 Y

Restore script

  • ovm-restore.sh

The script will restore the VM backup in an interactive fashion.

[root@ovm-manager01 bin]# /opt/ovm-bkp/bin/ovm-restore.sh My_vm
============================================================ Please choose the VM vm1 backup you want to restore: ============================================================ ======================================================= 1) My_vm-FULL-20210305-0926        2) My_vm-SNAP-20210305-0936 =======================================================
Choice: -> 2 ============================================================
===================================================================
Oracle VM Pool will be the same of the backup taken.
With backup type SNAP it means that this is an OCFS2 reflink of the
source VM and, as you know, OCFS2 repositories cannot be presented
to more than one Oracle VM Pool.
===================================================================
==================================================================
Refreshing repository – vmdata_Repo - to get updated information...
==================================================================
===================================================================
Here you can see the list of repositories where the restore can be
executed on Oracle VM Pool OVM-Lab.
Backup vm1-SNAP-20200304-1825 size is equal to 20 GB
Please choose the Oracle VM repository where to restore the backup
named My_vm-SNAP-20200304-1825:
===================================================================
=======================================================
1) vmdata_Repo - Free 4758 GB
=======================================================
Choice: –> 1
===================================================================
=======================================================================
WARNING: vNIC(s) HW-ADDR are still used by the source VM or by an other VM
WARNING: restored VM will use other vNIC(s) HW-ADDR
=======================================================================
================================================
Creating Clone-Customizer to get VM restored....
================================================
=======================================================
Restoring to target repository vmdata_Repo....
=======================================================
=======================================================
Waiting for Vm restore to be available......0 seconds
... Waiting for Vm restore to be available......160 seconds
=======================================================
=======================================================
Deleting temporary CloneCustomizer created......
=======================================================
=======================================================
Addinv vNIC(s) using configuration of the source VM
vNic 1 on Network-Id: 0a0b3c00
=======================================================
=======================================================
Moving Vm My_vm-RESTORE-20200304-1842
to the Oracle VM Pool: OVM-Lab
=======================================================

Notice that the name of the restored vm will not be the same as the original but will have “Restore-date” appended to it.  

My scripts

I had to write some on my own too, as there it is no way to list the vm backups and their configuration in a bulk mode. It can get very tedious to do your regular checks If you have 20 vms with multiple backups each. I now made them available in my github 

Displays all repositories and their filesystem (NFS/OCFS), all attached vms (simple_name and UUID).
  Note: run this from the ovm server and not from the ovmm.

[root@ovm-server02]# ./check_repo_vm.sh

====================================================================================    
VMs for directory /OVS/Repositories/0004fb00000300005e228a81464525c4               
Used_GB : 5.5T Free_GB: 2.4T Free_pct: 71% ==================================================================================== 0004fb0000060000e15330805c08afd6 => OVM_simple_name = 'Mysqlvm' 0004fb00000600006d36f09c20f39584 => OVM_simple_name = 'DNS1_vm' 0004fb000006000078cdd427c9b38b3a => OVM_simple_name = 'wwweb'

    List the current ovm-bkp setup (Per vm) in your ovm environment

[root@em1]# ./check_vm_bkp_config.sh | grep Myvm

    List all backups that are currently stored for configured vms

[root@em1]# ./check_vm_backuplist.sh

    Let’s say you have been asked to drop all backups for 3 or 4 vms that are to be decommissioned. This will generate the 
   drop script “drop_bkps.sh” for all the backups linked to those vms . You only need to put the vm names in the script string list 

[root@em1]# vi drop_vm_backup.sh
#!/bin/bash

strings=(
Myvm1 # <----- change me
Myvm2 # <----- change me
myvm3 # <----- change me )

for i in "${strings[@]}"; do /opt/ovm-bkp/bin/ovm-listbackup.sh  "$i"|awk -F'    == ' '{print $3}'| cut -d ' ' -f 1 | grep "\S" | awk '{print "/opt/ovm-bkp/bin/ovm-delete.sh " $0}' #>> drop_bkps.sh
done

    Same principle here, you only need to put the vms name in the script string list to display their backups. It’s faster
     than grepping from my other script check_vm_backuplist.sh output and handy for 3-10 vms check. 

Purge oldest reserved backups

Preserved backups will never be deleted but sometimes customers like to keep single monthly preserved backup for a vm for example. This script relies on a check_vm_backup.sh that you have to adapt with the list of vms you want to delete the old preserved backups from. Once run, it will generate delete_reserved_date.sh file  that can be run to delete all redundant preserved backups (in crontab for example).

[root@em1 ~]# vi ./clean_reserved_bkp.sh

#!/bin/bash

/opt/ovm-bkp/bin/check_vm_backup.sh > backup_list-"`date +"%d-%m-%Y"`".log 2awk '!= "YES" {next} {s=$8; sub(/-FULL-.*/, "", s)} s == ps {print pval} {ps = s; pval="/opt/ovm-bkp/bin/ovm-delete.sh "$8}' backup_list-"`date +"%d-%m-%Y"`".log > delete_reserved_"`date +"%d%m%Y"`".sh 3chmod u+x delete_reserved_"`date +"%d%m%Y"`".sh 4delete_reserved_"`date +"%d%m%Y"`".sh
delete_reserved_"`date +"%d%m%Y"`".sh

cron entry :

0 2 1 * * /root/clean_reserved_bkp.sh


Conclusion

This will close this series dedicated to Oracle VM environment. Next time I talk about about Oracle virtualization it would be about the successor of OVM which is called OLVM that ditched xen for KVM (a fork of Open source Ovirt project). A very fresh and exciting technology that I can’t wait to explore.   

Thank you for reading