 Intro
Intro
In part II, and after demonstrating how to use OCI Bastion service using the Console (see part I ) we will cover how to create Bastion Service using automation tools like OCI CLI and terraform as I didn’t want all these approaches to be lumped in one post.
Quick table of contents
- Create Bastion Service using OCI CLI
- Create Bastion Service using terraform
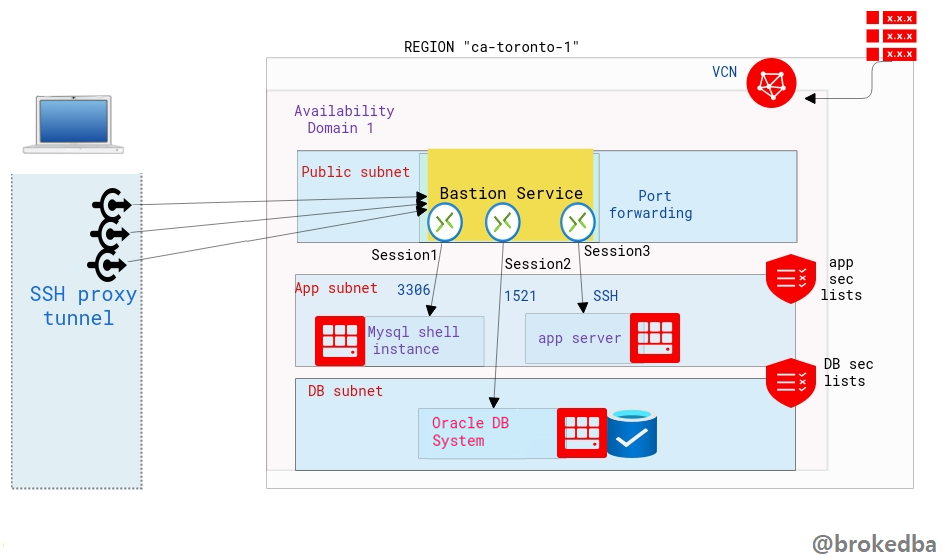
As described in part I The bastion service is linked to the target subnet and a bastion session will define the port forwarding to the target instance.
Our environment :
- VCN vcnterra has the private subnet db-sub with a CIDR of 192.168.78.0/24
- DB instance IP is 192.168.78.10
I. Create Bastion Service from OCI CLI
OCI CLI is perfect for quickly automate bastion service creation with many sessions/ports,.
- Install and configure OCI CLI as described here . Assuming your default profile will be the target tenancy
1. Create the Bastion
by specifying the compartment and subnet ids from the previous example.
$ export comp_id=ocid1.compartment.oc1..a***q
$ export subnet_id=ocid1.subnet.oc1.ca-toronto-1.a**q

-- Create the Bastion --
$ oci bastion bastion create --bastion-type Standard --compartment-id $comp_id --target-subnet-id $subnet_id --client-cidr-list '["0.0.0.0/0"]'

-- describe the Bastion Service --
$ export bastion_id=$(oci bastion bastion list --compartment-id  $comp_id --all --query "data[0].id" --raw-output)

$ oci bastion bastion get --bastion-id $bastion_id  --query "data.{Name:name,bastion_type:\"bastion-type\",state:\"lifecycle-state\",allow_list:\"client-cidr-block-allow-list\",jump_ip:\"private-endpoint-ip-address\",timeout:\"max-session-ttl-in-seconds\"}"   --output table

+-----------+-------------+-------------+---------------+--------+---------+
| Name      | allow_list  |bastion_type | jump_ip       | state  | timeout |
+-----------+-------------+-------------+---------------+--------+---------+
| bastion2* |['0.0.0.0/0']| STANDARD    |192.168.78.127 | ACTIVE | 10800   |
+-----------+-------------+-------------+---------------+--------+---------+
2. Create Port forwarding Bastion Session
We will use $bastion_id and other required attributes we inserted in the console earlier
$ oci bastion session create-port-forwarding --display-name bastiontoDBSession --bastion-id $bastion_id --key-type PUB --ssh-public-key-file id_rsa_oci.pub --target-port 22 --target-private-ip 192.168.78.10 --wait-for-state SUCCEEDED
- export the bastion session OCID
$ session_id=$(oci bastion session list --bastion-id $bastion_id --session-lifecycle-state ACTIVE --sort-order asc --all --query "data[0].id" --raw-output)
- Display the ssh proxy command details from the bastion session resource
$ oci bastion session get --session-id $session_id --query "data.\"ssh-metadata\".command" --raw-outputssh -i <privateKey> -N -L <localPort>:192.168.78.10:22 -p 22 ocid1.bastionsession.oc1.ca-toronto-1.ama**@host.bastion.ca-toronto-1.oci.oraclecloud.com
II. Create Bastion Service From terraform
This is also super cool to have, especially when deploying a full stack and needing to connect to private resources right away.
The ssh command can even be extracted from the output (we’ll use the same environment).
3 x Configuration files
- Bastion.tf for both Bastion and Bastion session
$ vi bastion.tf

resource "oci_bastion_bastion" "mybastion" {
    #Required
    bastion_type = "standard"
    compartment_id = var.compartment_ocid
    target_subnet_id = oci_core_subnet.terraDB.id   #CHANGE ME
     name = var.bastion_name
    client_cidr_block_allow_list = [var.bastion_cidr_block_allow_list]
}
##################################
#    Bastion Session
##################################

resource "oci_bastion_session" "mybastion_session" {
    #Required
    bastion_id = oci_bastion_bastion.mybastion.id
    key_details {
        public_key_content = var.ssh_public_key
    }
    target_resource_details {
        session_type = var.bastion_session_type
        target_resource_port = "22"
        target_resource_private_ip_address = "192.168.78.10"
    }
    display_name = var.bastion_session_name
    key_type = "PUB"
    session_ttl_in_seconds = "10800"
}
- variables.tf
$ vi variable.tf
variable "bastion_cidr_block_allow_list" { default= "0.0.0.0/0"}
variable "bastion_name" { default = "BastionMyDB"}
variable "bastion_session_type" {default = "PORT_FORWARDING"}
variable "bastion_session_name" {default = "Session-Mybastion" }
variable "ssh_public_key" { default = "~/id_rsa_oci.pub"}
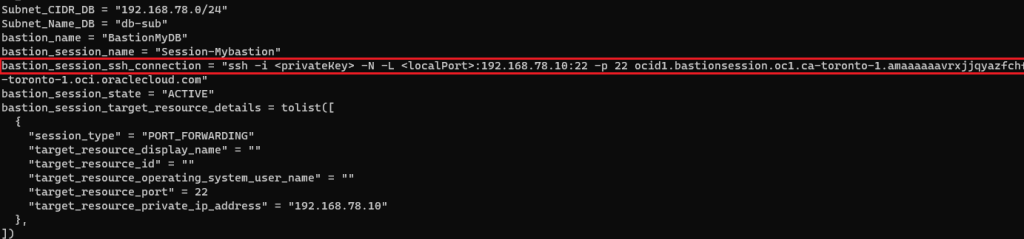
- output.tf to extract all necessary information including the ssh command
$ vi output.tf
 output "bastion_session_state" {
           value = oci_bastion_session.mybastion_session.state}
output "bastion_session_target_resource_details" {
           value = oci_bastion_session.mybastion_session.target_resource_details}
output "bastion_session_ssh_connection" {
           value = oci_bastion_session.mybastion_session.ssh_metadata.command}
- After setting the subnet/compartment ids, terraform apply will create the bastion & display something like the below
SSH connection Usage
- Final result will looks like this, notice I added & to run it in the background, so I won’t have to open another session to login to the private DB instance.
# ssh -i ~/.ssh/id_rsa_oci -N -L 22:192.168.78.10:22 -p 22 ocid1.bastionsession.oc1.ca-toronto-1.amaaaaaavr**a@host.bastion.ca-toronto-1.oci.oraclecloud.com &
- Run the final ssh command to access the target resource using a sort of loopback where localhost is forwarded into the target instance IP through the opened proxy tunnel.
# ssh -i  ~/.ssh/id_rsa_dbcs opc@localhost
[opc@hopsdb-oci ~]$ cat /etc/redhat-release        --- target instance
 Red Hat Enterprise Linux Server release 7.9 (Maipo)
[opc@hopsdb-oci ~]$ ifconfig  ens3
ens3: flags=4163<UP,BROADCAST,RUNNING,MULTICAST>  mtu 9000
inet 192.168.78.10  netmask 255.255.255.0  broadcast 192.168.78.255
Warning: Beware as It’s important to distinguish between : - ssh key pair used to used to build the Bastion session
- ssh key pair used in the target vm (our db instance) upon creation
- The first is used when we run the bastion command , the second is used when connecting as opc@locahost .
Conclusion
In this article we learned
- How to create OCI Bastion service using OCI CLI , and finally Terraform.
- With the above there is no excuse not to try this super cool feature that is absolutely FREE.
Thanks for reading
No comments:
Post a Comment