Showing posts with label VirtualBox. Show all posts

Monday, September 20, 2021

Vagrant tips: How to automatically adjust the Time Zone of your vagrant box

This image has an empty alt attribute; its file name is vagrant_tz.png

Intro

I was playing with my Linux vagrant boxes lately and I realized I was always spinning third party boxes that had a totally different time zone (Europe/UK mostly). Up until now I never bothered as I have used bunch of those from vagrant Cloud for years. I sometimes notice, and think of using a shell command to fix it during the bootstrap, but it I haven’t had the time. However, I was heavily debugging some logs this week and the wrong Time Zone started to get annoying for me so I decided to look for a permanent fix. 

I. Vagrant Time zone plugin to the rescue 

  • Solution

    There is no need to add random shell script in the shell provisioning area of your Vagrantfile.Teemu Matilainen has you covered with his sweet ruby plugin called  vagrant-timezone that does just that.


  • How does it work
    Install the plugin:
  • C:\Users\brokedba> vagrant plugin install vagrant-timezone
    Installing the 'vagrant-timezone' plugin. This can take a few minutes...
    Fetching vagrant-timezone-1.3.0.gem
    Installed the plugin 'vagrant-timezone (1.3.0)'!


      Configuration

    To Configure time zone for all Vagrant VMs, add the following to $HOME/.vagrant.d/Vagrantfile or to a project specific Vagrantfile (see below example in windows)

    C:\Users\brokedba\.vagrant.d>vagrant init
    --- Add the IF block below in the master or each build’s Vagrantfile

    Vagrant
    .configure("2") do |config| if Vagrant.has_plugin?("vagrant-timezone") config.timezone.value = "America/Toronto" end # ... other stuff end

    You can of course choose your own Time Zone from this TZ database list   


    - The configuration is done on vagrant up and vagrant reload actions.
    Note that no services are restarted automatically so they may keep using the old time zone information. 
     

    - This plugin requires Vagrant 1.2 or newer.


II. Usage and prerequisites


III. Compatibility

  • Linux guests.
    • Arch
    • CoreOS
    • Debian (and derivatives)
    • Gentoo
    • RedHat (and derivatives)
  • BSD guests:

    • FreeBSD
    • NetBSD
    • OpenBSD
    • OS X
  • Windows


Conclusion:


This will hopefully encourage you to more often use and enjoy vagrant boxes without being stuck with the original time zone .

Thanks for reading

Sunday, August 2, 2020

Fixes for Vagrant/Virtualbox errors due to latest Windows 10 updates

INTRO


1- Failed to create the host-Only adapter

A Host-Only adapter can usually be created from virtualbox GUI (see below) or from VboxManage.exe call as admin (manually or from an external app).
Note: I could still do it from vagrant before.

Image for post
Create a Host Only adaptor from the vbox GUI
Stderr: 0%...
Progress state: E_FAIL
VBoxManage.exe: error: Failed to create the host-only adapter
VBoxManage.exe: error: Operation canceled by the user
VBoxManage.exe: error: Details: code E_FAIL (0x80004005), component VirtualBoxWrap, interface IVirtualBox
VBoxManageHostonly.cpp
Image for post

Workaround

You will have to temporarily change the user account Control setting. That way the vagrant background task won’t hang then crash as windows won’t show the confirmation pop up.

Image for post
Disable notification when apps make changes to the system

2- VT-x is not available

After solving the earlier issue, I tried to run the `vagrant up` again but here comes another error message in my output.

... The command and stderr is shown below.
Command: ["startvm", "6cef1e57-d4d3-4633-a122-1be55e990eec", "--type", "headless"]

Stderr: VBoxManage.exe: error: VMMR0_DO_NEM_INIT_VM failed: VERR_NEM_MISSING_KERNEL_API_2.
VBoxManage.exe: error: VT-x is not available (VERR_VMX_NO_VMX)
VBoxManage.exe: error: Details: code E_FAIL (0x80004005), component ConsoleWrap, interface IConsole

Workaround

ThereforeVT-x is a set of intel CPU instructions that include hardware virtualization features which accelerate virtual machines. This must be enabled at BIOS level. Coincidentally, I also had to update my laptop BIOS the same week, but it’s not what caused the error.
Windows is known to automatically disable VT-x if Hyper-V is enabled. In my case I am sure the new updates have enabled it back. You will, therefore, have to unset that again.

PS C:\Users\brokedba> bcdedit /set hypervisorlaunchtype off
The operation completed successfully.

Tuesday, April 14, 2020

How to Enable Nested Virtualization in VirtualBox (New Feature)


Did you ever want to have labs where you could play with different hypervisors withing a single virtual machine in your laptop?
I know this sounds more like an INCEPTION remake than a decent requirement but you can't blame us for being greedy knowing all what tools like virtualbox can help us do nowadays. 

To give more context to this issue. I was just trying to play with KVM lately when I realized that I was actually installing a hypervisor inside a guest machine within another hypervisor. Pretty weird indeed :) when you think of it  but I only stopped because a tool was complaining that no hypervisor was recognized. 
So how to make a Hypervisor (KVM) aware of the Host hardware when it's only installed under another Hypervisor layer (virtualbox)? This is called nested Virtualization btw.

well, after digging a little online, it turns out that the latest versions of Virtualbox do provide this feature and it is very simple to enable even after your vm has been provisioned.     


1. Environment

Host: Intel based Dell laptop with windows 10
Hypervisor:
Virtualbox
Guest OS:
Oracle Linux 7
Hypervisor installed within the guest: KVM
Issue description from KVM.org:
For KVM to run from a vm it needs access to a set of CPU instructions (intel VT or AMD) to enable running fully isolated virtual machines at native hardware speeds (HVM ). Learn more.            

2. Symptoms


In my case the Host CPU socket is intel hence I would be looking whether Intel VT (Virtualization Technology) is listed as virtualization capability on the guest machine. 

 - So I ran the below which should display 2 if intel Virtualization capability is enabled. I got 0

[root@localhost ~]#  egrep -c "(svm|vmx)" /proc/cpuinfo
 0
 - Alternatively you can also check if nested virtualization is enabled in kvm (kvm_intel). Still nothing 
[root@localhost ~]# lsmod | grep kvm
kvm                   659456  0
irqbypass              16384  1 kvm

3. Solution  


All you have to do is to make sure your Virtualbox is of version 6.1.4 and from there you can "activate" nested virtualization. Use either one of the below options. 


  • Adding <NestedHWVirt enabled="true"/> in CPU section of your .vbox file inside your VM folder (usually hidden in windows)
  • Running the following vboxmanage command  
C:\Program Files\Oracle\VirtualBox> vboxmanage modifyvm awx_vagrant --nested-hw-virt on
Here is the result to same lsmod command after applying the change.
[root@localhost ~]# lsmod | grep kvm
kvm                   659456  0
kvm                   659456  1 kvm_intel
irqbypass              16384  1 kvm
Another quick way to check if the change is effective is by opening the processor setting tab in Virtualbox .


  • Enable Nested Virtualization on Vagrant
If you are using vagrant to provision your vm you can also do it by adding below customize line in your vagrant file.
config.vm.provider "virtualbox" do |vb|
vb.memory = var_mem_size
vb.cpus   = var_cpus
vb.name   = var_vm_name
vb.customize ['modifyvm', :id, '--nested-hw-virt', 'on']


Sunday, September 15, 2019

Vagrant: Create a Red Hat 8 base box packaged for Oracle 19c (Vbox)


Intro

Vagrant is an opensource tool for working with virtual environments (VirtualBox,HyperV,Vmware..etc). It provides a simple command-line client for managing these environments, using a text-file (VagrantFile) defining the attributes of each environment.  
To know more about vagrant you can try their getting started guide or consult the Vagrant official documentation.

Vagrant cloud already offers a plethora of existing Boxes, from windows to BSD (including numbers of Linux distros. But in case you are looking for a specific setup for your builds, you may need a custom box.
In this article we will create a prepackaged Vagrant box from a existing RedHat 8 base box then uppload/publish it into the Vagrant cloud.
 
Note: This box will include necessary packages to install Oracle 19c Database or grid infrastrcuture software on Rhel8. Feel free to use it in your vagrant builds (see link at the bottom of this post).

Pre-requisites

To create a Vagrant box from scratch there are few requirements to respect regarding the virtual machine  

  • The first network interface (adapter 1) must be a NAT adapter. Vagrant uses this to connect the first

  • VirtualBox Guest Additions must be installed so that things such as shared folders can function.

However, these steps won’t be necessary here since we are customizing an already existing base box.
If you still want to know more about doing this from a new vm, check out Tim Hall’s example.
This tutorial is divided in two parts : I. Create the Oracle 19c ready Vagrant box , II. Share it online

I. Create the Oracle 19c ready Vagrant box from an existing one

1. Import a generic RHEL8 base Box in the local vagrant environment

   
  On a new location in your Computer, Initialize the current directory to be a Vagrant environment and populate our  

  target online RedHat8 base box in the created Vagrantfile.


- Open a cmd box in your system and run the following commands

D:\VM\vagrant> vagrant init generic/rhel8                                                

- Startup the vm 

D:\VM\vagrant> vagrant up

- Stop the vm and attach the RHEL8 iso file to the optical drive in VirtualBox

D:\VM\vagrant> vagrant halt  

- Restart the vm                                      

D:\VM\vagrant> vagrant up                         

2. Create a local yum repository

[root@linuxtechi-rhel8 ~]# mount /dev/cdrom /media                           
[root@linuxtechi-rhel8 ~]# vi /etc/yum.repos.d/rhel8.repo     

[InstallMedia-BaseOS]                                                       
name=Red Hat Enterprise Linux 8 - BaseOS                                    
metadata_expire=-1                                                          
gpgcheck=0                                                                  
enabled=1                                                                   
baseurl=file:///media/BaseOS/                                               

[InstallMedia-AppStream]                                                    
name=Red Hat Enterprise Linux 8 - AppStream                                 
metadata_expire=-1                                                          
gpgcheck=0                                                                  
enabled=1                                                                   
baseurl=file:///media/AppStream/                                     

**2.1: If you don't have the .iso file at your disposal you can use the Online RedHat 8 beta repository to build your
   repo (see below text ). Otherwise skip to next step.

[root@linuxtechi-rhel8 ~]# vi /etc/yum.repos.d/rhel8.repo     
[rhel-8-for-x86_64-baseos-beta-rpms]
name = Red Hat Enterprise Linux 8 for x86_64 - BaseOS Beta (RPMs)
baseurl = https://downloads.redhat.com/redhat/rhel/rhel-8-beta/baseos/x86_64/
enabled = 1
gpgcheck = 0

[rhel-8-for-x86_64-appstream-beta-rpms]
name = Red Hat Enterprise Linux 8 for x86_64 - AppStream Beta (RPMs)
baseurl = https://downloads.redhat.com/redhat/rhel/rhel-8-beta/appstream/x86_64/ enabled = 1
gpgcheck = 0
- Remove the Red Hat subscription warning (unable to read consumer identity) 
[root@linuxtechi-rhel8 ~]# vi /etc/yum/pluginconf.d/subscription-manager.conf
[main]
enabled=0
- Clean subscription data
[root@linuxtechi-rhel8 ~]# subscription-manager clean
Clear the repository cache by running the following command.
[root@linuxtechi-rhel8 ~]# dnf clean all  -- or yum clean all
- Verify whether Yum / DNF is getting packages from Local Repo
[root@linuxtechi-rhel8 ~]# dnf/yum repolist
Red Hat Enterprise Linux 8 - AppStream      7.1 MB/s | 5.3 MB     00:00
Red Hat Enterprise Linux 8 - BaseOS          24 MB/s | 2.2 MB     00:00
Last metadata expiration check: 0:00:02 ago on Fri 23 Aug 2019 03:40:20 PM UTC.
repo id                  reponame                                status
InstallMedia-AppStream       Red Hat Enterprise Linux 8 - AppStream     4,672
InstallMedia-BaseOS          Red Hat Enterprise Linux 8 - BaseOS        1,658

- Download and Install the 19c preinstall rpm package provided by oracle: Same goes for any oracle preinstall version

[root@linuxtechi-rhel8 ~]# curl -o oracle-database-preinstall-19c-1.0-1.el7.x86_64.rpm https://yum.oracle.com/repo/OracleLinux/OL7/latest/x86_64/getPackage/oracle-database-preinstall-19c-1.0-1.el7.x86_64.rpm
[root@linuxtechi-rhel8 ~]# yum -y localinstall oracle-database-preinstall-19c-1.0-1.el7.x86_64.rpm
Error:
  Problem: conflicting requests
- nothing provides compat-libcap1 needed by oracle-database-preinstall-19c-1.0-1.el7
- nothing provides compat-libstdc++-33 needed by oracle-database-preinstall-19c-1.0-1.el7

Solution: The above error occurred because the two mentioned rpms were missing from Red Hat 8 package base. We will    
have to install them manually before the 19c preinstall package.   
[root@linuxtechi-rhel8]# curl -o compat-libstdc++-33-3.2.3-72.el7.x86_64.rpm https://yum.oracle.com/repo/OracleLinux/OL7/latest/x86_64/getPackage/compat-libstdc++-33-3.2.3-72.el7.x86_64.rpm
[root@linuxtechi-rhel8 ~]# curl -o compat-libcap1-1.10-7.el7.x86_64.rpm https://yum.oracle.com/repo/OracleLinux/OL7/latest/x86_64/getPackage/compat-libcap1-1.10-7.el7.x86_64.rpm
[root@linuxtechi-rhel8]# rpm -ivh compat-libstdc++-33-3.2.3-72.el7.x86_64.rpm
[root@linuxtechi-rhel8]# rpm -ivh compat-libcap1-1.10-7.el7.x86_64.rpm   
- Rerun yum Install on the 19c preinstall package
-- 
[root@linuxtechi-rhel8 ~]# yum -y localinstall oracle-database-preinstall-19c-1.0-1.el7.x86_64.rpm Installed products updated.
Installed:
oracle-database-preinstall-19c-1.0-1.el7.x86_64 
ksh-20120801-252.el8.x86_64 libICE-1.0.9-13.el8.x86_64
libSM-1.2.3-1.el8.x86_64                    libX11-1.6.7-1.el8.x86_64                  
libX11-common-1.6.7-1.el8.noarch libX11-xcb-1.6.7-1.el8.x86_64
libXau-1.0.8-13.el8.x86_64                  libXcomposite-0.4.4-14.el8.x86_64
libXext-1.3.3-9.el8.x86_64                  libXi-1.7.9-7.el8.x86_64                    libXinerama-1.1.4-1.el8.x86_64 libXmu-1.1.2-12.el8.x86_64
libXrandr-1.5.1-7.el8.x86_64                libXrender-0.9.10-7.el8.x86_64
libXt-1.1.5-8.el8.x86_64                    libXtst-1.2.3-7.el8.x86_64
libXv-1.0.11-7.el8.x86_64 libXxf86dga-1.1.4-12.el8.x86_64
libXxf86misc-1.0.4-1.el8.x86_64 libXxf86vm-1.1.4-9.el8.x86_64
libdmx-1.1.4-3.el8.x86_64                   libxcb-1.13-5.el8.x86_64                   
xorg-x11-utils-7.5-28.el8.x86_64 xorg-x11-xauth-1:1.0.9-12.el8.x86_64
bc-1.07.1-5.el8.x86_64                      gssproxy-0.8.0-5.el8.x86_64
keyutils-1.5.10-6.el8.x86_64                libaio-devel-0.3.110-12.el8.x86_64         
libverto-libevent-0.3.0-5.el8.x86_64    nfs-utils-1:2.3.3-14.el8.x86_64    
quota-1:4.04-10.el8.x86_64                  quota-nls-1:4.04-10.el8.noarch
rpcbind-1.2.5-3.el8.x86_64                  smartmontools-1:6.6-3.el8.x86_64           
unzip-6.0-41.el8.x86_64

- Add few more packages that will be needed for future oracle installations and builds

# New for OL8/RHEL8
[root@rhel8 ~]# yum instal libnsl
# Other rpms
[root@rhel8 ~]# yum install bind sysstat unixODBC unixODBC-devel binutils zip dnsmasq
- Add the default Vagrant ssh public key to avoid having ssh access issues after packaging your box 
[root@rhel8 ~]# wget --no-check-certificate https://raw.githubusercontent.com/mitchellh/vagrant/master/keys/vagrant.pub -O .ssh/authorized_keys
[root@rhel8 ~]# shutdown -h now

3. Package the box using Vagrant

  Once the VM is created and the Vagrant configuration is complete, we can turn the VM into a Vagrant box using the "vagrant
  package" command.

cd D:\VM
D:\VM> vagrant package --base rhel8 --output rhel8_ora.box
==> rhel8: Exporting VM...
==> rhel8: Compressing package to: D:/VM/rhel8_ora.box
- You can now add it locally to the list of available boxes.
D:\VM> vagrant box add D:/VM/rhel8_ora.box --name Scofieldd/rhel8_ora
==> box: Box file was not detected as metadata. Adding it directly...
==> box: Adding box 'scofieldd/rhel8_ora' (v0) for provider:
     box: Unpacking necessary files from: file:///D:/VM/rhel8_ora.box
     box: Progress: 100% (Rate: 437M/s, Estimated time remaining: --:--:--)
==> box: Successfully added box 'scofieldd/rhel8_ora' (v0) for 'virtualbox'!
- Check if the newly added base box is  listed
D:\VM> vagrant box list
generic/rhel8       (virtualbox, 1.9.22)
rhel8               (virtualbox, 0)

II. Upload your custom Boxes via the Vagrant Cloud Web Interface :

   After you've created the .box file, these steps can be followed (the name is rhel8_ora and not
   rhel8_ora1) .                                                         
                                                                                                                         
  1. Go to the Create Box page and name the box and give it a simple description


   2. Create your first version for the box. This version must match the format [0-9].[0-9].[0-9]                             

                                                                                                  
   3. Create a release version and a provider for the box which is virtualbox. 

                                                                                                                     
    4. Upload the created rhel8_ora.box file for your provider (Virtualbox)                     


    You can now find  your new box in the Vagrant section of Vagrant Cloud.                  

   To try this box just rerun the vagrant commands using the new box name  (scofieldd/rhel8_ora) .
 
   1. Initialise the vagrant file

D:\VM\vagrant> vagrant init scofieldd/rhel8_ora  
D:\VM\vagrant> vagrant up
I’ll share Oracle builds for this box in my next blog post. Stay tunned ;)

Thursday, August 15, 2019

Clone a RAC 12c VM environment with Virtualbox (import/export)


Intro

Have you ever finished a lab in your laptop with several virtual machines connected to each other and thought “Well that was neat! but how can I create a backup in my external hard drive and run it again at work or in any other computer?” The answer lays in this very article. For those of you who have finished any RAC environment lab (i.e Racattack) in VirtualBox, saving images of the created Oracle RAC system and hand it over to another location for a restore could be done in a matter of minutes! 
As matter of fact, Oracle VM VirtualBox can import and export virtual machines in Open Virtualization Format (OVF) which is an industry-standard format that we are going to use in this tutorial.

This tutorial will describe the steps to export then import a RAC environment in Virtualbox through import/export Appliance tools and other commands.

Considerations

The export of a VM is a straightforward process and saving RAC images would be an easy task if it weren’t for the shared asm disks.Therefore asm disks needed a bit more care than the guest systems but all was done in a timely manner. Furthermore, make sure your new computer’s VirtualBox Host Only Ethernet Adapter has the same IP segment than your Vms before importing them.

Note:
The directory path names used during the export/import (C:/,D;/) should be adapted to your own environment.

Follow the below steps and try the GUI alternatives if you find it easier than the command line options.


1. Export Shared disks

     - Detach the disks from RAC VMs:

image
     - Export them to a new location
"C:\Program Files\Oracle\VirtualBox\VBoxManage.exe" clonemedium disk "C:\VM\RAC lab\london1\asm_1.vdi" "H:\OS\ORACLE\Lab Oracle\asm_1.vdi" --format VDI --variant Fixed
"C:\Program Files\Oracle\VirtualBox\VBoxManage.exe" clonemedium disk "C:\VM\RAC lab\london1\asm_2.vdi" "H:\OS\ORACLE\Lab Oracle\asm_2.vdi" --format VDI --variant Fixed
"C:\Program Files\Oracle\VirtualBox\VBoxManage.exe" clonemedium disk "C:\VM\RAC lab\london1\asm_3.vdi" "H:\OS\ORACLE\Lab Oracle\asm_3.vdi" --format VDI --variant Fixed
"C:\Program Files\Oracle\VirtualBox\VBoxManage.exe" clonemedium disk "C:\VM\RAC lab\london1\asm_4.vdi" "H:\OS\ORACLE\Lab Oracle\asm_4.vdi" --format VDI --variant Fixed
"C:\Program Files\Oracle\VirtualBox\VBoxManage.exe" clonemedium disk "C:\VM\RAC lab\london1\asm_5.vdi" "H:\OS\ORACLE\Lab Oracle\asm_5.vdi" --format VDI --variant Fixed

  Note: You can also start Disk Copying Wizard which is a GUI equivalent to the above.

image

2. Export the VMs to ovf templates

     - List VMs

"C:\Program Files\Oracle\VirtualBox\VBoxManage.exelist vms
"london1" {45ae6298-7e95-4ef1-864d-85c995cb46ff}                             
"london2" {3c6a0e27-74f0-47ea-b3d7-ac9c253bb03b}                             

     - Export the VMs
    The OVA extension encapsulates all OVF folder content (.ovf,.mf*.vhd or *.vmdk) into a single zipped file

"C:\Program Files\Oracle\VirtualBox\VBoxManage.exe" export "london1" -o  "H:\OS\ORACLE\Lab Oracle\london1.ova"  --ovf10     
"C:\Program Files\Oracle\VirtualBox\VBoxManage.exe" export "london2" -o  "H:\OS\ORACLE\Lab Oracle\london2.ova"  --ovf10                         

  Note: You can also start Export Appliance Wizard for each VM which is the GUI equivalent to the above commands.

image

3. Copy the shared disks and exported VMs to a new Host

image


4. Import both VMS

"C:\Program Files\Oracle\VirtualBox\VBoxManage.exe" import "D:\VM\Racattack\london1.ova"     --options keepallmacs 
"C:\Program Files\Oracle\VirtualBox\VBoxManage.exe" import "D:\VM\Racattack\london2.ova"     --options keepallmacs   
Note: You can also start Import Appliance Wizard for VM which is the GUI equivalent to the above commands.
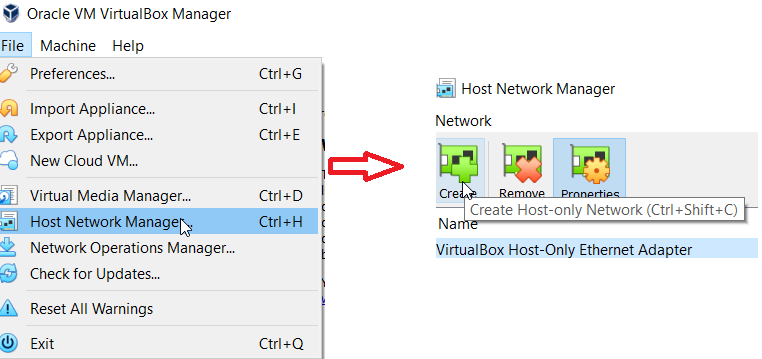
 *** Make sure your new computer’s VirtualBox Host Only Ethernet Adapter has the same IP segment than your Vms (example in my lab :192.168.78.1)

image

5. Change asm disks to shared

"C:\Program Files\Oracle\VirtualBox\VBoxManage.exe" modifymedium disk "D:\VM\Racattack\asm_1.vdi" –type shareable
"C:\Program Files\Oracle\VirtualBox\VBoxManage.exe" modifymedium disk "D:\VM\Racattack\asm_2.vdi"  --type shareable "C:\Program Files\Oracle\VirtualBox\VBoxManage.exe" modifymedium disk "D:\VM\Racattack\asm_3.vdi"  --type shareable                          
"C:\Program Files\Oracle\VirtualBox\VBoxManage.exe" modifymedium disk "D:\VM\Racattack\asm_4.vdi"  --type shareable                          
"C:\Program Files\Oracle\VirtualBox\VBoxManage.exe" modifymedium disk "D:\VM\Racattack\asm_5.vdi"  --type shareable                          

   Note: You can also do the above through Virtual Media Manager  (GUI equivalent).

6. Attach the asm disks to both RAC VMs

"C:\Program Files\Oracle\VirtualBox\VBoxManage.exe" storageattach london1 --storagectl "SATA" --port 1  --device 0 --type hdd --medium "D:\VM\Racattack\asm_1.vdi" --mtype shareable  
"C:\Program Files\Oracle\VirtualBox\VBoxManage.exe" storageattach london1 --storagectl "SATA" --port 2  --device 0 --type hdd --medium "D:\VM\Racattack\asm_2.vdi" --mtype shareable                                 
"C:\Program Files\Oracle\VirtualBox\VBoxManage.exe" storageattach london1 --storagectl "SATA" --port 3  --device 0 --type hdd --medium "D:\VM\Racattack\asm_3.vdi" --mtype shareable
"C:\Program Files\Oracle\VirtualBox\VBoxManage.exe" storageattach london1 --storagectl "SATA" --port 4  --device 0 --type hdd --medium "D:\VM\Racattack\asm_4.vdi" --mtype shareable
"C:\Program Files\Oracle\VirtualBox\VBoxManage.exe" storageattach london1 --storagectl "SATA" --port 5  --device 0 --type hdd --medium "D:\VM\Racattack\asm_5.vdi" --mtype shareable
"C:\Program Files\Oracle\VirtualBox\VBoxManage.exe" storageattach london2 --storagectl "SATA" --port 1  --device 0 --type hdd --medium "H:\OS\ORACLE\Lab Oracle\asm_1.vdi" --mtype shareable       
"C:\Program Files\Oracle\VirtualBox\VBoxManage.exe" storageattach london2 --storagectl "SATA" --port 2  --device 0 --type hdd --medium "D:\VM\Racattack\asm_2.vdi" --mtype shareable      
"C:\Program Files\Oracle\VirtualBox\VBoxManage.exe" storageattach london2 --storagectl "SATA" --port 3  --device 0 --type hdd --medium "D:\VM\Racattack\asm_3.vdi" --mtype shareable      
"C:\Program Files\Oracle\VirtualBox\VBoxManage.exe" storageattach london2 --storagectl "SATA" --port 4  --device 0 --type hdd --medium "D:\VM\Racattack\asm_4.vdi" --mtype shareable      
"C:\Program Files\Oracle\VirtualBox\VBoxManage.exe" storageattach london2 --storagectl "SATA" --port 5  --device 0 --type hdd --medium "D:\VM\Racattack\asm_5.vdi" --mtype shareable
        image

7. ReConfigure the asm disks in each RAC nodes

   Since udev Device Mapping configuration got somehow lost during the import we will have to redo that again.
    On each VM do the following:

7.1 Create partition from above added disks
   - As root user use fdisk command to partition the attached disks. Repeat the steps below for all the disks (sdb, sdc, sdd,
   sde,sdf). 

 [root@london1 ~]# fidsk /dev/sd*     
      >> n    -- new
      > p     -- primary
      > 1     -- 1 partition
      > w     -- write the change for all the disks
      [root@london1 ~]# ls -l /dev/sd?1
      brw-rw---- 1 root disk 8,  1 Jul 19 05:34 /dev/sda1
      brw-rw---- 1 root disk 8, 17 Jul 19 05:52 /dev/sdb1
      brw-rw---- 1 root disk 8, 33 Jul 19 05:53 /dev/sdc1
      brw-rw---- 1 root disk 8, 49 Jul 19 05:54 /dev/sdd1
      brw-rw---- 1 root disk 8, 65 Jul 19 05:54 /dev/sde1
      brw-rw---- 1 root disk 8, 65 Jul 19 05:54 /dev/sdf1   


7.2 Verify scsi_id configuration 

   - The content of /etc/scsi_id.config should include the option -g for the scsi_id command to expect an UUID from the
    shared devices. if not run the below in one line 

printf  "options=-g --whitelisted --replace-whitespace"  > /etc/scsi_id.config
   - Check if the the symbolic link for scsi_id is still there (RHEL 7 only)            
ln -s  '/usr/lib/udev/scsi_id'   '/sbin/scsi_id'

7.3 Rebuild the Udev rules in the /etc/udev/rules.d/99-oracle-asmdevices.rules file

  - Run the following script as root

i=1
cmd="/sbin/scsi_id -g -u -d"
for disk in sdb sdc sdd sde sdf; do
cat <<EOF >> /etc/udev/rules.d/99-oracle-asmdevices.rules KERNEL=="sd?1",SUBSYSTEM=="block", PROGRAM=="$cmd /dev/\$parent", \
RESULT=="`$cmd /dev/$disk`", SYMLINK+="asm-disk$i", OWNER="grid", GROUP="dba", MODE="0660"
EOF i=$(($i+1)) done
7.4 Reload the udev rules and restart udev:
# /sbin/partprobe /dev/sdb1 /dev/sdc1 /dev/sdd1 /dev/sde1 /dev/sdf1                                                                                                               
# /sbin/udevadm test /block/sdb/sdb1                              
# /sbin/udevadm test /block/sdc/sdc1                              
# /sbin/udevadm test /block/sdd/sdd1                              
# /sbin/udevadm test /block/sde/sde1                        
# /sbin/udevadm test /block/sde/sdf1     
# /sbin/udevadm control --reload-rules                                 
   - Check the generated sim links
[root@london1 ~]# ls -l /dev/asm-*                                   
brw-rw---- 1 grid dba 8, 17 Jul 19 07:28 /dev/asm-disk1           
brw-rw---- 1 grid dba 8, 33 Jul 19 07:28 /dev/asm-disk2           
brw-rw---- 1 grid dba 8, 49 Jul 19 07:28 /dev/asm-disk3           
brw-rw---- 1 grid dba 8, 65 Jul 19 07:28 /dev/asm-disk4 
brw-rw---- 1 grid dba 8, 65 Jul 19 07:28 /dev/asm-disk4

8. Restart The clusterware on both new VMs and voila   

image