Showing posts with label terraform. Show all posts

Friday, December 8, 2023

OCI FortiGate HA Cluster - Reference Architecture: Code review & Fixes

Intro


OCI Quick Start repositories on GitHub are collections of Terraform scripts and configurations provided by Oracle. These repositories are designed to help orgs quickly deploy common infrastructure setups on OCI Platform.
Each Quick Start focuses on a specific use case or workload, which simplify the process of provisioning on OCI using Terraform. A sort of IaC based reference architecture.


Today, we will code review one of those reference architecture which is a Fortinet firewall Solution deployed in OCI.
Note: This article won’t discuss the architecture, but will rather address its terraform code flaws and fixes.


Why some errors never get to your OCI Resource Manager stack?


  • Certain Terraform errors may not reach your RM stack due to its design. For instance, RM allows the hardcoding of specific variables, like availability domains, directly in its interface. This sidesteps the need for these variables to be checked by native conditions in the TF code.

  • Moreover, RM reads these variables from the schema.yaml file, altering the behavior compared to local Terraform CLI execution. This approach can result in certain errors being handled or bypassed within the RM environment, creating a distinction from standard Terraform workflows.


The stack: FortiGate HA Cluster using DRG - Reference Architecture


The stack is a result of the collaboration of both Oracle and Fortinet. This architecture is based on a Hub & Spoke topology, using FortiGate firewall from OCI Marketplace. I actually deployed it while working on one of my projects.


For details of the architecture, see Set up a hub-and-spoke network topology.


The repository


You will find this terraform config under the main oci-fortinet github repository. But not in the root directory.


The Errors


At the time of writing this, the errors were still not fixed despite opening issues and sharing the fix. You can see that the last commit goes back to 2 years. You will need to clone the repo and cd to the drg-ha-use-case subdirectory 

$ git clone https://github.com/oracle-quickstart/oci-fortinet.git

$ cd use-cae/drg—ha-use-case

$ terraform init


1.  Data source error in Regions with unique AD


You will face this issue on a region with only one availability domain (i.e ca-toronto-1) as the data source of the availability domain will fail the terraform execution plan.


CAUSE:  See issue #8 

  • In the above error terraform complains about the availability data source having only one element

  • This impacts 2 of the “oci_core_instance resource” blocks (2 web-vms, 2 db-vms).

  •  Problem? 

    • count.index for the data source block will always be equal 0 on single AD regions (1 element).
      See data_source.tf line 8-10. This configuration hasn’t been tested in single AD regions.

      $ vi data_source.tf

      # ------ Get list of availability domains
      8 data "oci_identity_availability_domains" "ADs" { 9  compartment_id = var.tenancy_ocid 10 }


  • Reason:

    • In terraform the count.index always starts at 0, if you have a resource with a count of 4, the count.index object will be 0, 1, 2, and 3.

    • Let’s take for example the "web-vms" oci_core_instance block in compute.tf > line 235

    • If we run the condition:
      - The variable availability_domaine_name is empty
      - The ads data source length = 1 element. That means that the AD name will be equal to
      ads data_source collection with an index value of [0+1] =

    • data…ads.availability_domains[1] doesn’t exist as it only contains 1 element
       

Solution 

Complete the full availability domain conditional expression on line 235 and line 276 (web-vms/db-vms)

  • Add the case where data source ads.availability_domains has 1 element (the region has one AD only)


Bad logic 

Seeking the name of the count.index+1 availability domain is still wrong when the region has more than 1 AD

  • Example: say you want to create 3 vms and your region has 2 Availability domains >1 .

    • The first iteration [0] will set count.index+1 = 1 ( 2nd data source element = AD2) 

    • Then the second iteration sets a count.index+1 = 2 ( 3rd data source element=AD3)

    • The 2nd and 3rd iteration will always fail because there’s only 2 ADs (index list [0,1]).


2. Wrong compartment argument in the security list data sources


Another issue you will run into is a failure to deploy subnets due to data source collection being empty (no element).


CAUSE:  See issue #9 

  • In the above error terraform complains that {allow_all_security} data source is empty

    • This impacts all fortigate subnets blocks in the config as they all share the same security lists.

Reason:

  • In this configuration there are 2 compartments , one for compute and another for network resources

  • If you take a look at  "allow_all_security"  block in datasource.tf > line 64-to-74

  • You’ll notice a wrong compartment ID in the security lists data source (compute instead of network)


    Solution 
     

    This was a silly mistake, but took me a day to figure out while delving through a pile of new terraform files.

    All you need to do is replace the compute compartment variable by var.network_compartment_ocid

    Edit network.tf line 64-74

    # ------ Get the Allow All Security Lists for Subnets in Firewall VCN

    data
    "oci_core_security_lists" "allow_all_security" {
      compartment_id = var.network_compartment_ocid    <--- // CORRECT Compartment
      vcn_id         = local.use_existing_network ? var.vcn_id: oci_core_vcn.hub.0.id
    ...


    3. More code inconsistencies


    I wasn’t done debugging as I found other misplaced compartment variables in some vnic attachments data sources

    • See datasource.tf : line 103-115 &118-130, you need to replace them by var.compute_compartment_ocid 


    Conclusion & recommendations

    • This type of undetected code issues ,is why I never trust the first deployment in Resource Manager.
      In order to avoid problems in the future, especially if you decide to migrate out of RM at some point, I suggest the following workflow:

      1. Run locally and validate any code bug

      2. Run on Resource Manager

      3. Store to git repo (blue print with eventual versioning)

    • I hope this was helpful as the issues I opened are still unsolved for over a year in their GitHub repo.  


    Sunday, November 5, 2023

    Terraform for dummies part 6: Deploy a static website on Alibaba Cloud

    image


    Intro

    3 years ago, I started the terraform for dummies series where I wanted to deploy a static website in any cloud provider there was (the dummy in question was me duh:)). But the mistake most of us make is to think AWS, Azure, GCP, Oracle Cloud are the only Hyperscalers out there.


    Wrong
    !
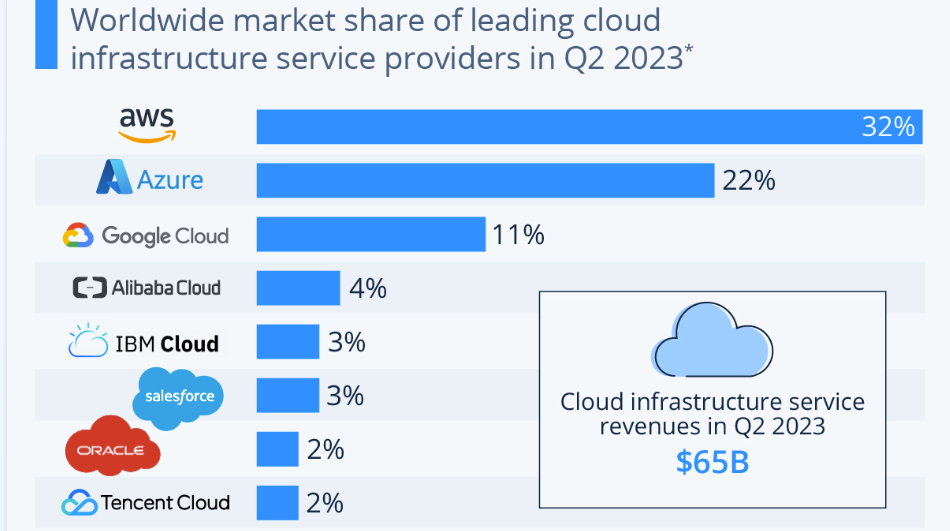
    Alibaba Cloud market share even stole GCP’s 3rd place in 2021 (9.5% or $8.7 Billion). It has also moved from "Niche Players" to the "Visionaries" quadrant since in the
    Gartner Cloud infrastructure report.


    You can learn more about AliCloud services, on my previous post > Intro to Alibaba Cloud


    In this 6th tutorial (as done for
    AWS/Azure/GCP/OCI), we will deploy a webserver with a custom homepage.
    We’ll cover 2 deployments (VPC + Instance) before ending with some thoughts on AliCloud experience/challenges.
     

    Here’s a direct link to my GitHub repo linked to this lab => terraform-examples/terraform-provider-alicloud

    Content :
    I. Terraform setup
    IV. Partial deployment (VPC)
     V. Full deployment (instance)
    Alibaba Cloud experience (hits and misses)


    Overview

    Topology

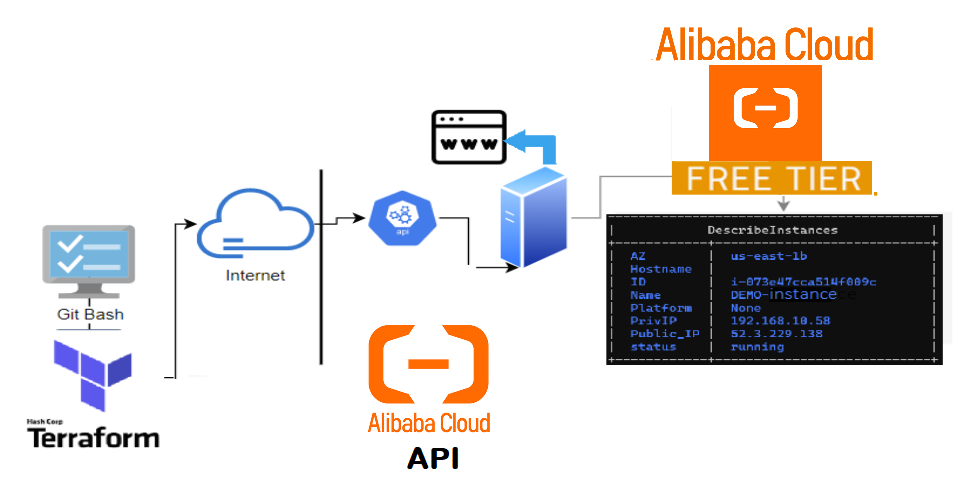
    The below shows the layers involved between your workstation and AliCloud while provisioning through terraform.

  • Where do I find a good AliCLoud deployment sample?
  • You can either check the AliCloud registry, their GitgHub examples, or create a resource from the console then use the terraform import function to generate the deployment in HCL format (vpc,instance,subnet,etc..) based on their id.

    Example for a VPC >>

    1- Create a shell resource declaration for the vpc ina  file called vpc.tf

    2- Get the id of the VPC resource from your AliCloud Console

    3- Run the Terraform import then Terraform show to load the vpc’s full declaration on the same file (vpc.tf)

    4- Now you can remove the id and all non required attributes to create a vpc resource

    1- $ vi vpc.tf 

      provider "alicloud" {     region = "us-east-1"    }
      resource "alicloud_vpc" "terra_vpc" {
    }
    2- $ terraform import alicloud_vpc.terra_vpc vpc-0xio5hkexl4c43jpqw5yw
    3- $ terraform show -no-color > vpc.tf

    Terraform lab content

    • VPC Deployment:To grasp the basics of a single network resource deployment.

    • Instance Deployment: includes the instance provisioning (with above vpc) with a nginx web sever.


    I.Terraform setup


    Windows: Download and run the installer from their website (32-bit ,64-bit)

    Linux Download, unzip and move the binary to the local bin directory

    $ wget https://releases.hashicorp.com/terraform/1.0.3/terraform_1.0.3_linux_amd64.zip
    $ unzip terraform_1.0.3_linux_amd64.zip
    $ mv terraform /usr/local/bin/
    $ terraform --version Terraform v1.0.3

    AliCloud authentication

    Same as AWS, you will need to provide both access_key_id & secret_access_key. This can be done by Including them within environment variables (TF_VAR_*) or using terraform.tfvars

    Assumptions

    I’ll assume either of the two above options are present/configured in your workstation:
  • Example: using environment variables
    EXPORT TF_VAR_access_key = "<my_access_key_id>"  
    EXPORT TF_VAR_secret_key = "<my_secret_key>"
  • I’ll also assume you have an ssh key pair to attach to your ecs instance. If not, here is a handy command   

    $  ssh-keygen -P "" -t rsa -b 2048 -m pem -f ~/.ssh/id_rsa_ali
    Generating public/private rsa key pair.


    II. Clone the repository

    • Pick an area on your file system to hold the terraform config and issue the following command.

    $ git clone https://github.com/brokedba/terraform-examples.git

    Note: You will find 2 directories inside the repository which will make things easier:  


    III. Provider setup

    Install and setup the alicloud provider for our VPC config

    • Cd Into terraform-provider-ali/create-vpc where our configurations resides

    ubuntu $ cd ~/terraform-examples/terraform-provider-ali/create-vpc 
    • Alicloud provider will be automatically installed by terraform init.

    $ terraform init
      Initializing provider plugins...
      - Finding aliyun/alicloud versions matching "1.211.2"...
      - Downloading plugin for provider "alicloud" (aliyun/alicloud) 1.211.2...
    
    
    $ terraform --version
      Terraform v1.0.3
      + provider.a v1.211.2   ---> the provider is now installed
      
    • Let's see what's in the create-vpc directory (click to see content)

    $ tree
      .
      |-- outputs.tf        ---> displays resources detail after the deploy
      |-- variables.tf      ---> Resource variables needed for the deploy   
      |-- vpc.tf            ---> Our vpc terraform declaration
    |—- terraform.tfvars ---> Our authentication variables to alicloud

    IV. VPC Deployment


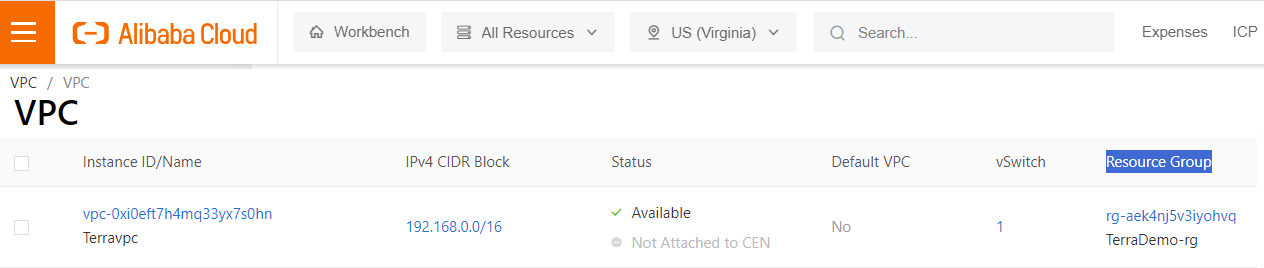
    This will create several components including a resource group, VPC, Vswitch (subnet) and a security group

    • Once the authentication (access_key_id/secret) set, we can run terraform plan

    $ terraform plan
       Refreshing Terraform state in-memory prior to plan... 
      ------------------------------------------------------------------------
      An execution plan has been generated and is shown below.
        Terraform will perform the following actions:
    
    # alicloud_resource_manager_resource_group.rg will be created
    + "alicloud_resource_manager_resource_group" "rg"
    {..}
    # alicloud_security_group.terra_sg will be created
    + resource "alicloud_security_group" "terra_sg" {
    + display_name        = "TerraDemo-rg"
    {..}
    # alicloud_security_group_rule.allow_http_80 will be created + resource "alicloud_security_group_rule" "allow_http_80"
    + cidr_ip           = "0.0.0.0/0"
    + policy            = "accept"
    + port_range        = "80/80"
    {..}
    # alicloud_security_group_rule.allow_http_22 will be created + resource "alicloud_security_group_rule" "allow_http_22"
    {..}
    # alicloud_security_group_rule.allow_http_443 will be created + resource "alicloud_security_group_rule" "allow_http_443"
    {..}
    # alicloud_vpc.terra_vpc will be created
    + resource "alicloud_vpc" "terra_vpc" {
    ...
    + cidr_block             = "192.168.10.0/16"
    ...}
    # alicloud_vswitch.terra_sub will be created
    + resource "alicloud_vswitch" "terra_sub" {
    ...
    + cidr_block             = "192.168.0.0/24"
    ...
    + zone_id              = "us-east-1b"              
        {..}
    Plan: 7 to add, 0 to change, 0 to destroy.

    Note: I deliberately kept only relevant attributes for the VPC resource plan

    • Next, we can finally run terraform deploy to create a resource group , VPC, Vswitch and SG

    $ terraform apply -auto-approve
    alicloud_vpc.terra_vpc: Creating...
    ...
    Apply complete! Resources: 6 added, 0 changed, 0 destroyed.
    Subnet_CIDR = "192.168.10.0/24"
    Subnet_Name = "terrasub"
    vpc_CIDR = "192.168.0.0/16"
    vpc_dedicated_security_group_Name = "terra-sg"
    vpc_dedicated_security_ingress_rules = tolist([
      "allow_https_22:  22/22 , CIDR: 0.0.0.0/0",
      "allow_http_80:   80/80 , CIDR: 0.0.0.0/0",
      "allow_https_443: 443/443 , CIDR: 0.0.0.0/0",
    ])
    vpc_id = "vpc-0xi0eft7h4mq33yx7s0hn"
    vpc_name = "Terravpc"


    Observations:

    When setting security groups, the nic_type parameter must be set to intranet when linked to a VPC, while  registry doc says the default value is internet (this will fire an error).


    Now
    let’s destroy the VPC as the next instance deploy contains the same VPC specs.

    $ terraform destroy -auto-approve
    
    Destroy complete! Resources: 7 destroyed.


    V. Full deployment (Instance)


    Let's launch a full instance deployment from scratch by switching to the second directory
    terraform-provider-alicloud/launch-instance/

    • Here's the content:

    $ tree ./terraform-provider-alicloud/launch-instance
    .
    |-- cloud-init           ---> SubFolder
    |   `--> vm.cloud-config ---> script to config a webserver & add a HomePage
    |-- compute.tf    ---> Instance related terraform configuration
    |-- outputs.tf    ---> displays the resources detail at the end of the deploy
    |-- variables.tf  ---> Resource variables needed for the deploy   
    |-- vpc.tf        ---> same vpc terraform declaration deployed earlier
    

    compute.tf holds the ecs instance block. All the rest comes from the vpc example.
                                                             -- “ Cloud-init subfolder” --
    Cloud-init
    : is a cloud instance initialization method that executes tasks upon instance Startup by providing the user_data entry in the aclicloud_instance resource definition (See below).

    ...variable "user_data" { default = "./cloud-init/vm.cloud-config"} 
    $ vi compute.tf resource "alicloud_instance" "terra_inst" {
    ... user_data                    = filebase64(var.user_data)
    ...    
    • I used cloud-init to install nginx and load an html page that will be the server's HomePage.

    • Make sure you set the path for ssh public key accordingly in the variable (see variables.tf)

    resource "alicloud_key_pair" "terra_key" {

       key_name   = var.key_name
       public_key = file(var.ssh_public_key)}


    LAUNCH THE INSTANCE

    • Cd in “launch-instance” directory, run the init , then plan command to validate the ecs instance info. 

    $ terraform plan
       Refreshing Terraform state in-memory prior to plan... 
      ------------------------------------------------------------------------
      An execution plan has been generated and is shown below.
        Terraform will perform the following actions:
    
      ... # VPC declaration <----------------- (see previous vpc deploy) 
    ...
    # alicloud_resource_manager_resource_group.rg will be created
       + resource "alicloud_resource_manager_resource_group" "rg" {
          + display_name  = "TerraDemo-rg")
    ...}

    # alicloud_instance.terra_inst
    will be created + resource "alicloud_instance" "terra_inst" { + ... + image_id                 = "centos_7_9_uefi_x64_20G_alibase_20230816.vhd"
    + availability_zone        = "us-east-1a"
    + instance_name            = "ecs.c5.large"
    + host_name            = "TerraHost"
    + instance_type            = "ecs.c5.large"
    + key_name                 = "demo_ali_KeyPair"
    + private_ip              = "192.168.10.51"
    + instance_charge_type     = "PostPaid"
    + internet_charge_type     = "PayByTraffic"
    + user_data                = "c8c701575f9c76db131ccf77cf352da……"
    + system_disk_size         = 20
    + stopped_mode             = "StopCharging"
    + ...
    + ...} # alicloud_key_pair.key_pair will be created
      + resource "alicloud_key_pair" "key_pair" {
        {...} ...
      } Plan: 9 to add, 0 to change, 0 to destroy.
    • Let’s launch our instance using terraform apply (I left a map of different OS images in the variables.tf)

    $ terraform apply -auto-approve
    ...
    alicloud_vpc.terra_vpc: Creating...
    alicloud_key_pair.key_pair: Creation complete after 2s [id=demo_ali_KeyPair]
    alicloud_vpc.terra_vpc: Creation complete after 11s [id=vpc-0xiug9rc5utxaj3wl39a4]

    alicloud_security_group.terra_sg: Creation complete after 1s [id=sg-0xiis3c92f51bgmybx4c]
    alicloud_vswitch.terra_sub: Creation complete after 7s [id=vsw-0xi6lj5g2hvlaleytf54a]
    alicloud_instance.terra_inst: Creating... [10s elapsed] alicloud_instance.terra_inst: Creating... 17s [id=i-0xi6p7buqfj6902i8ul5]
    ... Apply complete! Resources: 9 added, 0 changed, 0 destroyed. Outputs: ...
    vpc_Name = Terravpc
    vpc_CIDR = 192.168.0.0/16
    Subnet_CIDR = 192.168.10.0/24
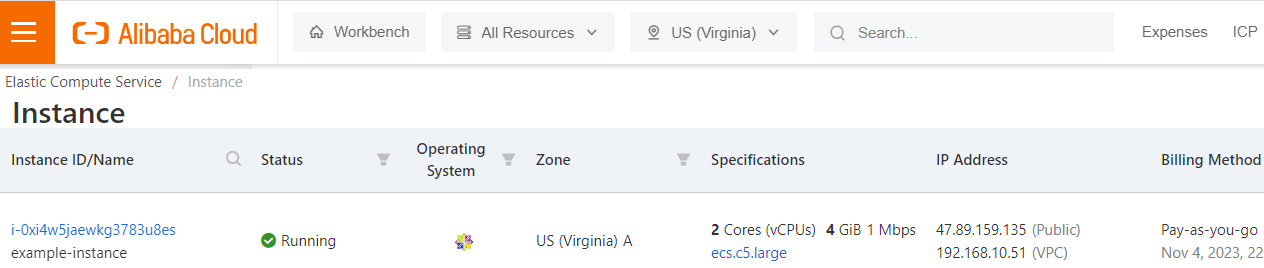
    private_ip = "192.168.10.51" public_ip = "47.89.159.135"
    vpc_dedicated_security_ingress_rules = [
      "allow_https_80 :  80/80 , CIDR: 0.0.0.0/0",
      "allow_https_443:  443/443 , CIDR: 0.0.0.0/0",
      "allow_https_22:  22/22 , CIDR: 0.0.0.0/0",
    ]
    SSH_Connection = ssh connection to instance TerraCompute ==> ssh -i ~/id_rsa_ali root@47.89.159.135

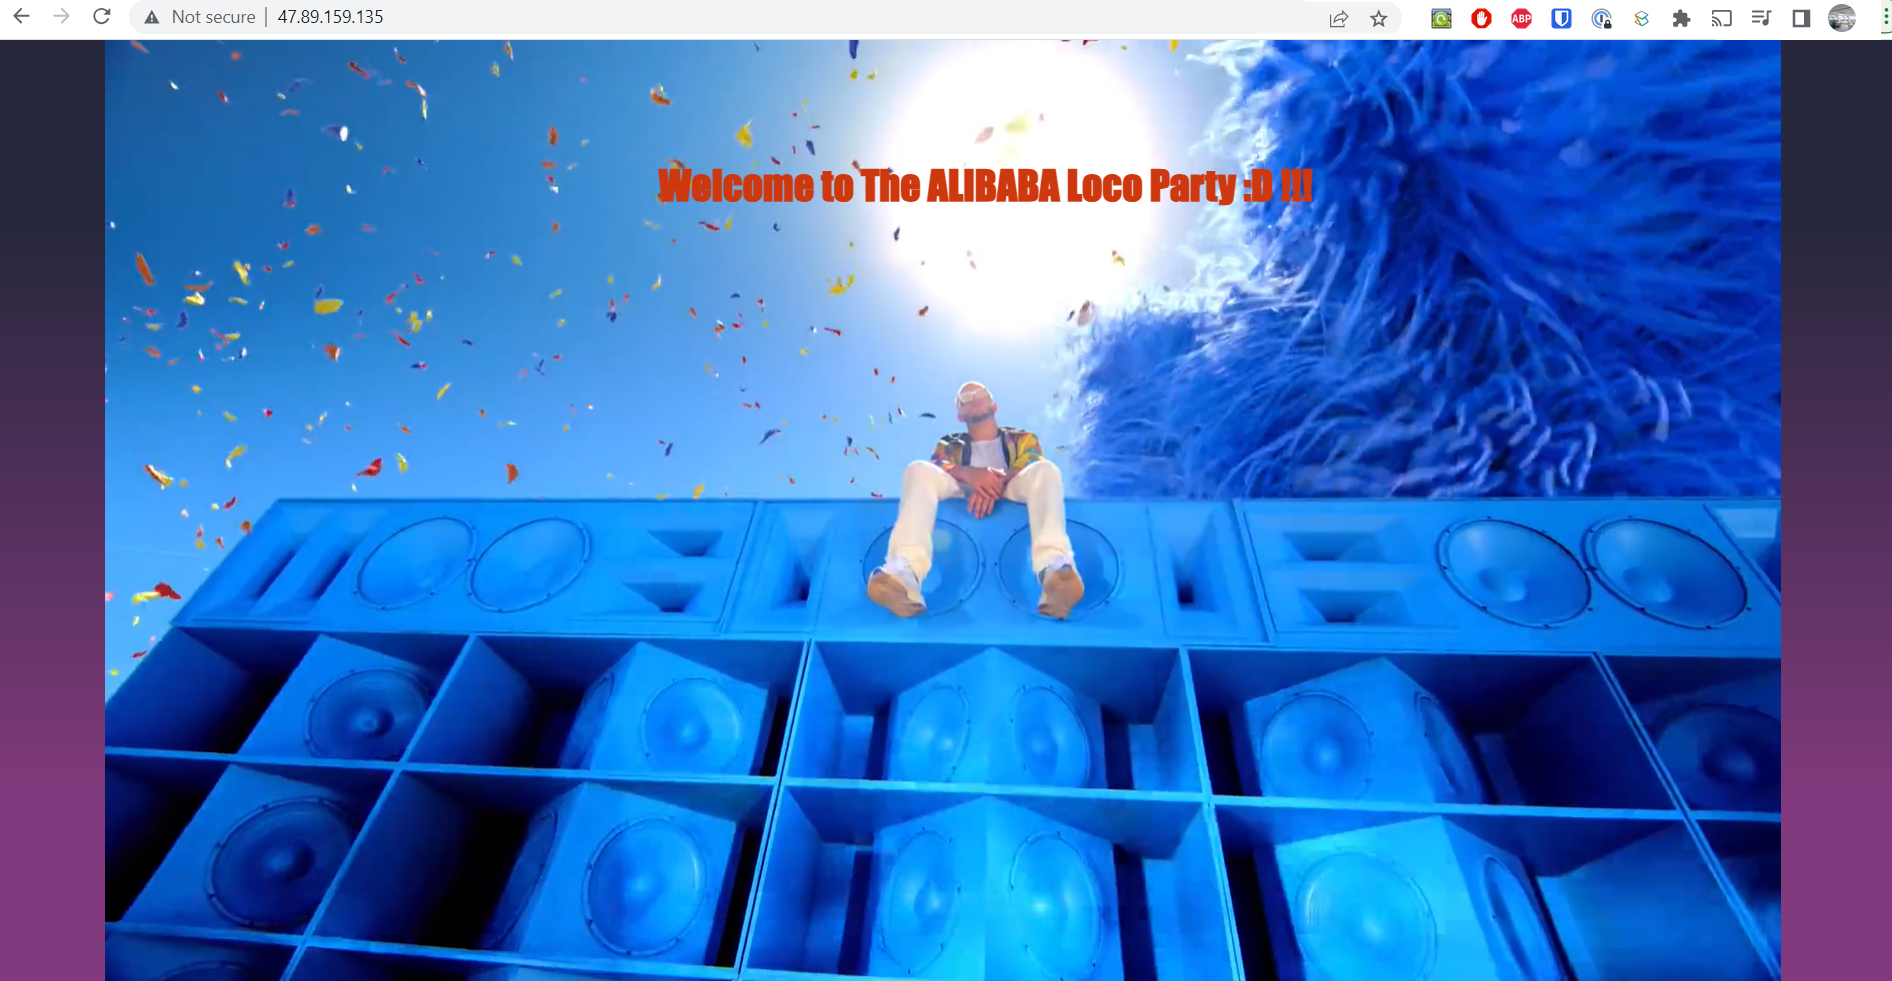
    • Once the instance is provisioned, juts hit the public IP address in your browser and Voila!

    • Here I just embedded a video clip into the webpage but you can adapt the cloud-init file to your own liking.

    • You can also tear down this configuration with a terraform destroy


    Tips

    •  You can fetch any of the specified attributes in outputs.tf  using terraform output command i.e: 

      $ terraform output SSH_Connection
      ssh connection to instance TerraCompute ==> ssh -i ~/.ssh/id_rsa_ali root@47.89.159.135
    • Sometimes an instance type is not available in the specified region/AZ, you’d have to switch the zones 

      $ terraform apply
      Error: [ERROR]
      │    StatusCode: 403
      │    Code: Zone.NotOnSale
      │  Message: code: 403, The resource in the specified zone is no longer available
      for sale
      ------------>fix: switch from us-east-1b to us-east-b

    Alibaba Cloud Hits and Misses

       
         Pros

      • I was really impressed by the speed at which the compute instances were spun (17seconds)

      • No brainer for  those who have the majority of their business and customers in south Asian region

      • High availability option in China regions is insane.i.e Beijing region has a whooping 12 Availability zones

      • Different billing types like Prepaid/Postpaid, By traffic/By Bandwidth, even via Paypal.


        Cons

      • AliCloud lacks popularity & support in the community (fewer blogs/articles) or maybe most of it is Chinese.

      • It can be a headache to find Zones supporting the service you want to deploy especially out of Asia.

      • The learning curve is a bit stiff once you go beyond the simple sandbox, The doc alone won’t cut it. 

      • Customers Should Choose Regions, Zones out of choice not because it’s the only one that’s not sold out. 

      • There is no way to extract a Zone id based on it’s region in the alicloud_zones Data block:


         CONCLUSION

      • We just demonstrated how to quickly deploy an instance using terraform in AliCloud 

      •  Alibaba Cloud presents impressive strengths, especially for businesses operating in specific regions

      • However, it does come with challenges, such as limited global community support &potential complexities.

      • This is probably the last chapter of this Series unless I decide to add Kubenetes to the party
                                                                                Time will tell :)

      Thank you for reading!

      Wednesday, August 16, 2023

      Optimizing GitHub Workflows: How to Auto cleanup your cache after use


      Intro


      In the CI/CD space, every second counts like in an F1 race. That's where GitHub Actions cache comes in. Caching is like a pit stop for your code – it saves precious time by providing pre-loaded resources to speed up pipeline execution by storing and reusing previously downloaded dependencies.


      However, cache use especially in public repositories might be risky and prone to malicious intrusion. Therefore you need to shield yourself against any potential vulnerabilities and  cache attacks. In this blog post, we’ll optimize GitHub cache across different workflow jobs, but cleanup things as soon as we’re done.


      Caching vulnerabilities in public Repos


      When it comes to caching in a public repository (with s
      ecrets), running workflows can become a dangerous practice. Here's why:

      • Exposure to Unauthorized Access Anyone with read access can create a pull request and access the sensitive data within a public repo cache.

      • Forks of a repository can also create PRs on the base branch and access caches on the base branch.

      • Data Exfiltration Hackers can exploit the cached secrets to gain unauthorized access to your systems

      • No Encryption Caches are not encrypted by default, making stored secrets easily readable if discovered

      • Inadvertent Exposure Devs might accidentally push sensitive data to a public repo without realizing it.

      • Cache poisoning A malicious tool used in a test workflow can poison its cache. Later, another workflow using the same cache might be affected, read more in this github-cache-poisoning article.


      It is even worse for artifacts as there’s literally a download button accessible to anyone in the internet 


      Remediation


      There are essential security best practices to minimize this risk, but today, I'll focus on only one from the list below.

      • Secret Management Tools: Use secret management tools provided by Vault, AWS Secrets Manager etc.

      • Use OIDC: See my previous blog post (OIDC in GitHub actions)

      • Private Repositories: Not always possible(OSS projects), but helps limit access to authorized users only.

      • Encryption: ensure strong encryption of the cached data

      • Don't store any sensitive information in the cache

      • Temporary Caching: If you need to use caching for performance optimization, ensure that it's temporary and short-lived.


      Demo: Instant Cache cleanup

      Broom Icon

      As mentioned earlier, one solution for minimizing the attack surface involves regularly clearing the cache to prevent long-term exposure. The following example will demonstrate exactly that using cache action and GitHub CLI. 


      Cache Retention in GitHub

      • GitHub Cache default retention is 7 days for caches that have not been accessed.

      • There is no cache number limit, but the total size of all caches in a repository is limited to 10 GB.

      • The artifacts & workflow log files on the other hand are usually retained for 90 days before auto deletion.

      Cache action

      We’ll be using a cache action called actions/cache@v3 that has 3 main parameters:

      • path: A list of files, directories, and wildcard patterns to cache and restore

      • key: An explicit key for a cache entry

      • restore-key: A list of prefix-matched keys to use for restoring stale cache if no cache hit occurred for key.


                                                    PREREQUISITES
       

      • A repository

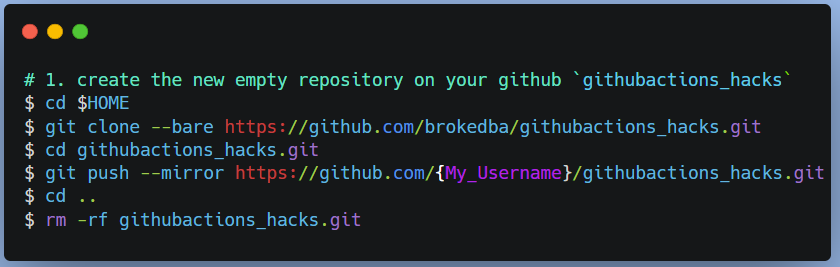
        Example   Repo: brokedba/githubactions_hacks  Branch: git_actions
        You can clone my repo and reload it into your GitHub but remember to add the environment & branch.

      • An environment
        Name: lab_tests , with deployment branch set to `selected branch`: i.e git_actions 

      • A workflow

            You can download test_cache_cleanup.yml under .github/workflows.

                       
      • The common workflow and jobs declaration

      • Trigger event: push     Target branch: git_actions

      • paths: our yaml workflow test_cache_cleanup.yml

      # “test_cache_cleanup.yml

      name: 'My_Cache_cleanup_Workflow'
      on:
        push: <------ Trigger
          branches: [ "git_actions" ]
          paths:
            - '.github/workflows/test_cache_cleanup.yml'  <--- File 

      jobs:
        terraform_setup_cache_load:
         
      runs-on: ubuntu-latest
         
      environment: test-labs <--- Environment linked to git_action branch
      snipet ...

      • Initial steps: checkout the repo and install a specific version of terraform (1.0.3)

         steps:  
          # 1. Checkout the repository to the GitHub Actions runner
          - name: Checkout
            uses: actions/checkout@v3 
         

      # 2. Install the latest version of Terraform CLI
           - name: Setup Terraform
      uses: hashicorp/setup-terraform@v1
             with:
      terraform_version: 1.0.3
              terraform_wrapper: false
       

      • Prepare the dependencies directory (for the terraform provider files)

      • Note: My repo has 0 terraform config file, but we’ll assume we ran terraform init (see section #4.)

      # 3. Create a cache for the terraform plugin and copy terraform binary
      - name: Config Terraform plugin cache
      run: |
      echo 'plugin_cache_dir="$HOME/.terraform.d/plugin-cache"' >~/.terraformrc
      mkdir --parents ~/.terraform.d/plugin-cache
      terraform -v
      terra_bin=`which terraform`
      cp $terra_bin . <------ copy terraform binary to local directory


      # 4. Perform remaining steps ...example terraform init before caching.
      # - name: terraform init

      #   run: |
      # Initialize the Terraform directory(creating initial files, load modules etc.)
      #  example: terraform init ...


      snipet ...

      • Cache all dependencies (terraform 1.0.3 binary + provider plugin)

        • Cache key includes github.run_id which is a unique ID for our workflow run

        • Restore-keys will use the same pattern  i.e: “Linux-terraform-5868971041

      # ###################################
      # Save directory files into our cache
      # ###################################
         
      #  Save all plugin files and working Directory in a cache
          - name: Cache Terraform
      uses: actions/cache@v3
      with:
      path: |
                ~/.terraform.d/plugin-cache
                ./*
      key: ${{ runner.os }}-terraform-${{ github.run_id }} <---- Our unique Cache Key
      restore-keys: |
                key: ${{ runner.os }}-terraform-${{ github.run_id }}                

      • Now time to restore the cache in another job (runner), avoiding repo checkout, terraform install and initialization.

      # ###################################
      # JOB 2 : terraform Plan
      # ###################################
         

      Terraform_Plan:
      name: 'Terraform Plan'
          runs-on: ubuntu-latest
          environment: test-labs <--- Environment linked to git_action branch
      : write-all : [] <---- dependency on the previous job successpermissions
      needsterraform_setup_cache_load


      # Use default shell   
      defaults:     
      run:
             shell: bash

      steps:

      # ######################################
      # Restore directory files from the cache
      # ######################################
       

      # 1. Restore all plugin files, tf binaries,and working directory in a cache

          - name: Cache Terraform
      uses:
      actions/cache@v3
      with:
      path: |
                ~/.terraform.d/plugin-cache
                ./*
      key:
      ${{ runner.os }}-terraform-${{ github.run_id }}
      restore-keys: |
                key:
      ${{ runner.os }}-terraform-${{ github.run_id }} <-- Our restore Cache Key

      • Right after that, we can run additional steps like terraform plan

      # 2. Configure terraform in the new runner reusing the cache.
          -
      name: Config Terraform plugin cache
      run: |
              echo 'plugin_cache_dir="$HOME/.terraform.d/plugin-cache"' >
      ~/.terraformrc
      # terraform Init not needed here. provider files already in the cache

      # 3. Execute terraform PLAN   
          - name: Terraform Plan
      run: |
             
      echo "== Reusing cached version of terraform binary 1.0.3 =="
              sudo cp
      ./terraform  /usr/local/bin/
              terraform -v     
      # example:
      terraform plan
      -input=false -no-color -out tf.plan

      • Finally, we clean up our cache when done with our workflow using GitHub CLI (cache deletion requires a token with write permission)

      • That's all there is, I chose gh-action over rest API list/delete with our unique key. now let's see logs


      Workflow Execution result


      • The cache is visible for a short period during the execution
                 

      • But at the end, we can see the listed available caches and the matching cache being deleted.
         

      Artifact vs. Caching

      First Both are similar concepts to speed up the execution of CI/CD pipelines but each serve a slightly different purpose.

      Caching

      • Involves storing intermediate results or dependencies and commonly reused files from previous jobs runs.

      • When your workflow/job runs again, it quickly retrieves the stored items instead of recreating them.

      • This greatly speeds up the execution time of the pipeline, the same operations are performed only once.

      • It’s ideal for components such as libraries, dependencies, or intermediate build outputs. It's like keeping your tools on standby, so you don't need to fetch them every time you work on a task.

      • GitHub does not allow modifications once entries are pushed – cache entries are read-only records.

      Artefacts

      • Allow you to share data between running jobs and save them after the workflow is complete.

      • An artifact is a file or collection of files produced during a workflow run.

      • Example: docker image that is built early in the CI workflow but required to be pushed/run in a later stage.


          Screenshot of the

      Difference

      • Caching is used to re-use non-changing files between jobs/workflows like sharing build dependencies.

      • Artifacts are used to save files after workflow ended such as Logs, manifest, statefile, built binaries etc.

      Conclusion:

      • Caching optimizes workflows, but you should ensure they don't become targets for malicious actors.

      • We concentrated on instant GitHub cache cleanup today as one way to mitigate security vulnerabilities.

      • GitHub CLI is the ideal tool that streamlines cache cleanup directly from within your workflow.

      • Strategic setup and cleanup sustain a secure workflow (i.e Regularly clearing GitHub caches) 

      • Next, I will implement these tips in OIDC based .

      Stay tuned