Monday, October 30, 2023

Terraform pipelines for dummies part1: Run a terraform configuration in GitLabCI

Intro

Automating infrastructure provisioning with Terraform is nothing for many, but to truly harness IaC power, seamless integration with CI/CD pipelines is key. In this guide, we'll walk you through the process of setting up and running your Terraform configurations within GitLab CI from an GitHub imported repo. This powerful combination not only ensures consistent deployments but also brings version-controlled infrastructure management to the forefront of your development workflow. down pointing left hand index (brown)This is the first topic of my terraform pipelines for dummies series that covers pipelined deployments in GitLab, GitHub Actions, AzureDevOps, AWS Catalyst and GCP Cloud build. A beautiful excuse to learn CI/CD for Infra bros while having fun. 


I. Importing a GitHub Repo to GitLab


If you have your source repo stored in GitHub (i.e github.com/brokedba/terraform-examples )
There are two ways to do it :

  • Option1: Import from GitHub using GitLab UI 

  • In your GitLab portal, click new project and select “import project” option

  • Once you select the import project option, hit "Repository by URL" and fill the source/target repo details 

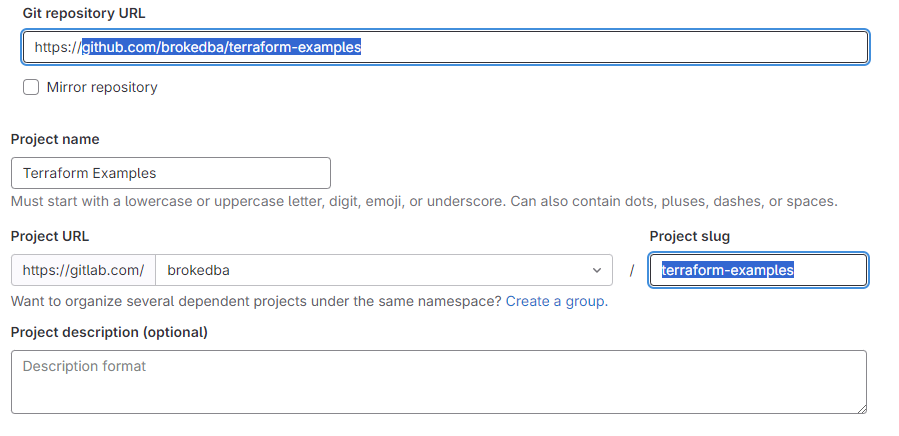
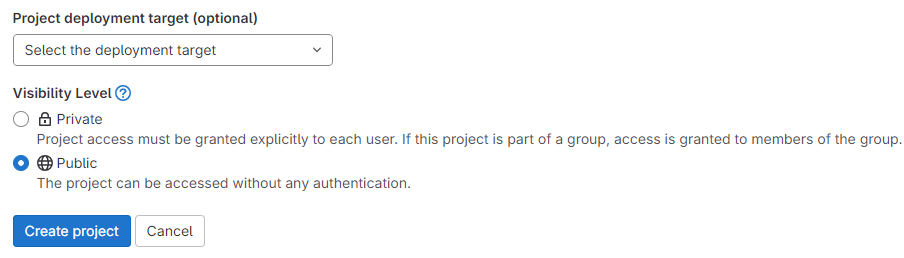
  • Choose the visibility of the imported project (repo),  and hit create project.


                    Note
You could also import the repo by authorizing GitLab to access your GitHub in one click


  • Option2: Import using git CLI
    1. Clone the GitHub repository on your shell

      $ git clone https://github.com/brokedba/terraform-examples.git
    2. Add an ssh public key to your Gitlab under GitHub Profile> preference>SSH Key

    3. Test your connection with your Gitlab from your terminal by specifying the SSH private key

      brokedba@brokdba:~$ ssh -i ~/.ssh/id_rsa_gitlab -T git@gitlab.com
      Welcome to GitLab, @brokedba!
    4. Create a New GitLab Project in GitLab GUI same as the git repo name “terraform-examples

    5. Add GitLab as a Remote repo: adjust the below with your GitLab Namespace 

      $ cd terraform-examples
      $ git remote add origin git@gitlab.com/{Namespace}/terraform-examples.git
    6. Push to GitLab: this will ask for your Gitlab Credentials

      $ GIT_SSH_COMMAND="ssh -i ~/.ssh/id_rsa_gitlab" git push -u origin main
      remote: Resolving deltas: 100% (733/733), done.
      To git@gitlab.com:brokedba/terraform-examples.git
      * [new branch]      main -> main
      Branch main set up to track remote branch main from origin.


II. CI/CD pipeline Authentication Variables


Now that our repo is imported we’ll set the necessary variables for our terraform pipeline.
Our target platform will be Oracle Cloud.

  1. Under the Project,  Click  Settings > CI/CD > Variables > Expand > Add Variable.

  2. Under "Variables", click "Expand" and add your the Authentication variables


For our deployment we’ll need to set below variables. GitLab equivalent for secrets is masked variables 

  • TF_VAR_tenancy_ocid :  Masked

  • TF_VAR_private_key_path: Masked

  • TF_VAR_fingerprint: Masked

  • TF_VAR_user_ocid: Masked

  • TF_VAR_compartment_ocid:  Masked (where to create the resource )

  • TF_VAR_region

  • TF_VAR_ssh_public_key: variable of type file, for the vm to be deployed (to contain long text)

  • TF_VAR_gitlab_access_token: this token authorizes runners to interact with GitLab. Unlike GitHub, where authentication is automatic through GITHUB_TOKEN, GitLab requires manual setup.

III. Creating the Terraform pipeline in GitHub


The GitLab CI/CD pipeline config is controlled by a .gitlab-ci.yml file, similar to GitHub Workflow.


Description of the GitLab-ci content


Each gitlab-ci template allows the abstraction of actions depending on its type. In our case base.gitlab.ci extends all terraform workflow stages. This is different than GitHub actions, with shorter code footprint . \  

  • 1) Generic section contains the include which loads templates and the variables

TF_ROOT represents the working directory where our terraform config files reside in my repo.
I many deployments, but the variable can take any subdirectory I want (i.e launch-instance).
Note: the SAST template in the picture was removed later from my include please do the same.       

  • 2) Terraform workflow section where our terraform deployment tasks are performed (init, plan, deploy)


    After we declared the stage names and defined the same in a sequence as described below.

    1. fmtfor formatting the Terraform config.

    2. validate – validation of code.

    3. build – run terraform plan

    4. deploy – executes terraform apply command. Then save the state file as an artifact

    5. cleanupload the artifact (state file) and  destroy the resource. 

            Each stage uses the keyword “extends” with .terraform:*  that references a function in the template

    VI. Executing the Terraform pipeline


      Now that we have both the project (repo), the variables, and the pipeline defined let’s run it and monitor the workflow.

    • Go to your project> build > Pipeline and click Run Pipeline

    • DEPLOY: Both validate & build (tf plan) stages are now done, the pipeline waits for a manual deploy

            • Once run, you can check the logs while our web server is being deployed in Oracle Cloud platform

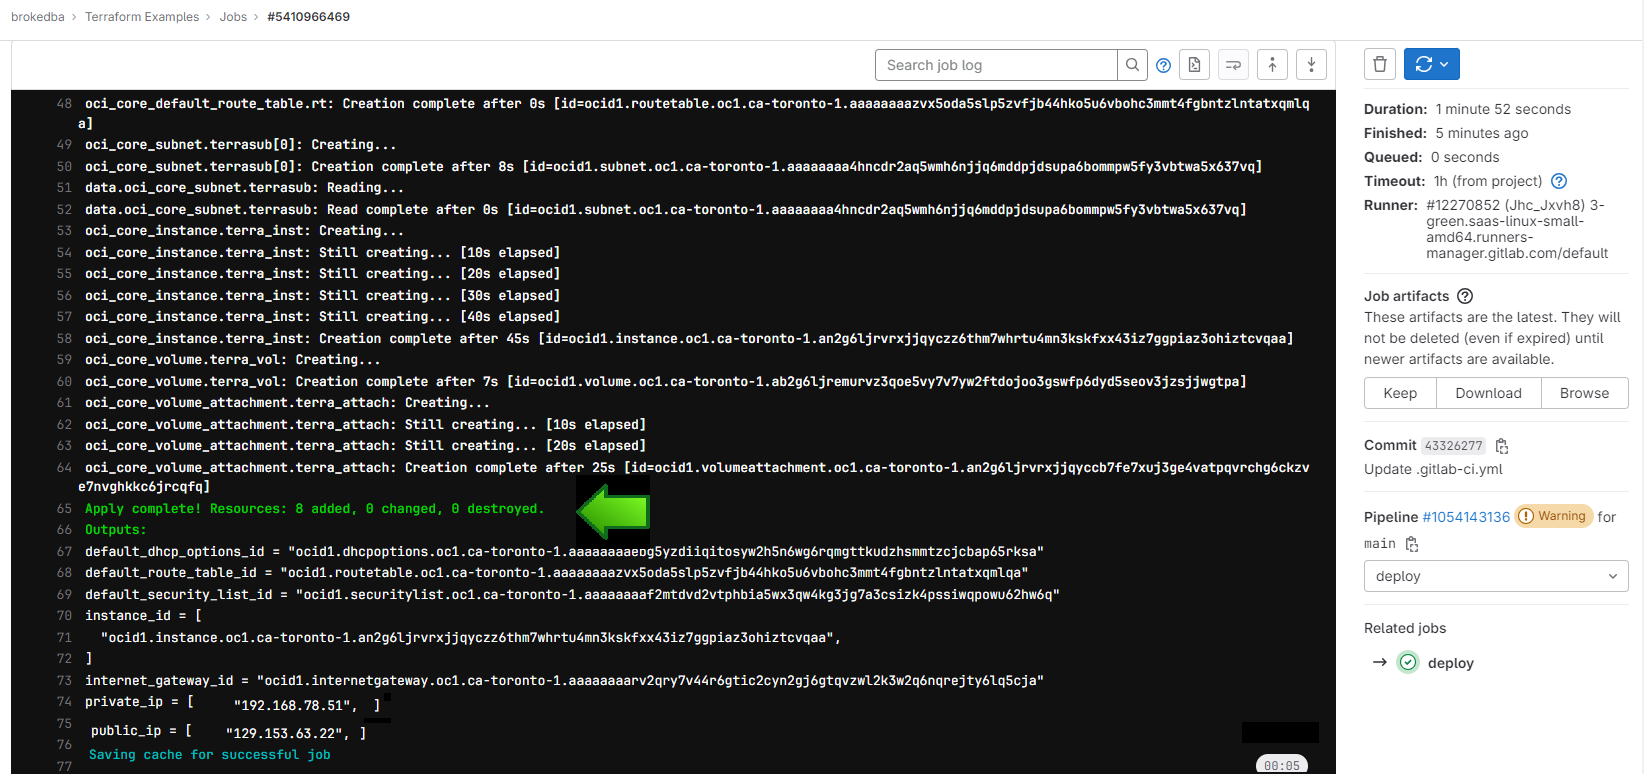
            • If we check the console, we’ll see that the webserver is now up and running, ready to take requests

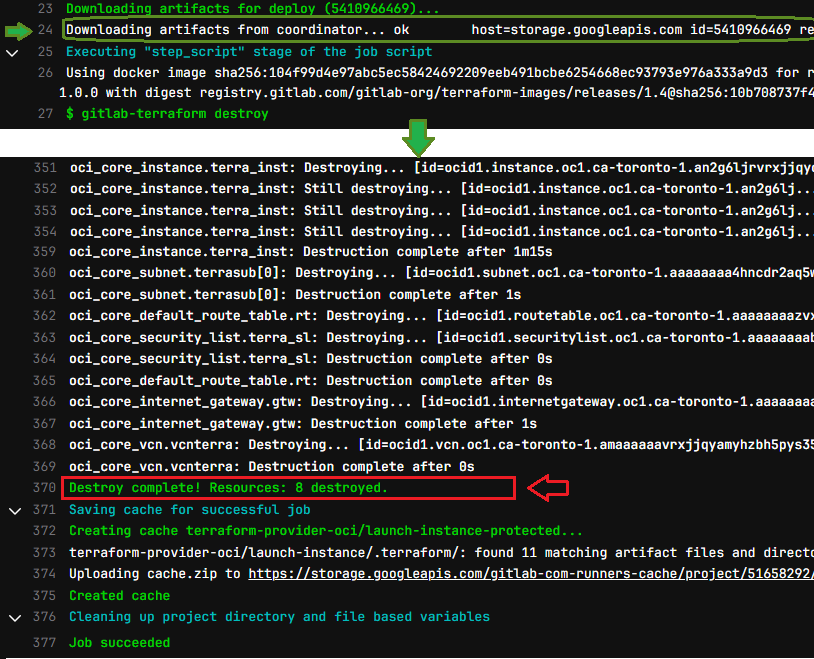
            • DESTROY: After a successful deploy, all looks good, we can now cleanup by tearing down our resources

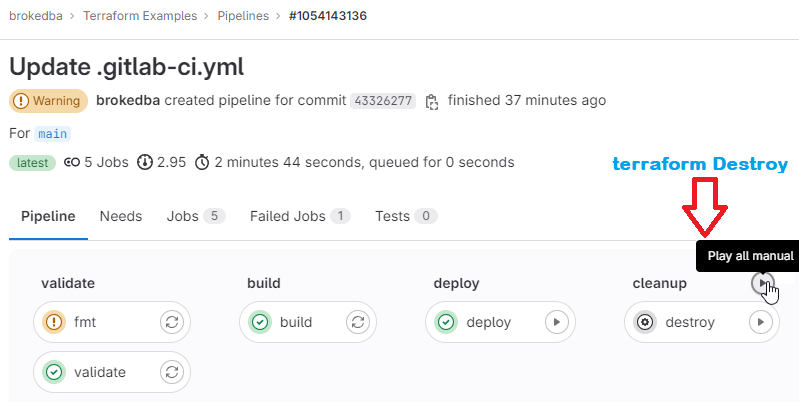
            • Notice how the cleanup job reused the state file, loaded from the artifact to destroy the webserver


            Final pipeline status

            Once complete we can see the status and the time it took to finish the pipeline (fmt had just a minor warning) 


            V. GitLab Experience "Hits and Misses"


            There are pros and tread offs about using GitLab over GitHub actions , here’s few to consider 

            Pros

            • GitLab is Open source but still more secure than GitHub.

            • I love how GitLab allows to pause a pipeline stage using the manual job option that GitHub doesn’t have. 

            • GitLab has lot of templates available for different frameworks unlike GitHub actions 3rd-party marketplace

            • GitLab CI offers better reporting and auditing capabilities, for tracking/analyzing workflow performance.

            • Full of other features: child pipelines, dynamic pipeline generation, very flexible conditionals, composable pipeline definitions, security, merge trains, code review.

            Cons

            • GitLab lacks GitHub’s massive popularity/support in the community (fewer blogs/StackOverflow posts).

            • GitLab supports only one CI workflow file (gitlab-ci.yaml) per repository, whereas GitHub allows multiple.

            • GitLab UI lacks Auto-refresh of the pipeline/job status forcing you to refresh the browser unlike in GitHub.


            Conclusion:

            • We just showed a simple pipeline automating the whole workflow of a terraform deployment in OCI.

            • We also leveraged GitLab's unique manual job option for pausing pipeline stages which is rare elsewhere.

            • GitLab's singular approach relies on a rich built-in template library instead of a public Market place.

            • I tried to share few bits in terms of experience but there are tons of articles comparing GitLab&GitHub.

            • My demo didn’t cover event triggers via rules(CI_PIPELINE_SOURCE), but you can learn more here.

            • I also used artifacts to save a state file but it’s recommended to use GitLab managed remote state instead

            • Hope this helps , Next I’ll dive into GitHub Actions terraform Multicloud pipelines using OIDC.


            Stay tuned


            Thursday, October 19, 2023

            Farewell to ClickOps: OCI CLI seamless Data Guard Replication for ExaC@C


            Intro

            Since the very beginning, everyone got introduced to  Cloud services through the console as it’s very quick. But the cloud CLI tooling provides a stronger, yet user-friendly way to automate tasks, often covering features not even available in the console. Moreover, DBAs often assume that the CLI is primarily designed for managing compute-based services, overlooking its potential benefits for their database fleet. In this tutorial, we'll demonstrate how to automate the Data Guard association of your database between two Exadata Cloud at Customer infrastructures in separate regions.
            On top of it, I’ll show you where to look and the type of logs that are generated if you need to troubleshoot.


            Using the API to Enable Data Guard on ExaC@C

            REST API Endpoint
            Obviously, Rest APIs provided by the Cloud platform is the core vehicle that allows anything (infrastructure resource, or cloud services) to be created, deleted or managed.
            This why the best thing to explore a new feature is to check the REST API Endpoint.
            In our case the endpoint is
            CreateDataGuardAssociation

            POST /20160918/databases/{databaseId}/dataGuardAssociations

            You can check more details here CreateDataGuardAssociationDetails 


            API method for a Data guard association using existing cluster


            Below is the configuration details for creating a Data Guard association for a ExaCC Vmcluster database


            The attributes are as below


            API Attributes
            Attributes Required Description Value
            creationType Yes Other Options: WithNewDbSystem, ExistingDbSystem ExistingVmCluster
            databaseAdminPassword Yes The admin password and the TDE password must be the same.
            isActiveDataGuardEnabled No True if active Data Guard is enabled. True
            peerDbUniqueName No
          • DB_UNIQUE_NAME of peer DB to be created.
          • Unique across the fleet/tenancy
          • Defaults to
            <db_name>_<3 char>_<region-name>.
            peerSidPrefix No DB SID prefix to be created. unique in the VM cluster
            instance # is auto appended to the SID prefix
            protectionMode Yes MAXIMUM_AVAILABILITY
            MAXIMUM_PERFORMANCE
            MAXIMUM_PROTECTION
            MAXIMUM_PERFORMANCE
            transportType Yes SYNC
            ASYNC
            FASTSYNC
            ASYNC
            peerDbHomeId No Supply this value to create standby DB with an existing DB home
            databaseSoftwareImageId No The database software image OCID


            API request Examples


            Here is a basic API call example for Database system which slightly differs from the Exadata Cloud implantation.


            Response Body


            The response body will contain a single DataGuardAssociation resource.


            Using OCI CLI to Enable Data Guard on ExaCC

            Now that we’ve explored REST API structure, we can move to a practical example using OCI CLI. Both Exada Cloud@Customer (Edge DB service) are located in different regions in Canada in 2 DataCenters.   

            Usage

            $ oci db data-guard-association create from-existing-vm-cluster [OPTIONS]

            Generate a sample json file to be used with this command option.

            The best way to leverage OCI CLI with a complex structure is to generate a full command JSON construct. 

            # oci db data-guard-association create from-existing-vm-cluster \
            --generate-full-command-json-input > dg_assoc.json
            {
              "databaseAdminPassword": "string",
              "databaseId": "string",
              "databaseSoftwareImageId": "string",
              "peerDbHomeId": "string",
              "peerDbUniqueName": "string",
              "peerSidPrefix": "string",
              "peerVmClusterId": "string",
              "protectionMode":"MAXIMUM_AVAILABILITY|MAXIMUM_PERFORMANCE|MAXIMUM_PROTECTION"
            ,"transportType": "SYNC|ASYNC|FASTSYNC" }


            Practical Example

            Here we will configure a Data guard setup from an ExaC@C site to another with no existing standby DB home.

            • Below template matches a DG association without a peer Database Home in the standby VM Cluster

            # vi dg_assoc_MYCDB_nodbhome.json

            {
            "databaseAdminPassword": "Mypassxxxx#Z",      
            "databaseId": "ocid1.database.oc1.ca-toronto-1.xxxxx",   <--- primary DB
            "databaseSoftwareImageId": null,
            "peerDbHomeId": null,
            "peerDbUniqueName": "MYCDB_Region2",   <--- Standby DB
            "peerSidPrefix": "MYCDB",
            "peerVmClusterId": "ocid1.vmcluster.oc1.ca-toronto-1.xxxxxx", <--- DR cluster
            "protectionMode": "MAXIMUM_PERFORMANCE", "transportType": "ASYNC", "isActiveDataGuardEnabled": true   
            }

            • Now we can run the full command with the adjusted JSON template

            # oci db data-guard-association create from-existing-vm-cluster \
            --from-json file://dg_assoc_MYCDB_nodbhome.json


            Response Body


            Right after the run you’ll have the provisioning starting and the work request assigned

            • You will need the id to check the status (Check for SUCCESS or FAILURE)

            # export workreq_id=ocid1.coreservicesworkrequest.xxxxx
            # oci work-requests work-request get --work-request-id $workreq_id \
            --query data.status


            Troubleshooting


            Automating tasks with CLI provides the advantage of not leaving you in the dark when things go awry. Here are some valuable troubleshooting insights when using OCI CLI
            : 

            • The work request status and error detail is easily accessible using get command for troubleshooting 

            • API based operations on existing systems like DB replications, offer comprehensive logs that are invaluable for diagnosing issues inside the target servers (i.e Exadata Cloud VM clusters).

            • Oracle Data Guard association ensures clean rollbacks for quick retries in case of failures - a significant advantage over manual cleanup which we all hated back in on-premises setups.


            Work request


            The very first thing to check is the status of the request and the details of the error in case of failure.

            • Even without a work request ID, the below query allows you to list all previous data guard association jobs

            # oci work-requests work-request list -c $comp_id –-query \
            data[?\"operation-type\"=='Create Data Guard'].\
            {status:status,operation:\"operation-type\",percent:\"percent-complete\",
            \"workreq_id\":id
            }"
            --output table

            • The output will look like the below .

            • You want to display details about the error ? Sure there is an oci command for that 

            # oci work-requests work-request-error list --work-request-id $workreq_id –all \
            --query "data[].[code,message]"
            --output table

            • You can see few insights on the stage where your DG association failed for instance


            Logs in your ExaData Cloud@Customer


            When a database related operation is performed on an
            ExaC@C VM , log files from the operation are stored in subdirectories of /var/opt/oracle/log.


            check logs

            Running below find command while your Data guard association is running can help you list the modified logs

            $ find $1 -type f -print0 | xargs -0 stat --format '%Y :%y %n'| sort –nr \
            | cut -d: -f2- | head


            PRIMARY

            let’s see what logs are created on the primary side

            dg folder

            This will likely contain below files. 

            $ ls /var/opt/oracle/log/GRSP2/dbaasapi/db/dg dbaasapi_SEND_WALLET_*.log dbaasapi_CONFIGURE_PRIMARY_*.log dbaasapi_NEW_DGCONFIG_*.log dbaasapi_VERIFY_DG_PRIMARY_*.log dbaasapi_SEND_WALLET_*.log

            1. VERIFY_DG_PRIMARY
            First file created is {log_dir}/<Database_Name>/dbaasapi/db/dg/
            dbaasapi_VERIFY_DG_PRIMARY*.log

            $ tail -f dbaasapi_VERIFY_DG_PRIMARY_2022-05-27_*.log
            ...
            Command: timeout 3 bash -c 'cat < /dev/null > /dev/tcp/clvmd01.domain.com/1521' Exit: 124 Command has no output
            ERROR: Listener port down/not reachable on node: clvmd01.domain.com:1521
            ...

            Below excerpt shows the precheck step that failed, which was fixed by running the oci cli command again


            2. PRIMARY_Configure
            After the second run, the prechecks passed, but now there's an issue with the primary configuration (se below).

            Let’s dig a bit deeper , but it seems it’s related to some service not being able to start.

            dgcc folder

            "dgcc" represents the Data Guard Configuration checker, which is responsible for checking the Data Guard status and configurations. Below logs contain information about the activities and status of dgcc on the ExaC@C

            $ ls /var/opt/oracle/log/MYCDB/dgcc dgcc_configure-sql.log dgcc_configure-cmd.log dgcc_configure.log

            dgdeployer folder

            DGdeployer, is the process that performs the DG configuration. The dgdeployer.log file should contain the root cause of a failure to configure the primary database mentioned earlier.

            $ ls /var/opt/oracle/log/MYCDB/dgdeployer
            dgdeployer.log
            dgdeployer-cmd.log

            As displayed here, we can see that the PDB service failed to start

             dgrops folder


            The dgrops  log file contains the output of the dgrops script, which includes the steps performed, the commands executed, and any errors or warnings encountered.
            This log helped identifying the issue which was that the PDB state wasn't saved in the primary CDB.

            Solution

            On the primary CDB, restart the PDB and save its state and voila.The DG association should now be successful.    

            $ alter pluggable database MYPDB_TEST close instances=all;
            $
            alter pluggable database MYPDB_TEST open instances=all; $ alter pluggable database MYPDB_TEST save state instances=all;


            STANDBY

            At this point, there are no troubleshooting steps left. But I though I’d add a list of available logs at the DR site.
             prep folder

            This will store logs about preparation of the standby including creating the DB home based on our previous example

            $ view /var/opt/oracle/log/MYCDB/prep/prep.log

             dg folder

            This folder will include logs pertaining to the standby database creation as shown below

            $ view /var/opt/oracle/log/MYCDB/dbaasapi/db/dg/dbaasapi_CREATE_STANDBY_*.log


            Conclusion

            This tutorial we learned to

            • Seamlessly automate Data Guard associations between diverse ExadataCloud@Customer systems. 
            • leverage OCI CLI & JSON templates to discover its extensive utility beyond compute services.
            • Additionally, you now have a clear understanding of where to access and how to interpret the logs, essential for troubleshooting potential issues.
            • Hope this will encourage every DBA to start using OCI CLI every day for their administration tasks 

            Thank you for reading