Sunday, October 24, 2021

Create a local Windows10 VPN bastion using a vagrant box

vagrant.pngIntro

There are many examples online on how to create a linux vagrant box including mine. But not so much around windows boxes.
The easiest way?  just shop around in Vagrant Cloud, identify a windows box, and spin it using vagrant up. That’s exactly what I did but I faced a problem after the trial period expired as I couldn’t even license it using a product key. In this blog we will showcase how to create a vagrant box based on windows 10 pro that you can activate if you have a license.

Why Create a windows vm inside a PC laptop

  • My VPN cuts all internet access !

    My team have recently been provided VPN links to a client’s environment that cuts internet access, this made us think of a workaround to isolate that network within a Virtualbox vm which worked like a charm.To make it even faster to spin as the team grew, I decided to find vagrant boxes in Vagrant Cloud and shared the Vagrantfile with the colleagues.

  • What happens when Windows evaluation period ends?

    As soon as these evaluation based vagrant boxes expired, the vms started to shutdown every hour or so, which makes one’s work at risk. You don’t want your OS to shut off in a middle of a migration task :). We even bought license keys but the vms couldn’t get activated.

    This image has an empty alt attribute; its file name is image-7.png

  • Vagrant box version after another, l still faced the same issue when trying to license it.
    Bottom line is those vagrant boxes had evaluation-only license, and not licensed to activate the software permanently.

Solution: Create a new vagrant box from scratch  

INSTALL WINDOWS

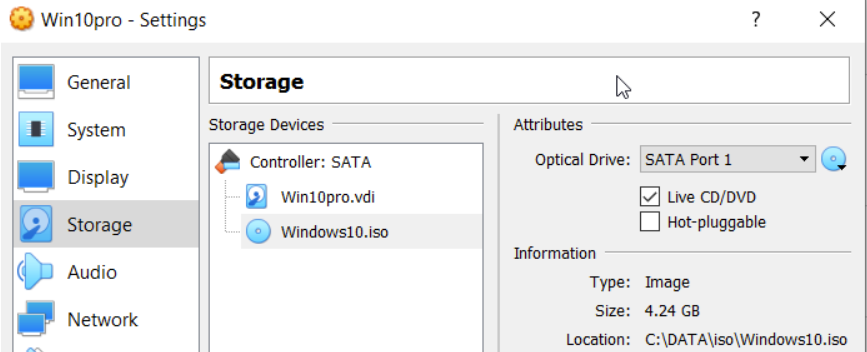
      • Insert the iso in the storage section

        This image has an empty alt attribute; its file name is image-8.png

      • You will be prompted to sign into your Microsoft account, again skip this.

      • After the OS is install is finished, install VirtualBox Guest additions package on the vm (optional)

      • Create a local admin: vagrant /password: vagrant (during or after installation)

        net user vagrant vagrant /add /expires:never
        net localgroup administrators vagrant /add

      • Make sure the network you are connected to is private.Run the below cmd 

        Set-NetConnectionProfile -NetworkCategory Private
        PS C:\Windows\system32> Get-NetConnectionProfile Name : Network InterfaceAlias : Ethernet InterfaceIndex : 6 NetworkCategory : Private <----- IPv4Connectivity : Internet IPv6Connectivity : NoTraffic

      PREPARE WINDOWS FOR VAGRANT

    • Base Windows Configuration

      • Turn off UAC: run as admin in cmd prompt ( in one line)
      • reg add HKEY_LOCAL_MACHINE\Software\Microsoft\Windows\CurrentVersion\Policies\System /v EnableLUA /d 0 /t REG_DWORD /f /reg:64

      • Configure and Enable WinRM service: Run as admin each line &hit enter
      • winrm quickconfig -q winrm set winrm/config/winrs '@{MaxMemoryPerShellMB="512"}' winrm set winrm/config '@{MaxTimeoutms="1800000"}' winrm set winrm/config/service '@{AllowUnencrypted="true"}' winrm set winrm/config/service/auth '@{Basic="true"}' Set-Service WinRM -StartupType "Automatic" Start-Service WinRM

      • Note- WinRm is the alternative to ssh for windows boxes which allows vagrant to connect to the box.
      • Enable remote connection to your box
      • Set-ItemProperty -Path 'HKLM:\System\CurrentControlSet\Control\Terminal Server' -name "fDenyTSConnections" -value 0 Enable-NetFirewallRule -DisplayGroup "Remote Desktop"

      • Disable complex passwords (Powershell)
      • secedit /export /cfg c:\secpol.cfg (gc C:\secpol.cfg).replace("PasswordComplexity = 1", "PasswordComplexity = 0") | Out-File C:\secpol.cfg secedit /configure /db c:\windows\security\local.sdb /cfg c:\secpol.cfg /areas SECURITYPOLICY rm -force c:\secpol.cfg -confirm:$false

      • Disable "Shutdown Tracker"
      • if ( -Not (Test-Path 'registry::HKEY_LOCAL_MACHINE\SOFTWARE\Policies\Microsoft\Windows NT\Reliability')) { New-Item -Path 'registry::HKEY_LOCAL_MACHINE\SOFTWARE\Policies\Microsoft\Windows NT' -Name Reliability -Force } Set-ItemProperty -Path 'registry::HKEY_LOCAL_MACHINE\SOFTWARE\Policies\Microsoft\Windows NT\Reliability' -Name ShutdownReasonOn -Value 0

      • Optional: Disable "Server Manager" starting at login (for server versions non-Core)
      • Optional: Clean unused files and zero free space on C drive (Optional)
      • C:\Windows\System32\cleanmgr.exe /d c:


      • Optional: Download and run sldete to zero out free space
      • PS C:\> sdelete.exe -z c:

      • Optional: allow PowerShell to display a progress bar when using the WinSSH communicator.
      • if (!(Test-Path -Path $PROFILE)) { New-Item -ItemType File -Path $PROFILE -Force } Add-Content $PROFILE '$ProgressPreference = "SilentlyContinue"'


     EXPORTING YOUR BASE BOX

      • Create a new Vagrantfile with some default settings that will allow your users and Vagrant to connect to the box

        # -*- mode: ruby -*- # vi: set ft=ruby : # All Vagrant configuration is done below. The "2" in Vagrant.configure # configures the configuration version (for backwards compatibility).
        Vagrant.configure(2) do |config| config.vm.guest = :windows config.vm.communicator = "winrm" config.vm.boot_timeout = 600 config.vm.graceful_halt_timeout = 600 # Create a forwarded port mapping which allows access to a specific port # within the machine from a port on the host machine. config.vm.network "forwarded_port", guest: 80, host: 8080 config.vm.network :forwarded_port, guest: 3389, host: 3389 config.vm.network :forwarded_port, guest: 5985, host: 5985, id: "winrm", auto_correct: true config.vm.provider "virtualbox" do |vb| # Customize the name of VM in VirtualBox manager UI: vb.name = "win10_pro_vm" end end


      • Export the virtualbox as vagrant box ( make sure your CDV drive is empty)

        vagrant package --base Win10Pro --output /path/to/output/Win10Pro.box --vagrantfile /path/to/initial/Vagrantfile

      • Add the box to vagrant repo you name it as you wish

        vagrant box add /path/to/output/Win10Pro.box --name brokedba/Win10pro

      • Add winrm-fs and vbguest in your physical host to allow shared folders syncing and auto-install of Vbox Guest additions package (if not done on the base box)

        vagrant plugin install winrm-fs vagrant plugin install vagrant-vbguest


      Test the vagrant box

      Yay!! you now have the box registered locally and ready to bounce

      C:\> vagrant init C:\> vagrant up C:\> vagrant destroy --- to destroy the vm


      Test this vagrant box online

      If you want to spin this vagrant box without the hassle of creating the vagrant box , you can try mine already as It’s already stored in vagrant Cloud This image has an empty alt attribute; its file name is image-10.png
      You only need to
      1- download a small VagrantFile (by clicking save as) , copy it to your local directory then
      2- Run the vagrant up command within the same directory 

      C:\> vagrant up C:\> vagrant destroy --- to destroy the vm


      Conclusion

      - We have just demonstrated how to create a vagrant box for windows 10 that can be licensed later if needed.

      - If you are on Linux or Mac machine and are interested in installing windows 11, there is neat article about a shell script that will automatically install the OS for you through a new Virtualbox feature called
                    “Unattended install” >> Unattened-install-microsoft-windows-11-on-virtualbox


Sunday, October 17, 2021

Terraform for dummies part 4: Launch an vm with a static website on GCP

Intro

After AWS,Oracle Cloud, and Azure, GCP is the 4th cloud platform in our terraform tutorial series, we will describe what it takes to authenticate and provision a compute engine using their terraform provider. The instance will also have an nginx website linked to its public IP. If you want to know about the differences GCP brings in terms of networking it’s wrapped up on my blog 
 
Note: GCP terraform provider authentication was a hell to get hold on and counter intuitive comparing to other Cloud platforms. I wasted a lot of time just trying to figure if I could avoid hardcoding project id.     

Here’s a direct link to my GitHub repo linked to this lab =>: terraform-examples/terraform-provider-gcp

Content :
I. Terraform setup
IV. Partial deployment
 V. Full deployment
Tips  & Conclusion

Overview and Concepts

Topology

The following illustration shows the layers involved between your workstation and GCP cloud while running the terraform actions along with the instance attributes we will be provisioning.

image

Besides describing my GitHub repo before starting this tutorial, I’ll just briefly discuss some principles.

  • Terraform Files
  • - Can be a single file or split into multiple tf or tf.json files, any other file extension is ignored.
    - Files are merged in alphabetical order but resource definition order doesn't matter (subfolders are not read).
    - Common configurations have 3 type of tf files and a statefile.
      1- main.tf: terraform declaration code (configuration) . The file name can be anything you choose       
      2- variables.tf: Resource variables needed for the deploy
      3- outputs.tf: displays the resources detail at the end of the deploy
      4- terraform.tfstate: keeps track of the state of the stack(resources) after each terraform apply run

  • Terraform resource declaration syntax looks like this:
  • Component "Provider_Resource_type" "MyResource_Name" { Attribute1 = value .. 
                                                           Attribute2 = value ..}

  • Where do I find a good GCP deployment sample?
  • The easiest way is to create/locate an instance from the console and then use the import function from terraform to generate each of the related components in HCL format (vpc, instance,subnet,etc..) based on their id.

    Example for a VPC >>
    1-  Create a shell resource declaration for the vpc in a file called vpc.tf 
    2-  Get the id of the vpc resource from your GCP portal
    3-  Run the Terraform import then run Terraform show to extract the vpc full declaration from GCP to the same file (vpc.tf)
    4- Now you can remove the id attribute with all non required attributes to create a vpc resource (Do that for each resource) 
    1- # vi vpc.tf 
      provider "google" {
    features {}
    }
      resource "google_compute_network" "terra_vpc" {
    }
    2- # terraform import google_compute_network.terra_vpc {{project}}/{{name}}
    3- # terraform show -no-color > vpc.tf

    Note:
    If you want to import all the existing resources in your account in bulk mode terraformer can help import both code and state from your GCP account automatically.

    Terraform lab content: I purposely split this lab in 2 for more clarity

    • VPC Deployment: To grasp the basics of a single resource deployment.
    • Instance Deployment: Includes the instance provisioning configured as web sever(includes above vpc) .


    I.Terraform setup

         I  tried the lab using WSL (Ubuntu) terminal  from windows but same applies to Mac.

       GCP authentication (least user friendly)

      To authenticate to GCP with Terraform you will need GCloud, service account credentials key file, and the projectId

       Prerequisites

      Using dedicated service accounts to authenticate with GCP is recommended practice (not user accounts or API keys)
    • GCLOUD authentication configured with your GCP credentials. Refer to my Blog post for more details
    • $ gcloud auth login --activate

      $ gcloud config list --format='table(account,project)'
      ACCOUNT  PROJECT
      -------------- -------------
      bdba@gmail.com  brokedba2000
      Service account: Either you create a service account with “owner role” in the console or run the below cli commands
      1 -- Create service account
      $
      gcloud iam service-accounts create terraform-sa --display-name="Terra_Service"
      $
      gcloud iam service-accounts list --filter="email~terraform" --format='value(email)'

      2 -- Bind it to a project and add owner role
      $ gcloud projects add-iam-policy-binding PROJECT_ID --member="serviceAccount:email" --role="roles/owner"

      3 -– Generate the Key file for the service account
      $ gcloud iam service-accounts keys create ~/gcp-key.json --iam-account=email
      - I’ll also assume the presence of an ssh key pair to attach to your vm instance. If not here is a command to generate a PEM based key pair.  
      $  ssh-keygen -P "" -t rsa -b 2048 -m pem -f ~/id_rsa_az
      Generating public/private rsa key pair.
      Your identification has been saved in /home/brokedba/id_rsa_az.
      Your public key has been saved in /home/brokedba/id_rsa_az.pub.


    II. Clone the repository


    III. Provider setup

    1. INSTALL AND SETUP THE GCP PROVIDER

      • Cd Into terraform-provider-gcp/create-vpc where our configuration resides (i.e vpc)
        $ cd /brokedba/gcp/terraform-examples/terraform-provider-gcp/create-vpc 
      • GCP provider plugin will be automatically installed by running  ”terraform init”.
      • $ terraform init
          Initializing the backend...
        
          Initializing provider plugins...
          - Finding latest version of hashicorp/google...
          - Installing hashicorp/google v3.88.0...
          * Installed hashicorp/google v3.88.0 (signed by HashiCorp)
        Terraform has been successfully initialized!
        $ terraform --version Terraform v1.0.3 on linux_amd64 + provider registry.terraform.io/hashicorp/google v3.88.0
      • Let's see what's in the create-vpc directory. Here, only *.tf files matter (click to see content)
      • $ tree
          .
          |-- outputs.tf        ---> displays resources detail after the deploy
          |-- variables.tf      ---> Resource variables needed for the deploy   
          |-- vpc.tf            ---> Our vpc terraform declaration 
        

      IV. Partial Deployment

        DEPLOY A SIMPLE VPC

          • Once the authentication is setup and provider installed , we can run terraform plan command to create an execution plan (quick dry run to check the desired end-state).
            $ terraform plan
            var.prefix The prefix used for all resources in this example
            Enter a value: Demo Terraform used selected providers to generate the following execution plan.
            Resource actions are indicated with the following symbols: + create
            ------------------------------------------------------------------------ Terraform will perform the following actions: # google_compute_network.terra_vpc will be created
            + resource "google_compute_firewall" "web-server"
            {..
            + name               = "allow-http-rule"
            + allow {
            + ports                 = [+ "80", + "22",+ "443",+ "3389",]
            + protocol = "tcp"
            ...
            # google_compute_firewall.web-server will be created + resource "google_compute_firewall" "web-server" { {..}
            # google_compute_subnetwork.terra_sub will be created + resource "google_compute_subnetwork" "terra_sub"
            {..
            ip_cidr_range = ["192.168.10.0/24” ]
            ...
            }
            Plan: 3 to add, 0 to change, 0 to destroy.
            - The output being too verbose I deliberately kept only relevant attributes for the VPC resource plan
          • Next, we can run ”terraform deploy” to provision the resources to create our VPC (listed in the plan)
          • $ terraform apply -auto-approve
            google_compute_network.terra_vpc: Creating...
            google_compute_firewall.web-server: Creating...
            google_compute_subnetwork.terra_sub: Creating...

            ... Apply complete! Resources: 3 added, 0 changed, 0 destroyed. Outputs: project = "brokedba2000"
                   This image has an empty alt attribute; its file name is image-4.png

          Observations:

          - The deploy started by loading the resources variables in variables.tf which allowed the execution of vpc.tf
          - Finally terraform fetched the attributes of the created resources listed in outputs.tf

          Note: We’ll now destroy the VPC as the next instance deploy contains the same VPC specs.

            $ terraform destroy -auto-approve
            
            Destroy complete! Resources: 3 destroyed.


        V. Full deployment (Instance)

        1. OVERVIEW

          • After our small intro to VPC creation,  let's launch a vm and configure nginx in it in one command.
          • First we need to switch to the second directory terraform-provider-gcp/launch-instance/
            Here's the content:
          • $ tree ./terraform-provider-gcp/launch-instance
            .
            |-- cloud-init          --> SubFolder
            |   `--> centos_userdata.txt --> script to config a webserver the Web homepage
            | `--> sles_userdata.txt --> for SUSE
            | `--> ubto_userdata.txt --> for Ubunto
            | `--> el_userdata.txt --> for Enteprise linux distros
            |-- compute.tf ---> Compute engine Instance terraform configuration |-- outputs.tf ---> displays the resources detail at the end of the deploy |-- variables.tf ---> Resource variables needed for the deploy |-- vpc.tf ---> same vpc we deployed earlier

            Note: As you can see we have 2 additional files and one Subfolder. compute.tf is where the compute instance and all its attributes are declared. All the other “.tf” files come from my vpc example with some additions for variables.tf and output.tf

          • Cloud-init: is a cloud instance initialization method that executes scripts upon instance Startup. see below metadata entry of the vm instance definition (startup-script). There are 5 OS’ scripts  (Centos,Ubuntu,Windows,RHEL,SUSE) windows was not tested.
            ...variable "user_data" { default = "./cloud-init/centos_userdata.txt"} 
            $ vi compute.tf resource "google_compute_instance" "terravm" {
            metadata = { startup-script    = ("${file(var.user_data)}")
            ...    
          • In my lab, I used cloud-init to install nginx and write an html page that will replace the HomePage at Startup.
          • Make sure you your public ssh key is in your home directory or just modify the path below (see variables.tf)
          • $ vi compute.tf resource "google_compute_instance" "terravm" {
            metadata = {

            admin_ssh_key {

            ssh-keys = var.admin":${file("~/id_rsa_gcp.pub")}" ## Change me

        2. LAUNCH THE INSTANCE

          • Once in “launch-instance” directory, you can  run the plan command to validate the 9 resources required to launch our vm instance. The output has been truncated to reduce verbosity
          • $ terraform plan
              ------------------------------------------------------------------------
                Terraform will perform the following actions:
            
              ... # VPC declaration (see previous VPC deploy) 
            ...
            # google_compute_instance.terra_instance will be created
            + resource "google_compute_instance" "terra_instance" { + ... + hostname             = "terrahost"
            + machine_type         = "e2-micro"
            + name                  = "Terravm"
            + tags                  = [  + "web-server", ]
            + boot_disk {
            + initialize_params { + image  = "centos-cloud/centos-7"
            + network_interface {
            ...
            + network_ip            = "192.168.10.51"
            }
            + metadata             = {
              + "ssh-keys"       = <<-EOT ssh-rsa AAAABxxx…*
            EOT
               + "startup-script" = <<-EOT       
                  EOT}
            # google_compute_address.internal_reserved_subnet_ip will be created
            + resource "google_compute_address" "internal_reserved_subnet_ip" {

                  ...} ...
              } Plan: 5 to add, 0 to change, 0 to destroy.
          • Now let’s launch our CENTOS7 vm using terraform apply (I left a map of different OS ids in the variables.tf you can choose from)
            $ terraform apply -auto-approve
            ...
            google_compute_network.terra_vpc: Creating...
            google_compute_firewall.web-server: Creating...

            google_compute_subnetwork.terra_sub: Creating... google_compute_address.internal_reserved_subnet_ip: Creating...
            google_compute_instance.terra_instance: Creating... Apply complete! Resources: 5 added, 0 changed, 0 destroyed. Outputs: vpc_name = "terra-vpc"
            Subnet_Name = "terra-sub"
            Subnet_CIDR = "192.168.10.0/24"
            fire_wall_rules = toset([
            {…
            "ports" = tolist([
              "description" = "RDP-HTTP-HTTPS ingress trafic"
              "destination_port_ranges" = toset([
            "80",
              "3389",
            "443",
            "3389",])
            ]
            hostname = "terrahost.brokedba.com"
            project = "brokedba2000"
            private_ip = "192.168.10.51"
            public_ip = "35.227.81.2"
            SSH_Connection = "ssh connection to instance  TerraCompute ==> sudo ssh -i ~/id_rsa_gcp  centos@35.227.81.2"
            This image has an empty alt attribute; its file name is image-5.png

          This image has an empty alt attribute; its file name is image-6.png

            • Once the instance is provisioned, juts copy the public IP address(i.e 52.191.26.102) in chrome and Voila!
            • You can also tear down this configuration by simply running terraform destroy from the same directory

            Tips

            • You can fetch any of the specified attributes in outputs.tf  using terraform output command i.e:  
            • $ terraform output SSH_Connection
              ssh connection to instance TerraCompute ==> sudo ssh -i ~/id_rsa_gcp centos@ ’public_IP’
            • Terraform Console:
              Although terraform is a declarative language, there are still myriads of functions you can use to process strings/number/lists/mappings etc. There is an excellent all in one script with examples of most terraform functions >> here 
            • I added cloud-init files for different distros you can play with by adapting var.user_data & var.OS 


               CONCLUSION

            • We have demonstrated in this tutorial how to quickly deploy a web server instance using terraform in GCP and leverage Cloud-init (Startupscript) to configure the vm during the bootstrap .
            • We had to hardcode the projectId although it’s embedded in the config credentials (key file) which is makes it tedious and rigid
            • Remember that all used attributes in this exercise can be modified in the variables.tf file.
            • Route table and internet gateway didn’t need to be created
            • Improvement:  Validate that startup script works for windows too.
              Another improvement can be reached in terms of display of the security rules using formatlist
              stay tuned

        Thank you for reading!

        Monday, October 11, 2021

        Terraform for dummies part 3: Launch a vm with a static website on Azure

        Intro

        In this tutorial we will try provisioning a vm on azure using their terraform provider and reproduce the same deployment I have completed on AWS and Oracle Cloud.  As usual we won’t just deploy an instance but also configure an nginx website linked to its public IP. I’ll end this post with some notes on Azure/AWS differences.
        I used azurerm_linux_virtual_machine resource instead of the classic vm resource because azure decided it was better to split both windows/Linux for vm deployments(provider 2.0) which is unlike anything seen elsewhere.
         
        Note: I have done the same task with my AZ-CLI based bash scripts (avaialble in Github) which was very helpful to understand the logic behind components needed during the vm creation (More details: deploy-webserver-vm-using-azure-cli).

        Here’s a direct link to my GitHub repo linked to this lab =>: terraform-examples/terraform-provider-azure

        Content :
        I. Terraform setup
        IV. Partial deployment
         V. Full deployment
        Tips  & Conclusion

        Overview and Concepts

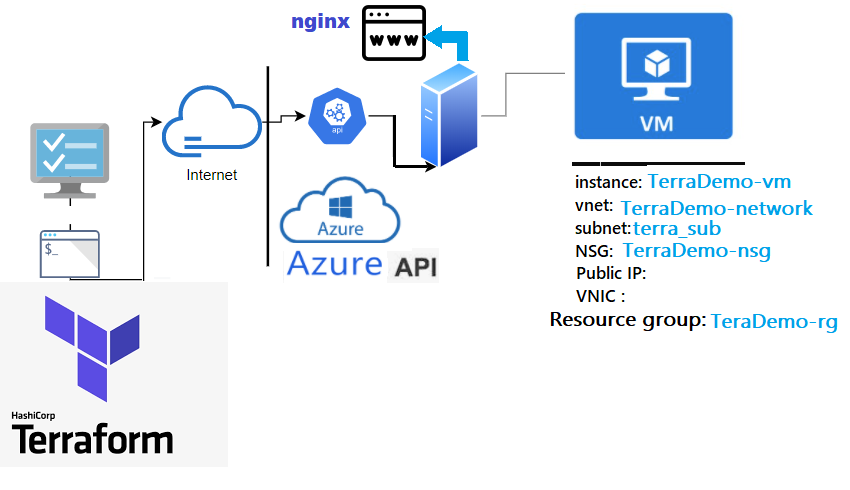
        Topology

        The following illustration shows the layers involved between your workstation an Oracle cloud infrastructure while running the terraform actions along with the instance attributes we will be provisioning.

        This image has an empty alt attribute; its file name is image-3.png

        Besides describing my GitHub repo before starting this tutorial, I’ll just briefly discuss some principles.

      1. Infrastructure As Code Manages and provisions cloud resources using a declarative code (i.e Terraform)  and definition files avoiding interactive configuration. Terraform is an immutable Orchestrator that creates and deletes all resources in the proper sequence. Each Cloud vendor has what we call a provider that terraform uses in order to convert declarative texts into API calls reaching the Cloud infrastructure layer.


      2. Terraform Files
      3. - Can be a single file or split into multiple tf or tf.json files, any other file extension is ignored.
        - Files are merged in alphabetical order but resource definition order doesn't matter (subfolders are not read).
        - Common configurations have 3 type of tf files and a statefile.
          1- main.tf: terraform declaration code (configuration) . The file name can be anything you choose       
          2- variables.tf: Resource variables needed for the deploy
          3- outputs.tf: displays the resources detail at the end of the deploy
          4- terraform.tfstate: keeps track of the state of the stack(resources) after each terraform apply run

      4. Terraform resource declaration syntax looks like this:
      5. Component "Provider_Resource_type" "MyResource_Name" { Attribute1 = value .. 
                                                               Attribute2 = value ..}

      6. Where do I find a good Azure deployment sample?
      7. The easiest way is to create/locate an instance from the console and then use the import function from terraform to generate each of the related components in HCL format (vnet, instance,subnet,etc..) based on their id.

        Example for a Vnet >>
        1-  Create a shell resource declaration for the vnet in a file called vnet.tf 
        2-  Get the id of the vnet resource from your Azure portal
        3-  Run the Terraform import then run Terraform show to extract the vnet full declaration from azure to the same file (vnet.tf)
        4- Now you can remove the id attribute with all non required attributes to create a vnet resource (Do that for each resource) 
        1- # vi vnet.tf 
          provider "azurerm" {
        features {}
        }
          resource "azurerm_virtual_network" "terra_vnet" {
        }
        2- # terraform import azurerm_virtual_network.terra_vnet /subscriptions/00*/resourceGroups/Mygroup/providers/Microsoft.Network/virtualNetworks/terra_vnet
        3- # terraform show -no-color > vnet.tf

        Note:
        If you want to import all the existing resources in your account in bulk mode (not one by one) there are tools like py-az2tf or terraformer, which can import both code and state from your azure account automatically.

        Terraform lab content: I have deliberately split this lab in 2:

        • Vnet Deployment: To grasp the basics of a single resource deployment.
        • Instance Deployment: Includes the instance provisioning configured as web sever(includes above vnet) .


        I.Terraform setup

           Although I’m on windows I  tried the lab using WSL (Ubuntu) terminal (but same applies to Mac).

           Azure authentication

          To authenticate with your azure account, Terraform will only need you to login using az cli . This can be done by running az cli commands described here >> az-cli installation

           Assumptions

          - I will assume that  below authentication option is present in your workstation:
        • AZCLI default profile configured with your azure credentials. Refer to my Blog post for more details
        • $ az account show 
          EnvironmentName    HomeTenantId     IsDefault    Name        State
          -----------------  ----------------  ----------- -------------  -------
          AzureCloud        00000000-00000000… True        BrokeDba Lab  Enabled
          - I’ll also assume the presence of an ssh key pair to attach to your vm instance. If not here is a command to generate a PEM based key pair.  
          $  ssh-keygen -P "" -t rsa -b 2048 -m pem -f ~/id_rsa_az
          Generating public/private rsa key pair.
          Your identification has been saved in /home/brokedba/id_rsa_az.
          Your public key has been saved in /home/brokedba/id_rsa_az.pub.


        II. Clone the repository


        III. Provider setup

        1. INSTALL AND SETUP THE AZURE PROVIDER

          • Cd Into terraform-provider-azure/create-vnet where our configuration resides (i.e vnet)
            $ cd /mnt/c/Users/brokedba/azure/terraform-examples/terraform-provider-azure/create-vnet 
          • Azure provider plugin will be automatically installed by running  ”terraform init”.
          • $ terraform init
              Initializing the backend...
            
              Initializing provider plugins...
              - Finding latest version of hashicorp/azurerm...
              - Installing hashicorp/azurerm v2.80.0...
              * Installed hashicorp/azurerm v2.80.0 (signed by HashiCorp)
            provider "azurerm" {
            Terraform has been successfully initialized!
            $ terraform --version Terraform v1.0.3 on linux_amd64 + provider registry.terraform.io/hashicorp/azurerm v2.80.0
          • Let's see what's in the create-vnet directory. Here, only *.tf files matter (click to see content)
          • $ tree
              .
              |-- outputs.tf        ---> displays resources detail after the deploy
              |-- variables.tf      ---> Resource variables needed for the deploy   
              |-- vnet.tf           ---> Our vnet terraform declaration 
            

          IV. Partial Deployment

            DEPLOY A SIMPLE VNET

              • Once the authentication is setup and provider installed , we can run terraform plan command to create an execution plan (quick dry run to check the desired state/actions). Specify the prefix for your resource names
                $ terraform plan
                var.prefix The prefix used for all resources in this example
                Enter a value: Demo Terraform used selected providers to generate the following execution plan.
                Resource actions are indicated with the following symbols: + create
                ------------------------------------------------------------------------ Terraform will perform the following actions: # azurerm_network_security_group.terra_nsg will be created
                + resource "azurerm_network_security_group" "terra_nsg"
                {..
                + security_rule       = [
                + destination_port_ranges             = [+ "22", + "3389",+ "443",+ "80",]
                + direction                           = "Inbound"
                + name                                = "Inbound HTTP access"
                # azurerm_resource_group.rg will be created + resource "azurerm_resource_group" "rg" {..}
                # azurerm_subnet.terra_sub will be created + resource "azurerm_subnet" "terra_sub"
                {..
                + address_prefixes   = ["192.168.0.0/16” ]
                }
                # azurerm_subnet_network_security_group_association.nsg_sub will be created
                + + resource "azurerm_subnet_network_security_group_association" "nsg_sub"{

                # azurerm_virtual_network.terra_vnet will be created
                + resource "azurerm_virtual_network" "terra_vnet" {
                ...
                + address_space         = [ "192.168.0.0/16”
                ...}

                Plan: 5 to add, 0 to change, 0 to destroy.
                - The output being too verbose I deliberately kept only relevant attributes for the Vnet resource plan
              • Next, we can run ”terraform deploy” to provision the resources to create our Vnet (listed in the plan)
              • $ terraform apply -auto-approve
                azurerm_resource_group.rg: Creating...
                azurerm_virtual_network.terra_vnet: Creating...
                azurerm_network_security_group.terra_nsg: Creating...
                azurerm_subnet.terra_sub: Creating... ... Apply complete! Resources: 5 added, 0 changed, 0 destroyed. Outputs: Subnet_CIDR = 192.168.10.0/24
                Subnet_Name = internal
                vnet_CIDR = 192.168.0.0/16
                vnet_Name = Terravnet
                vnet_dedicated_security_group_Name = "Demo-nsg"
                vnet_CIDR = 192.168.0.0/16
                vnet_dedicated_security_ingress_rules = toset([
                {…
                "access" = "Allow"
                "description" = "RDP-HTTP-HTTPS ingress trafic"
                "destination_port_ranges" = toset([
                "22",
                "3389",
                "443",
                "80",])
                       This image has an empty alt attribute; its file name is image-1.png

              Observations:

              - The deploy started by loading the resources variables in variables.tf which allowed the execution of vnet.tf
              - Finally terraform fetched the attributes of the created resources listed in outputs.tf

              Note: We’ll now destroy the Vnet as the next instance deploy contains the same Vnet specs.

                $ terraform destroy -auto-approve
                
                Destroy complete! Resources: 6 destroyed.


            V. Full deployment (Instance)

            1. OVERVIEW

              • After our small intro to Vnet creation,  let's launch a vm and configure nginx in it in one command.
              • First we need to switch to the second directory terraform-provider-azure/launch-instance/
                Here's the content:
              • $ tree ./terraform-provider-azure/launch-instance
                .
                |-- cloud-init          --> SubFolder
                |   `--> centos_userdata.txt --> script to config a webserver+ modify the index
                | `--> sles_userdata.txt --> for SUSE
                | `--> ubto_userdata.txt --> for Ubunto
                | `--> el_userdata.txt --> for Enteprise linux distros
                | `--> Win_userdata.ps1 --> for windows
                |-- compute.tf ---> Instance related terraform configuration |-- outputs.tf ---> displays the resources detail at the end of the deploy |-- variables.tf ---> Resource variables needed for the deploy |-- vnet.tf ---> same vnet we deployed earlier

                Note: As you can see we have 2 additional files and one Subfolder. compute.tf is where the compute instance and all its attributes are declared. All the other “.tf” files come from my vnet example with some additions for variables.tf and output.tf

              • Cloud-init: is a cloud instance initialization method that executes tasks upon instance Startup by providing the user_data entry of the azure vm resource definition (See below). I have created enough for 6 OS’ (Centos,Ubuntu,Windows,RHEL,OL,SUSE)
                ...variable "user_data" { default = "./cloud-init/centos_userdata.txt"} 
                $ vi compute.tf resource "azurerm_linux_virtual_machine" "terravm" {
                ... custom_data    = base64encode ("${file(var.user_data)}")
                ...    
              • In my lab, I used cloud-init to install nginx and write an html page that will replace the HomePage at Startup.
              • Make sure you your public ssh key is in your home directory or just modify the path below (see variables.tf)
              • $ vi compute.tf resource "azurerm_linux_virtual_machine" "terravm" {
                ..

                admin_ssh_key {

                username = var.os_publisher[var.OS].admin

                public_key = file("~/id_rsa_az.pub")  } ## Change me

            2. LAUNCH THE INSTANCE

              • Once in “launch-instance” directory, you can  run the plan command to validate the 9 resources required to launch our vm instance. The output has been truncated to reduce verbosity
              • $ terraform plan
                 Terraform used selected providers to generate following execution plan. 
                Resource actions are indicated with the following symbols:
                ------------------------------------------------------------------------ Terraform will perform the following actions: ... # Vnet declaration (see previous vnet deploy)
                ...
                # azurerm_linux_virtual_machine.terravm
                will be created + resource "azurerm_linux_virtual_machine" "terravm" { + ... + admin_username           = "centos"
                + location         = "eastus"
                + size             = "Standard_B1s"
                + name                     = "TerraDemo-vm"
                + private_ip              = "192.168.10.51"
                + admin_ssh_key {                    = {
                      + public_key = <<-EOT ssh-rsa AAAABxxx…*
                EOT
                username =”centos”        }
                + custom_data             = (sensitive value)
                + os_disk {…}
                + source_image_reference {
                + offer     = "CentOS"
                + publisher = "OpenLogic"
                + version   = "latest"
                }
                } # azurerm_network_interface.Terranic will be created
                  # azurerm_network_interface_security_group_association.terra_assoc_pubip_nsg will be created
                # azurerm_network_security_group.terra_nsg will be created
                # azurerm_public_ip.terrapubip will be created
                    ...} ...
                  } Plan: 9 to add, 0 to change, 0 to destroy.
              • Now let’s launch our CENTOS7 vm using terraform apply (I left a map of different OS ids in the variables.tf you can choose from)
                $ terraform apply -auto-approve
                ...
                azurerm_resource_group.rg: Creating...
                azurerm_virtual_network.terra_vnet: Creating...

                azurerm_network_security_group.terra_nsg: Creating... azurerm_subnet.terra_sub: Creating... azurerm_subnet_network_security_group_association.nsg_sub: Creating...
                azurerm_network_interface.Terranic: Creating...
                azurerm_linux_virtual_machine.terravm: Creating...... Apply complete! Resources: 9 added, 0 changed, 0 destroyed. Outputs: ...
                Subnet_Name = "internal"
                vnet_CIDR = 192.168.0.0/16
                Subnet_CIDR = 192.168.10.0/24
                vnet_dedicated_security_ingress_rules = toset([
                {…
                "access" = "Allow"
                  "description" = "RDP-HTTP-HTTPS ingress trafic"
                  "destination_port_ranges" = toset([
                "22",
                  "3389",
                "443",
                "80",])
                ]
                SSH_Connection = ssh connection to instance TerraCompute ==> sudo ssh -i ~/id_rsa_az centos@’’ <---- IP not displayed due to bug with az provider
                private_ip = "192.168.10.4" public_ip = ""
                This image has an empty alt attribute; its file name is az-cli_vm.png

                • Once the instance is provisioned, juts copy the public IP address(i.e 52.191.26.102) in chrome and Voila!
                • Although a bug of  azurerm_linux_virtual_machine doesn’t show the public IP , just go to the console and copy past the IP into your browser
                • You can also tear down this configuration by simply running terraform destroy from the same directory

                Tips

                • You can fetch any of the specified attributes in outputs.tf  using terraform output command i.e:  
                • $ terraform output SSH_Connection
                  ssh connection to instance TerraCompute ==> sudo ssh -i ~/id_rsa_az centos@ ’’
                • Terraform Console:
                  Although terraform is a declarative language, there are still myriads of functions you can use to process strings/number/lists/mappings etc. There is an excellent all in one script with examples of most terraform functions >> here 
                • I added cloud-init files for different distros you can play with by adapting var.user_data & var.OS 


                Differences between Azure/AWS & things I wish azure kept simple

                • Network In Azure every subnet is a public subnet because as soon as you associate a public IP to a Vm’s VNIC, you'll magically have internet access. Internet gateway is not needed here because system routes are taking care of that.
                • CIDR range in azure is slightly larger than aws ( from /8 to /29).
                • ID Azure doesn’t provide regular alpha numeric IDs for its resources but a sort of path based identification (see below)
                  $ SUBNET ID  
                  /subscriptions/xx/resourceGroups/my_group/providers/Microsoft.Network/virtualNetworks/MY-VNET/subnets/My_SUBNET

                •  Naming  Case insensitive but unique, a resource group can’t have 2 resources of the same type with the same name   
                • Bummer: I wish azure kept one terraform resource  to create vms instead of having one for Linux and one for Windows since v2.0. This implies that we will have extra blocks/modules if we want to do both in one stack instead of leveraging loops. The classic one is not handy for Linux either.  

                   CONCLUSION

                • We have demonstrated in this tutorial how to quickly deploy a web server instance using terraform in Azure and leverage Cloud-init to configure the vm during the bootstrap .
                • Remember that all used attributes in this exercise can be modified in the variables.tf file.
                • Route table and internet gateway setting in our code were replaced by the Public IP and VNICs
                • I found azure vm spinning time so slow comparing to AWS or OCI, not sure if it’s it’s regional thing 
                • Improvement: I will look to improve the compute.tf code to allow both windows & Linux type of resource to provision. Validate that userdata works for windows too, unlike on az cli.
                  Another improvement can be reached in terms of display of the security rules using formatlist
                  stay tuned

            Thank you for reading!