Friday, August 19, 2022

Terraform live cost estimate using infracost free plugin

This image has an empty alt attribute; its file name is image-1.png


Intro

The cloud offers unlimited scalability at lower costs with the available resources. Companies enable their engineering teams to launch infrastructure as and when needed. However, since costs aren't shown to engineers before Cloud resources are deployed, the real cost implications are unknown. That causes higher than expected costs and ballooning budgets over time, which is a nightmare for CFOs considering Gartner estimated Cloud wasted spend exceeding $26.6 billion in 2021. Orgs Blaming dev teams or business units after the damage is done is pointless. What then, should they nuke everything after $$$ overspend? which one to kill first?


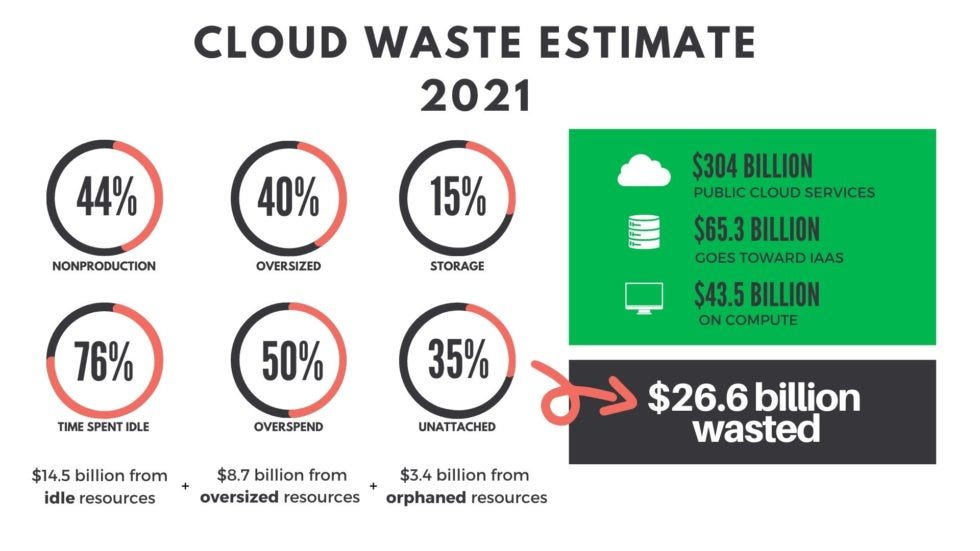
The usual suspects? Good ol’ Overprovisioning (~8.7billions) and idle resources ($14.5 billion).

Thus, the greatest challenge for every organization remains:
 How to proactively Reduce Cloud Wasted Spend?”

 
Today, we’ll explore an awesome solution that helps DevOps, SREs,& Devs continuously reduce their cloud costs.

                                                           This tool is called Infracost!
Table of contents


WHAT IS INFRACOST?


Infracost is a super cool tool that live calculates the cost of your Terraform resources on AWS, GCP or Azure before you even hit deploy. All it needs is your terraform files and its cli installed.

Infracost CLI fetches the prices from its Cloud Pricing API, that stores/updates the prices from AWS/Azure/GCP pricing APIs. Their GraphQL-based API gleans up to 3 million prices to return the cost .

  • VS Code extension: by far their slickest feature, where cost is displayed inside your tf code (See below)

This image has an empty alt attribute; its file name is webview.gif

  • Modules: Infracost can even scan modules within your project and pull all the pricing details in seconds.


How does Infracost work?

  • CLI Extracts cost-related parameters from parsing terraform files such as the instance type or disk size.

  • Retrieves prices from the Cloud Pricing API which returns the prices.

  • Calculates the monthly costs and outputs them in table, JSON or other formats.

No need to scroll long pricing pages, just pick a resource value in your *.tf file,& infracost will get its cost for you.    

Syntax (basic): the format and out-file arguments are optional

 infracost breakdown --path myterraDir --format json --out-file infracost-base.json 

  • Terraform variables can be set using --terraform-var-file or --terraform-var
     

I.Installation 


II. Setup and authentication

  • Register for a free API key,used by the CLI to authenticate/retrieve prices from our Cloud Pricing API

  • C:\> infracost auth login
    We're redirecting you to our log in page, please complete that,and return here to continue using Infracost.
    Waiting...
  • In the login Page you have two options sign up via email or githubThis image has an empty alt attribute; its file name is image-4.png

  • After this step your API key will be stored in credentials.yml file and infracost will be all set

    # The API key was saved to C:\Users\brokedba\.config\infracost/credentials.yml
    Your account has been authenticated.
  • You are now ready to use infracost by navigating to any terraform project and running the cli command

    # check Authentication
    C:\> infracost configure get api_key
    ico-7XXXXXXXXXXXXXXXXXXXXX

    C:\>notepad C:\Users\brokedba\.config\infracost/credentials.yml
    version: "0.1"
    api_key: ico-7XXXXXXXXXXXXXXXXXXXXX
    pricing_api_endpoint: https://pricing.api.infracost.io


      III. Use infracost

      1. Azure stack 

              Run Infracost

      • I will use one more option to include services that don’t incur costs using  --show-skipped

         launch-instance/$ infracost breakdown –-path . --show-skipped

      cost estimate of terraform config live before deploy.

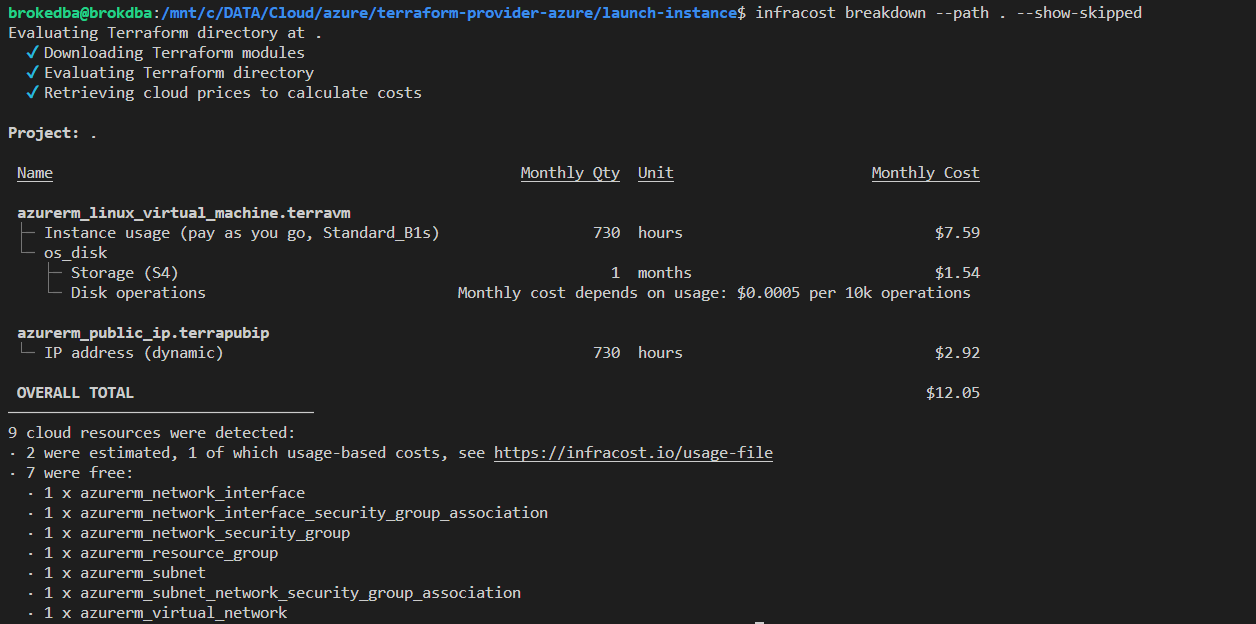
      Seems that our cheap static website will cost me USD$12/month 

      • Of the 9 resources, 2 have a fixed pricing (vm compute & public ip) and one(os_disk) based on usage

      • 7 are free which I wanted to display using  --show-skipped  option

      • Will talk later about usage based estimates
         

      2. AWS

      Image

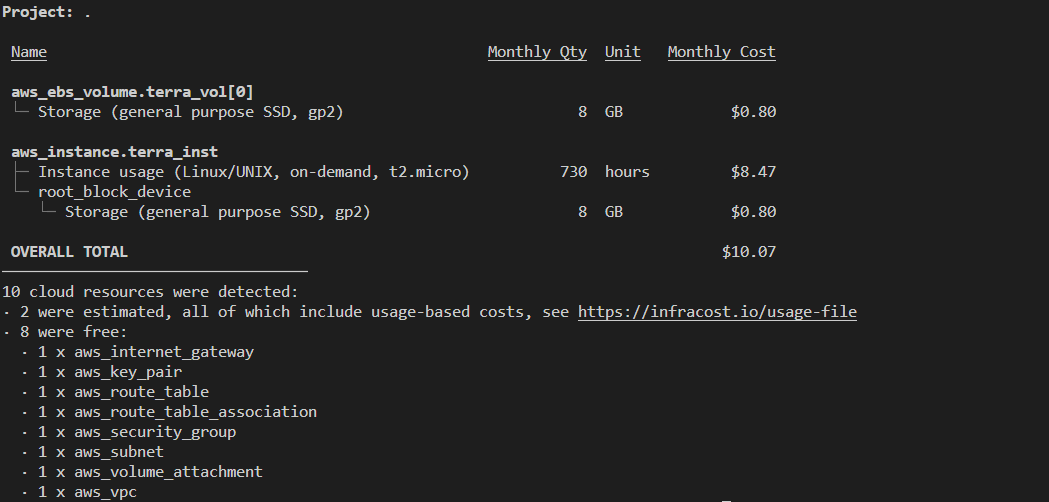
      USD$10/month for a t2.micro compute. Notice there is no fee for the public IP because it’s FREE is AWS.


      3. GCP

      Image

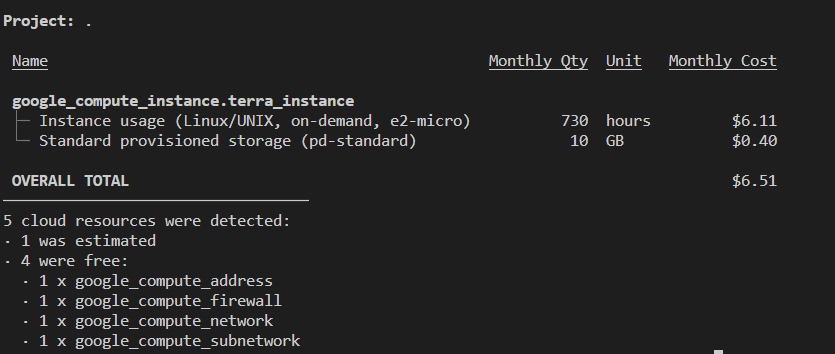
      USD$6.51/m for the same simple web instance stack . Again, no fees for the public IP nor usage based storage. Although GCP usually charges 0.004/hour for Static IPs.


      Change Currency

      What if I want to show the cost in CAD$ or Euro? Well, all you need is to run the below configure command.

      # List your preferred ISO 4217 currency and run the configure command
      $ Infracost configure set currency EUR

      Check if your stack estimate currency has changed (you might need to restart Visual Code to see GUI change)

      This image has an empty alt attribute; its file name is image-5.png


      III. Features

      1. CI/CD integration:

        • Add Infracost to your CI/CD pipeline, to see cost estimates in pull requests before making changes. It supports GitHub actions, GitLab CI, Circle CI, bitbucket, Jenkins & more

      2. Infracost usage based estimate

        • Infracost distinguishes the price of a resource from its cost

          • Price is a per-unit value published by cloud vendors (fixed)

          • Cost is equal to (resource's price) x (its usage), see below AWS Lambda example

            Name                             Quantity  Unit                 Monthly Cost
            aws_lambda_function.hi
            ├─ Requests              Cost depends on usage: $0.20 per 1M requests └─ Duration              Cost depends on usage: $0.0000166667 per GB-seconds PROJECT TOTAL                                                          $0.00

        • There are two options for showing costs instead of prices:

          • Fetch usage from CloudWatch/cloud APIs: to narrow usage-based costs (AWS only).

          • Specify usage manually:

            1. Use --sync-usage-file option to generate a new usage file

            2. Edit the file with your usage estimates & run below command (more details here)

              $ infracost breakdown --path . --usage-file infracost-usage.yml

      3. Infracost Cloud

        • SaaS version which allows team lead visibility across all changes(i.e most expensive pull requests)

        • I had a free trial upon sign up & all my cost estimates were actually sent to my cloud accountInfracost Cloud dashboard showing pull request cost changes over the last 30 days


      Security and Privacy

      • Rest assured Infracost doesn't touch secrets and only parse what pricing API needs to return the cost.

      Conclusion

      • There you have it, I promised I’ll blog about this amazing solution & it’s been very easy and fun to explore

      • This was longer than expected lol, but I hope it was enough information for you to dive into infracost

      • Bare I mind that I couldn’t list all the features which would require web scraping their whole website ;)

      • infracost diff shows diff of monthly costs between current and planned state (using usage.yml file)

      • Among Future features we might have

        • Supporting Oracle Cloud : please upvote the issue-911 in GitHub 

        • Point to statefile and get the cost in a machine that doesn't even have terraform installed 

        • Hiding and Sorting resources by cost

        • Integrate infracost with remote backend based tfsates (S3)


        Thank you for reading


        Tuesday, August 2, 2022

        Explore Alibaba Cloud part 2: AliCloud CLI installation and few examples

        This image has an empty alt attribute; its file name is alibaba3.png

        Cloud CLI tools are the Most direct and simple way to interact with a new Cloud platform, It is the perfect tool for executing simple and repeatable tasks which you don’t need to keep track off. Alibaba Cloud CLI tool which also manages Cloud resources (or stacks) is no exception. In this blog post, we will install AliCloud cli and try few API requests. I do that every time I explore a cloud platform (see previous posts aws, oci, azure, gcp).

        As usual, this post will be followed by another article about provisioning a vm in Ali Cloud through terraform.


        Requirement


        Whether on windows or on Linux the basic installation of Aliyun CLI will always require 2 elements:

        I. Alibaba Cloud CLI Installation


        Aliyun (translated “Ali Cloud”) was the original name of the company until 2017. Therefore you will install Aliyun CLI not Alibaba Cloud cli ;).

        • Windows

               1- Download & execute the following AzliyunCli installer(current version: v3.0.123) from

                    Alibaba Cloud website (latest zipped version)

                    GitHub(aliyun/aliyun-cli) (different version available)

               2- Unzip the downloaded file to get the executable file named aliyun.exe

               3- Add the exe file location directory path to your User %PATH% environment variable via GUI or cmd terminal

          -- Option 1: from the GUI
          C:\> SystemPropertiesAdvanced

          Note: Once the window is displayed –> click environment variables

          --- Option 2: using pathed

          C:\> PathEd.exe add "C:\DATA\cloud\alibaba

          C:\> aliyun version
          3.0.124

             Note: I used the handy pathed tool to append the %PATH% environment variable permanently

        • Linux
          Download the installation package for Linux using curl , decompress it and copy the content to the user bin directory.
        • brokedba~$ curl -sL https://github.com/aliyun/aliyun-cli/releases/download/v3.0.123/aliyun-cli-linux-3.0.123-amd64.tgz | sudo tar xzC /usr/local/bin
          brokedba~$ aliyun version
          3.0.123


        II. Authenticate to Alibaba Cloud from Aliyun CLI


        Once your
        Alibaba Cloud Free Tier account is created and aliyun cli installed. You will need API credentials including region, and language. There is a list of credentials type available to use in order to authenticate with.
         This image has an empty alt attribute; its file name is image-6.png


        The 2 categories are:  1. Key/StsToken based        2. Role/Instance principal based


        Obtain your Access key
        We will choose AccessKey authentication for our example. 

        1. Hover onto the profile picture in the upper-right corner, and click AccessKey management.  

          This image has an empty alt attribute; its file name is image-4.png

        2. On Access Key pair section click create AccessKey to generate AccessKey ID /AccessKey and copy them.

          This image has an empty alt attribute; its file name is image-5.png

        3. Now that we obtained our key pair we can finally configure our aliyun CLI profile (find all region ids here)

          1. Interactive Configuration
          brokedba~$ aliyun configure --mode AK -–profile
          default
          Configuring profile 'default' in '' authenticate mode...
          Access Key Id []: AccessKey ID
          Access Key Secret []: AccessKey Secret
          Default Region Id []: us-east-1
          Default Output Format [json]: json (Only support json)
          Default Language [zh|en] en: Saving profile[default] ...Done.

          Configure Done!!!
          ..............888888888888888888888 ........=8888888888888888888D=..............
          ...........88888888888888888888888 ..........D8888888888888888888888I...........
          .........,8888888888888ZI: ...........................=Z88D8888888888D..........
          .........+88888888 ..........................................88888888D..........
          .........+88888888 .......Welcome to use Alibaba Cloud.......O8888888D..........
          .........+88888888 ............. ************* ..............O8888888D..........
          .........+88888888 .... Command Line Interface(Reloaded) ....O8888888D..........
          .........+88888888...........................................88888888D..........
          ..........D888888888888DO+. ..........................?ND888888888888D..........
          ...........O8888888888888888888888...........D8888888888888888888888=...........
          ............ .:D8888888888888888888.........78888888888888888888O ..............


          2. static configuration

          brokedba~$ aliyun configure set \ --profile akProfile \ --mode AK \ --region cn-hangzhou \ --access-key-id AccessKeyID \ --access-key-secret AccessKeySecret

              • We can run aliyun configure command to verify our new configuration   
              • $ aliyun configure list

                Profile   | Credential      | Valid   | Region  | Language --------- | --------------- | ------- | --------- | -------- default * | AK:****6        | Valid   | us-east-1 | en


              •  aliyun cli configuration is typically stored in the below directory
                $ more $HOME/.aliyun/config.json
                {
                "current": "default",
                "profiles": [
                {
                "name": "default",
                "mode": "AK",
                "access_key_id": xxxxxxxx
                "access_key_secret":


                  III.Test your first API request


                  Few notions worth reminding before hitting the terminal with aliyun requests :    

                  A. Command structure: is based on the below components

                    $ aliyun <product> <operation> [--parameter1 value1 --parameter2 value2 ...]

                   Parameters: 
                  Each followed by  values.It will always depend on the product & operation value in the command.

                  • Result related parameters :
                      
                    1-  unfortunately aliyun doesn’t support table output format unlike any other CSP (JSON only.Bummer!)
                       2- “--output” : Allows to pick the list of fields to return in the response. It can be used to do some filtering.


                  B.  output :

                  The --output option allows to specify either a field, rows (using JMESpath), or num(row number).
                  The
                  best way to learn is to fetch all the output then locate the rows(path) and columns to display.

                  This image has an empty alt attribute; its file name is image-7.png 
                  To demonstrate the principle, here’s an example based on the ecs regions list command

                  --- Original command 
                  $ aliyun ecs DescribeRegions | head

                  { "Regions": {
                  "Region": [ ----> path/rows is Regions.Region[]
                  { "LocalName": "华北1(青岛)",
                    "RegionEndpoint": "ecs.cn-qingdao.aliyuncs.com",
                  "RegionId": "cn-qingdao"
                  },
                  ...

                  --- Fileterd output based on RegionId and RegionEndPoint

                  $ aliyun ecs DescribeRegions --output cols=RegionId,RegionEndpoint rows=Regions.Region[]


                  RegionId       | RegionEndpoint
                  --------       | --------------
                  us-east-1      | ecs.us-east-1.aliyuncs.com
                  us-west-1      | ecs.us-west-1.aliyuncs.com
                  eu-west-1      | ecs.eu-west-1.aliyuncs.com
                  me-east-1      | ecs.me-east-1.aliyuncs.com
                  eu-central-1   | ecs.eu-central-1.aliyuncs.com

                  ...


                  Examples
                   

                  You will have to rely on the help command first because there is no Alyun cli command reference available. This is the first time I see a CSP that doesn’t have a dedicated reference for its CLI tool.
                  Needless to say you’re on your own as all I found was this pdf.

                  You can get help by using the following commands:

                      ○ aliyun help: get product list
                      ○ aliyun help <product>: get the API information of a specific product
                  $ aliyun Ecs StopInstance help
                  Alibaba Cloud Command Line Interface Version 3.0.123
                  Product: Ecs (Elastic Compute Service) Parameters: 
                  --InstanceId  String  Required 
                  --ConfirmStop Boolean Optional 
                  --DryRun      Boolean Optional 
                  --ForceStop   Boolean Optional 
                  --Hibernate   Boolean Optional 
                  --StoppedMode String  Optional

                  ...

                • List of publicly available images in the current default region (us-east-1)

                  $ aliyun ecs DescribeImages --output cols=OSNameEn,Architecture,OSType,IsPublic rows=Images.Image[]

                  OSNameEn                                            | Architecture | OSType | IsPublic --------                                            | ------------ | ------ | --------
                  CentOS  7.9 64 bit for SCC                          | x86_64       | linux  | true
                  CentOS  8.4 64 bit for SCC                          | x86_64       | linux  | true
                  AlmaLinux  9.0 64 bit                               | x86_64       | linux  | true
                  Ubuntu  22.04 64 bit                                | x86_64       | linux  | true
                  CentOS Stream  9 64 bit                             | x86_64       | linux  | true
                  Fedora  35 64 bit                                   | x86_64       | linux  | true
                  Alibaba Cloud Linux  3.2104 LTS 64 bit UEFI Edition | x86_64       | linux  | true Alibaba Cloud Linux  3.2104 LTS 64 bit ARM Edition  | arm64        | linux  | true Alibaba Cloud Linux  3.2104 LTS 64 bit              | x86_64       | linux  | true

                • Object storage tool:

                • Download and install ossutil

                • $ wget http://gosspublic.alicdn.com/ossutil/1.7.7/ossutil64 
                  $ chmod 755 ossutil64
                  ./ossutil64 config
                • Create a private bucket with Zonal redundancy in us-east-1 region

                • $ ./ossutil64 mb oss://brokedbabucket -e oss-us-east-1.aliyuncs.com --acl private --storage-class IA --redundancy-type ZRS


                Auto completion
                 

                  This commands is supposed to command to enable auto completion in zsh/bash . But it doesn’t autocomplete operation commands as available in aws cli for example. 
                  $ aliyun auto-completion 


                Conclusion:

                In this tutorial we learned how to install and configure Aliyun cli. We also described the command syntax and tried few requests using output options.

                ○The filtering seem to be very limited as there are no JMESPATH examples anywhere associated with rows option

                ○ I wish there was a command line reference that could provide more help to end users

                ○ FREE tier: You will still have to confirm you can use your Free tier credits before deploying any resource. 

                Cheers.