Monday, March 21, 2022

OCI Bastion Service Part I: How to use it to connect to your Private Subnet (Console)

This image has an empty alt attribute; its file name is image-6.pngIntro

In the cloud, bastion or jump server is the only node exposed to the outside world and acts as a gateway between the private network where your backend resources (application, databases..etc) are hosted and the Internet. A Bastion runs bare minimum applications and is extremely secure. Even if any network can access it, it is still fortified against illegal entry and attack.

But What if there was another disruptive way to provide that sort of remote access without needing to configure a VM in a public subnet ? 

Quick table of contents

- What is Bastion service and why is it revolutionary
- Create Bastion Service using the Console

What is OCI Bastion service and why is it revolutionary

Let me demonstrate why OCI Bastion service makes your life easier. Imagine every team in your organization wanting their own Bastion VM because hey they're not fan of sharing their stuff with others. For each of your teams you would have to:
-  Create a public subnet
-  Create a VM in that subnet
-  Ensure the hardening and constant auditing of your bastion VMs  
-  Pay for the CPU and other resources of your bastion VM for each team.
 
OCI Bastion service is a FREE serverless, clientless connectivity that enables you to connect from anywhere-on any device or platform-(without an additional agent installation) to your instances In your private subnets.
You can leverage the ssh tunnel for literally any port via port-forwarding feature. Your target system can be a database compute instance (DBCS,MYSQL, EXACS,..) or any app server within your private subnets.

Why OCI Bastion service is better than other providers equivalent offerings

Exactly, with Oracle Bastion service, you not only won’t need to worry about creating, hardening or paying for a bastion vm anymore, but the service is FREE and you won’t have to install any agent nor grant permissions.        

Create Bastion Service 

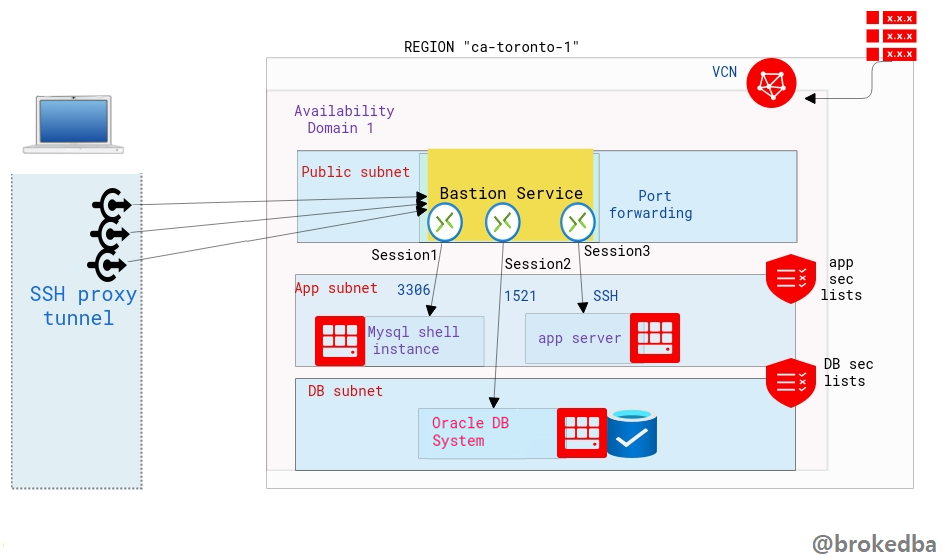
Let’s see how to create the bastion service through the Console, OCI CLI, and terraform. The bastion service  is linked to the target subnet and a bastion session will define the port forwarding to the target instance.
 Our environment :
  - VCN vcnterra has the private subnet db-sub with a CIDR of 192.168.78.0/24
 
-
DB instance IP is 192.168.78.10

I. From the console 

  • Under Identity & Security section on the Console menu, click `Bastion` or just search Bastion on the Console browser.

This image has an empty alt attribute; its file name is image-6.png

  • Hit  “Create Bastion”, and give a name for your Bastion Service, select the target VCN & subnet, along with the CIDR block representing a white-list network from which you want to connect to the target instance, and create the Bastion.

                                                  This image has an empty alt attribute; its file name is image-8.png

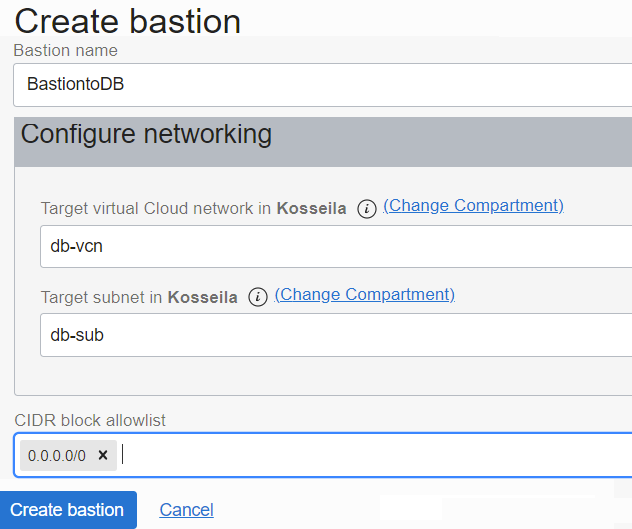
CIDR allowlist: 0.0.0.0/0 means you can ssh the db instance from anywhere.

2. Create the bastion session

We will now create the bastion session where we will define the forwarded port through the tunnel and the target IP

  • Click on the Bastion name to access the Bastion details page from which you can click on create bastion session.  

This image has an empty alt attribute; its file name is image-10.png

Note:
There are two session types, SSH Managed which requires a cloud agent and port forwarding session which we need.
You can either generate, upload, or paste your SSH public key.  

3. Generate the SSH command

  • Once the session is created click on the right side 3 dots button and select Copy SSH command.

    This image has an empty alt attribute; its file name is image-11.png 
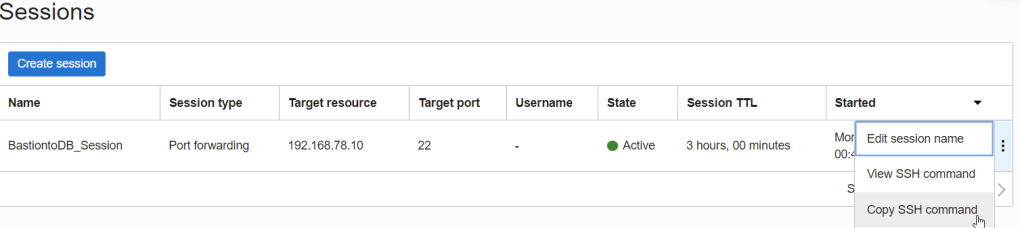
  • It should look like the below . You will need to replace privateKey with it’s local path and Localport with 22

    This image has an empty alt attribute; its file name is image-12.png
  • Final result will  looks like this, notice I added & to run it in the background, so I won’t have to open another session to login to the private DB instance. 
    # ssh -i ~/.ssh/id_rsa_oci -N -L 22:192.168.78.10:22 -p 22 ocid1.bastionsession.oc1.ca-toronto-1.amaaaaaavr**a@host.bastion.ca-toronto-1.oci.oraclecloud.com &
  • Run the final ssh command to access the target resource using a sort of loopback where localhost is forwarded into the target instance IP through the opened proxy tunnel. 

    # ssh -i  ~/.ssh/id_rsa_dbcs opc@localhost
    [opc@hopsdb-oci ~]$ cat /etc/redhat-release --- target instance
    Red Hat Enterprise Linux Server release 7.9 (Maipo)
    [opc@hopsdb-oci ~]$ ifconfig  ens3
    ens3: flags=4163<UP,BROADCAST,RUNNING,MULTICAST>  mtu 9000
    inet 192.168.78.10  netmask 255.255.255.0  broadcast 192.168.78.255

     Warning:  Beware as It’s important to distinguish between :
    • ssh key pair used to used to build the Bastion session
    • ssh key pair used in the target vm (our db instance) upon creation
  • The first is used when we run the bastion command , the second is used when connecting as opc@locahost .
      

    Conclusion

           In this article we learned

    • How slick is OCI Bastion service becoming a game changer thanks to its serverless connectivity to private networks.
    • How OCI Bastion service compares to the competition’s offering available in other Cloud providers
    • How to create OCI Bastion service using the Console.
    • With the above there is no excuse not to try this super cool feature that is absolutely FREE.
    • Thanks for reading


      Monday, March 14, 2022

      Terraform in OCI: The infamous error 404-NotAuthorizedOrNotFound

      This image has an empty alt attribute; its file name is image.pngIntro

      Terraform uses API to interact with your Cloud provider’s platform. Hence many error messages thrown by your terraform deploy come directly from the cloud platform (i.e OCI services) . In some cases, they prove to be very unhelpful and empty of insights, leaving you wonder what really is breaking your deployment. These are part of what we call the API Errors. In my case, I spent weeks pulling my hair off to find what was really behind my API 404 error.
      Therefor, I decided to summarize what was documented and what really happened.

      Service API Errors


      First, as It’s always better to lay down the basics, I would like to give a brief preview of API errors structure for OCI.
      Service error messages returned by the OCI Terraform provider include the following information:

      • Error - the HTTP status and API error codes
      • Provider version - the version of the OCI Terraform provider used to make the request
      • Service - the OCI service responding with the error
      • Error message - details regarding the error returned by the service
      • OPC request ID - the request ID
      • Suggestion - suggested next steps


      For example as shown in the official OCI documentation, the output is very similar  than common REST API errors

      Error: <http_code>-<api_error_code>
      Provider version: <provider_version>, released on <release_date>. This provider is <n> updates behind to current.
      Service: <service>
      Error Message: <error_message>
      OPC request ID: exampleuniqueID
      Suggestion: <next_steps>


      Commonly returned service errors.

          This list is not exhaustive and include only the error message and suggestion

      • "400-LimitExceeded" service limits exceeded for a resource 
      • Error: 400-LimitExceeded
        Error Message: Fulfilling this request exceeds the Oracle-defined limit for this
        tenancy for this resource type.
        Suggestion: Request a service limit increase for this resource <service>
      • "500-InternalError"  definitely means you’ll have to call your Oracle support friends ;)
      • Error: 500-InternalError
        Error Message: Internal error occurred
        Suggestion: Please contact support for help with service <service>


      When are API credentials checked? 

      • Terraform core workflow

        Let’s review terraform core workflow and its actions for the sake of completeness.

      • Workflow commands:
        init          Prepare your working directory for other commands
        validate   Check whether the configuration (modules, attribute names, and value types) is valid
        plan         Show changes required by the current configuration
        apply       Create or update infrastructure
        destroy    Destroy previously-created infrastructure

        Now the thing is, although init loads the cloud provider plugin, none of the first three commands will verify the API credentials for you. I bluntly assumed otherwise, which was clumsy but it’s never been very explicit in the doc.
        Bottom line:
        terraform apply is the only step where API credentials are checked, but that’s not all...      


      What the heck is 404-NotAuthorizedOrNotFound  

      • What I see

        This image has an empty alt attribute; its file name is image-1.png

      • As you can see, the suggestion was nowhere close to help me out with this conundrum.

      • My configuration ought to deploy a DB system stack & all previous commands (init,validate,plan) were successful.

      • What OCI API errors page says
        I found this note: `` Verify the user account is part of a group with the appropriate permissions to perform the actions in the plan you are executing``

              However, I could still create resources in the console with the same user without any permission issue.
              After struggling with it for several days, I then decided to put it on ice for few weeks.     
           
      • The real Root cause 

      2 weeks later, I accidentally found where all this mess came from, and the problem was right under my nose this whole time. I just decided to check my terraform.tfvars and each of OCI authentication variables one by one.

      That’s where I noticed that my credentials were mixed up between 2 tenancies

      # Oracle Cloud Infrastructure Authentication
      tenancy_ocid     = "ocid1.tenancy.oc1.."      # TENANCY 1
      user_ocid        = "ocid1.user.oc1.."         # USER FROM TENANCY 2
      fingerprint      = "1c:"                      # TENANCY 1 
      private_key_path = "~/oci_api_key.pem"        # TENANCY 1
      public_key_path  = "~/oci_api_key_public.pem" # TENANCY 1
      compartment_ocid = "ocid1.compartment.oc1."   # COMPARTMENT 2  
      • I agree, that’s pretty screwed up, but this can happen when working with different tenancies from our workstation.   
      • Once the discrepancy corrected the terraform stack was deployed as expected since the plan was successfully run. 


      Conclusion

    • It’s very easy to make mistakes when deploying using terraform especially when working with different tenancies.
    • We also noticed how API errors may just not be the most helpful insight to understand the root cause of such issues.
    • Bottom line is, always verify your credentials along with relying on source versioning platforms where credentials can be     
           safely saved for each of your environments/repos (
      Gitlab, OCI devops, terraform Cloud).
    • Additionally, the above platforms allow CI/CD pipelines to automate your testing when your workload/team starts to grow.
    • Hope this post will help those who encounter the same issue and spare them days of unnecessary troubleshooting.
    • Thanks for reading