
Showing posts with label Data Guard. Show all posts

Thursday, October 19, 2023

Farewell to ClickOps: OCI CLI seamless Data Guard Replication for ExaC@C


Intro

Since the very beginning, everyone got introduced to  Cloud services through the console as it’s very quick. But the cloud CLI tooling provides a stronger, yet user-friendly way to automate tasks, often covering features not even available in the console. Moreover, DBAs often assume that the CLI is primarily designed for managing compute-based services, overlooking its potential benefits for their database fleet. In this tutorial, we'll demonstrate how to automate the Data Guard association of your database between two Exadata Cloud at Customer infrastructures in separate regions.
On top of it, I’ll show you where to look and the type of logs that are generated if you need to troubleshoot.


Using the API to Enable Data Guard on ExaC@C

REST API Endpoint
Obviously, Rest APIs provided by the Cloud platform is the core vehicle that allows anything (infrastructure resource, or cloud services) to be created, deleted or managed.
This why the best thing to explore a new feature is to check the REST API Endpoint.
In our case the endpoint is
CreateDataGuardAssociation

POST /20160918/databases/{databaseId}/dataGuardAssociations

You can check more details here CreateDataGuardAssociationDetails 


API method for a Data guard association using existing cluster


Below is the configuration details for creating a Data Guard association for a ExaCC Vmcluster database


The attributes are as below


API Attributes
Attributes Required Description Value
creationType Yes Other Options: WithNewDbSystem, ExistingDbSystem ExistingVmCluster
databaseAdminPassword Yes The admin password and the TDE password must be the same.
isActiveDataGuardEnabled No True if active Data Guard is enabled. True
peerDbUniqueName No
  • DB_UNIQUE_NAME of peer DB to be created.
  • Unique across the fleet/tenancy
  • Defaults to
    <db_name>_<3 char>_<region-name>.
    peerSidPrefix No DB SID prefix to be created. unique in the VM cluster
    instance # is auto appended to the SID prefix
    protectionMode Yes MAXIMUM_AVAILABILITY
    MAXIMUM_PERFORMANCE
    MAXIMUM_PROTECTION
    MAXIMUM_PERFORMANCE
    transportType Yes SYNC
    ASYNC
    FASTSYNC
    ASYNC
    peerDbHomeId No Supply this value to create standby DB with an existing DB home
    databaseSoftwareImageId No The database software image OCID


    API request Examples


    Here is a basic API call example for Database system which slightly differs from the Exadata Cloud implantation.


    Response Body


    The response body will contain a single DataGuardAssociation resource.
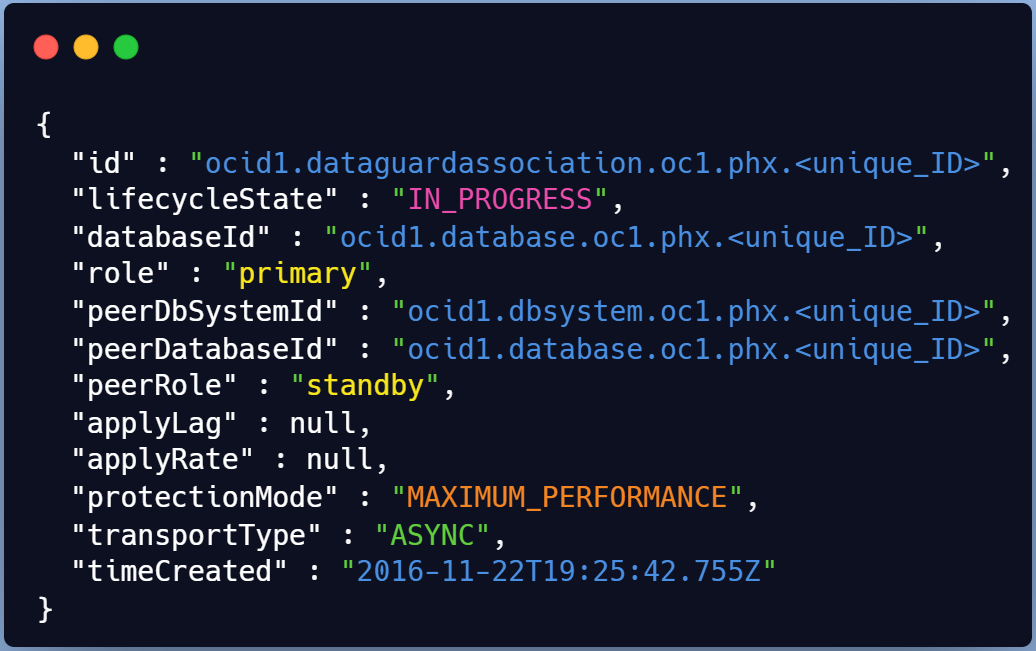


    Using OCI CLI to Enable Data Guard on ExaCC

    Now that we’ve explored REST API structure, we can move to a practical example using OCI CLI. Both Exada Cloud@Customer (Edge DB service) are located in different regions in Canada in 2 DataCenters.   

    Usage

    $ oci db data-guard-association create from-existing-vm-cluster [OPTIONS]

    Generate a sample json file to be used with this command option.

    The best way to leverage OCI CLI with a complex structure is to generate a full command JSON construct. 

    # oci db data-guard-association create from-existing-vm-cluster \
    --generate-full-command-json-input > dg_assoc.json
    {
      "databaseAdminPassword": "string",
      "databaseId": "string",
      "databaseSoftwareImageId": "string",
      "peerDbHomeId": "string",
      "peerDbUniqueName": "string",
      "peerSidPrefix": "string",
      "peerVmClusterId": "string",
      "protectionMode":"MAXIMUM_AVAILABILITY|MAXIMUM_PERFORMANCE|MAXIMUM_PROTECTION"
    ,"transportType": "SYNC|ASYNC|FASTSYNC" }


    Practical Example

    Here we will configure a Data guard setup from an ExaC@C site to another with no existing standby DB home.

    • Below template matches a DG association without a peer Database Home in the standby VM Cluster

    # vi dg_assoc_MYCDB_nodbhome.json

    {
    "databaseAdminPassword": "Mypassxxxx#Z",      
    "databaseId": "ocid1.database.oc1.ca-toronto-1.xxxxx",   <--- primary DB
    "databaseSoftwareImageId": null,
    "peerDbHomeId": null,
    "peerDbUniqueName": "MYCDB_Region2",   <--- Standby DB
    "peerSidPrefix": "MYCDB",
    "peerVmClusterId": "ocid1.vmcluster.oc1.ca-toronto-1.xxxxxx", <--- DR cluster
    "protectionMode": "MAXIMUM_PERFORMANCE", "transportType": "ASYNC", "isActiveDataGuardEnabled": true   
    }

    • Now we can run the full command with the adjusted JSON template

    # oci db data-guard-association create from-existing-vm-cluster \
    --from-json file://dg_assoc_MYCDB_nodbhome.json


    Response Body


    Right after the run you’ll have the provisioning starting and the work request assigned

    • You will need the id to check the status (Check for SUCCESS or FAILURE)

    # export workreq_id=ocid1.coreservicesworkrequest.xxxxx
    # oci work-requests work-request get --work-request-id $workreq_id \
    --query data.status


    Troubleshooting


    Automating tasks with CLI provides the advantage of not leaving you in the dark when things go awry. Here are some valuable troubleshooting insights when using OCI CLI
    : 

    • The work request status and error detail is easily accessible using get command for troubleshooting 

    • API based operations on existing systems like DB replications, offer comprehensive logs that are invaluable for diagnosing issues inside the target servers (i.e Exadata Cloud VM clusters).

    • Oracle Data Guard association ensures clean rollbacks for quick retries in case of failures - a significant advantage over manual cleanup which we all hated back in on-premises setups.


    Work request


    The very first thing to check is the status of the request and the details of the error in case of failure.

    • Even without a work request ID, the below query allows you to list all previous data guard association jobs

    # oci work-requests work-request list -c $comp_id –-query \
    data[?\"operation-type\"=='Create Data Guard'].\
    {status:status,operation:\"operation-type\",percent:\"percent-complete\",
    \"workreq_id\":id
    }"
    --output table

    • The output will look like the below .

    • You want to display details about the error ? Sure there is an oci command for that 

    # oci work-requests work-request-error list --work-request-id $workreq_id –all \
    --query "data[].[code,message]"
    --output table

    • You can see few insights on the stage where your DG association failed for instance


    Logs in your ExaData Cloud@Customer


    When a database related operation is performed on an
    ExaC@C VM , log files from the operation are stored in subdirectories of /var/opt/oracle/log.


    check logs

    Running below find command while your Data guard association is running can help you list the modified logs

    $ find $1 -type f -print0 | xargs -0 stat --format '%Y :%y %n'| sort –nr \
    | cut -d: -f2- | head


    PRIMARY

    let’s see what logs are created on the primary side

    ☆ dg folder

    This will likely contain below files. 

    $ ls /var/opt/oracle/log/GRSP2/dbaasapi/db/dg dbaasapi_SEND_WALLET_*.log dbaasapi_CONFIGURE_PRIMARY_*.log dbaasapi_NEW_DGCONFIG_*.log dbaasapi_VERIFY_DG_PRIMARY_*.log dbaasapi_SEND_WALLET_*.log

    1. VERIFY_DG_PRIMARY
    First file created is {log_dir}/<Database_Name>/dbaasapi/db/dg/
    dbaasapi_VERIFY_DG_PRIMARY*.log

    $ tail -f dbaasapi_VERIFY_DG_PRIMARY_2022-05-27_*.log
    ...
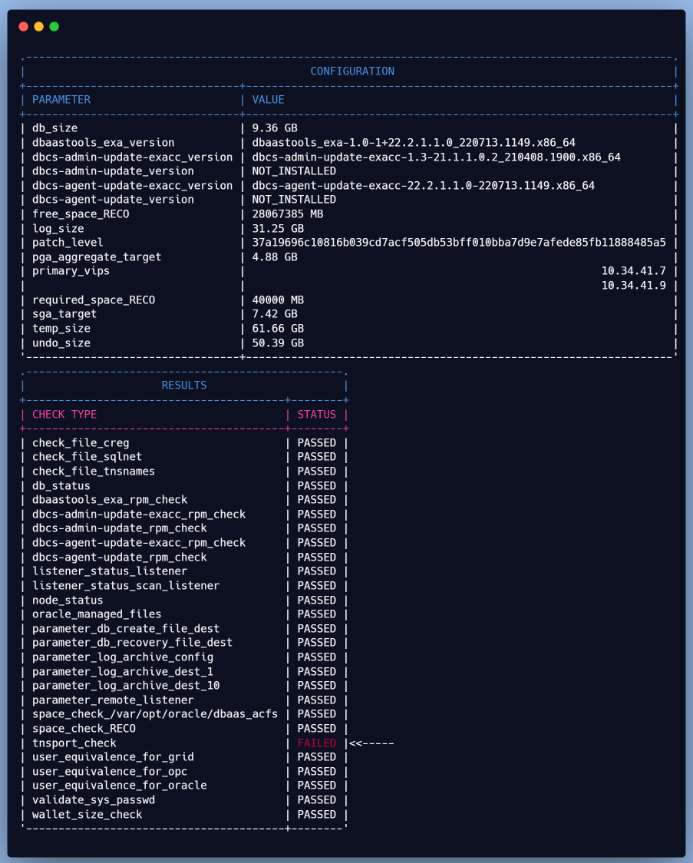
    Command: timeout 3 bash -c 'cat < /dev/null > /dev/tcp/clvmd01.domain.com/1521' Exit: 124 Command has no output
    ERROR: Listener port down/not reachable on node: clvmd01.domain.com:1521
    ...

    Below excerpt shows the precheck step that failed, which was fixed by running the oci cli command again

    2. PRIMARY_Configure
    After the second run, the prechecks passed, but now there's an issue with the primary configuration (se below).

    Let’s dig a bit deeper , but it seems it’s related to some service not being able to start.

    ☆ dgcc folder

    "dgcc" represents the Data Guard Configuration checker, which is responsible for checking the Data Guard status and configurations. Below logs contain information about the activities and status of dgcc on the ExaC@C

    $ ls /var/opt/oracle/log/MYCDB/dgcc dgcc_configure-sql.log dgcc_configure-cmd.log dgcc_configure.log

    ☆ dgdeployer folder

    DGdeployer, is the process that performs the DG configuration. The dgdeployer.log file should contain the root cause of a failure to configure the primary database mentioned earlier.

    $ ls /var/opt/oracle/log/MYCDB/dgdeployer
    dgdeployer.log
    dgdeployer-cmd.log

    As displayed here, we can see that the PDB service failed to start

    ☆ dgrops folder


    The dgrops  log file contains the output of the dgrops script, which includes the steps performed, the commands executed, and any errors or warnings encountered.
    This log helped identifying the issue which was that the PDB state wasn't saved in the primary CDB.

    Solution

    On the primary CDB, restart the PDB and save its state and voila.The DG association should now be successful.    

    $ alter pluggable database MYPDB_TEST close instances=all;
    $
    alter pluggable database MYPDB_TEST open instances=all; $ alter pluggable database MYPDB_TEST save state instances=all;


    STANDBY

    At this point, there are no troubleshooting steps left. But I though I’d add a list of available logs at the DR site.
    ☆ prep folder

    This will store logs about preparation of the standby including creating the DB home based on our previous example

    $ view /var/opt/oracle/log/MYCDB/prep/prep.log

    ☆ dg folder

    This folder will include logs pertaining to the standby database creation as shown below

    $ view /var/opt/oracle/log/MYCDB/dbaasapi/db/dg/dbaasapi_CREATE_STANDBY_*.log


    Conclusion

    This tutorial we learned to

    • Seamlessly automate Data Guard associations between diverse ExadataCloud@Customer systems. 
    • leverage OCI CLI & JSON templates to discover its extensive utility beyond compute services.
    • Additionally, you now have a clear understanding of where to access and how to interpret the logs, essential for troubleshooting potential issues.
    • Hope this will encourage every DBA to start using OCI CLI every day for their administration tasks 

    Thank you for reading

    Sunday, June 30, 2019

    MAA setup– Creating Single instance Physical Standby for RAC Primary - 12c

    Introduction:

    Oracle provides many options for preventing downtime and data loss, all of which make up the Maximum Availability Architecture (MAA). The Oracle Maximum Availability Architecture offers a set of standard reference architectures--Bronze, Silver, Gold, and Platinum Solutions-- that comply with Customer Business Objectives. With multiple instances, the RAC system gives a transparent HA and scalability environment, while Data guard delivers a real-time data protection with near zero to zero data loss. One of the (MAA) principles we are going to explore in this lab is the combination of both Oracle RAC and Active Data Guard.  This guide will take you through the steps to configure a Data Guard --single instance-- physical standby Database for a RAC Primary Database. Data Broker configuration and administration tasks (swicthover,validate..) will also be covered in this paper .

    Premise :

    This document assumes the following conditions :

    • Existing RAC Primary database with two instances (RACDB_1, RACDB_2) utilizing ASM for data file storage.
    • Primary RAC cluster based on my previous VirtualBox RACattack lab on Redhat 7  -> see post Deploying Oracle RAC Database 12c Lab on Red Enterprise Linux 7.  (Copies of the vms are available upon request). 
    • Grid and Oracle Restart won’t be available on the standby site since it’s a non ASM standby database setup
    • Oracle software on the standby host have already been installed/created.
    • Throughout this document, the below naming conventions (database name, database unique name, Oracle net services, instances and the hostnames ) have been used . 

    What will be covered ? In this post we will focus on the following content:

    I. OVERVIEW

      a. Topology

                                                  Fig 1- Gold MAA reference architecture
      The Gold MAA reference architure is ideal for service level requirement that can’t tolerate site failures. It is based on the clustered architecture pattern for the silver reference architecture With Oracle RAC , and adds a remote synchronized copy of the production database using Oracle Data Guard. This provide a combination of the transparent high availability and scalability of Oracle RAC with real-time data protection and availability or Oracle Data Guard.

      b. Environment

       
      You need 2 RAC nodes (4G min memory) and a third virtual machine for the physical standby host.
                                PRIMARY
                                     STANDBY

      Clusterware

      12c R1 Grid Infrastructure (12.1.0.2) 

            N/A

      Domain name

      evilcorp.com

      evilcorp.com

      Cluster Nodes/Host

      london1evilcorp.com
      london2.evilcorp.com

      paris.evilcorp.com

      IP adresses

      london1 : 192.168.78.51 (DNS master)london2 : 192.168.78.52 (DNS slave)            

                     paris: 192.168.78.53            

      SCAN

      london-cluster-scan.evilcorp.com

      N/A


      SCAN listener Host/port
       
      SCAN VIPs : 192.168.78.251/252/253
      (port 1525)

      N/A

      VIPs

      london1-vip: 192.168.78.61
      london2-vip: 192.168.78.62

      N/A

      DB_UNIQUE_NAME                         RAC_DB                                   PARIS

      DB_NAME

                                  RAC_DB

                                     RAC_DB

      DB Instances

                       RACDB_1, RACDB_2

                                            PARIS

      DB LISTENER

                                 LISTENER

                                          LISTENER

      DB Listener Host/port
       

          london1-vip, london2-vip (port 1521)

                              paris (port 1521)

      DB STORAGE

                                    ASM

                                      FileSystem

      File Management

                                   OMF

                             Hybrid (OMF/Manual) 

      Location for DB files

                                 +DATA

                        /u01/oradata/paris/data

      Fast Recovery Area
                             +FRA
                        /u01/oradata/paris/FRA

      ORACLE_HOME

      /u01/app/oracle/product/12.1.0.2/db_1

            /u01/app/oracle/product/12.1.0.2/db_1

      Oracle DB software version

                                12.1.0.2

                                       12.1.0.2

      OS

             Red Hat Enterprise Linux 7.1 (64 bit)

                Red Hat Enterprise Linux 7.1 (64 bit) 

      GRID_HOME

           /u01/app/grid/product/12.1.0.2/grid


      Pluggable database

          PDB

                                    PDB

      1) Standby Host preparation :
      I will keep this to the minimum and spare you the borring/redundant Oracle installation print screens. For all OS/Oracle related preparation (sysctl.conf/shell limits/swap/rpms/users..) please refere to my previous post Deploying Oracle RAC Database 12c Lab on Red Enterprise Linux 7. (vm copies are available upon request). 

              - Network Interface

    [root@localhost ~]# nmcli dev show eth0
    GENERAL.DEVICE:                         eth0
    ...
    IP4.ADDRESS[1]:                         192.168.78.53/24
    IP4.DNS[1]:                             192.168.78.51     ---- Master DNS Zone
    IP4.DNS[2]:                             192.168.78.52     ---- SLave  DNS Zone
    ...

              - Hostname :

    [root@localhost]# hostnamectl set-hostname paris.evilcorp.com 
    [root@localhost ~]# hostnamectl status
       Static hostname: paris.evilcorp.com
             Icon name: computer            Chassis: n/a        
    Virtualization: kvm
    Operating System: Red Hat Enterprise Linux Server 7.1 (Maipo)       
    CPE OS Name: cpe:/o:redhat:enterprise_linux:7.1:GA:server            
    Kernel: Linux 3.10.0-229.el7.x86_64       Architecture: x86_64

                -  Standby DNS configuration  : add the following line on the DNS server london1 as root:

    A- At the bottom of the Forward Zone file :

    [root@london1 ~]# vi /var/named/evilcorp.com  
    paris         A   192.168.78.53 

    B- At the bottom of the Backward Zone file:

    [root@london1 ~]# vi  /var/named/evilcorp.com.re 
    53.78.168.192  PTR paris.evilcorp.com.


    Check the the resolution:         

    [root@paris ~]# nslookup london1 
    Name:   london1.evilcorp.com
    Address: 192.168.78.51
    [root@paris ~]# nslookup london2
    Name:   london2.evilcorp.com
    Address: 192.168.78.52        
    [root@paris ~]# nslookup london-cluster-scan.evilcorp.com
    Name:   london-cluster-scan.evilcorp.com Address: 192.168.78.253                
    Address: 192.168.78.252
    Address: 192.168.78.251               

    II. PREPARATION                                                                             Go to Top

      a. Primary site preparation

                1. Enable Force Logging.  

      - Run the below on one of the RAC_DB instances to ensure all changes generate redo .        

    SYS@RACDB_1> alter database force logging;  

                2. Enable Archivelog Mode.

    [root@london1]# srvctl stop instance  -db RAC_DB –i RACDB_2
    [root@london1]# srvctl stop instance  -db RAC_DB -i RACDB_1 [root@london1]# srvctl start instance -db RAC_DB -i RACDB_1 -node london1 -startoption mount  
    [root@london1]# sqlplus sys/racattack@RAC_DB as sysdba
    sys@RACDB_1> alter database archivelog;  
    exit     
    sys@RACDB_1> alter database open;
                                                    

                3. Create the SLRs (Standby Redo Logs)..
                - Create the standby log files on the primary DB so the RMAN duplicate process  will automatically create them on the
                  standby site. nbr standby redo logs groups =  [nbr primary redo log files (2 ) + 1] x 2Nodes =6

    sys@RACDB_1> ALTER DATABASE ADD STANDBY LOGFILE THREAD 1 size 50m ; -- x3 Times 
    sys@RACDB_1> ALTER DATABASE ADD STANDBY LOGFILE THREAD 2 size 50m ; -- x3 Times
    sys@RACDB_1> SELECT THREAD#,GROUP#, BYTES/1024/1024 MB,STATUS from V$STANDBY_LOG;                
    THREAD#  GROUP#  MB STATUS                 
    --------- ------ ---- ----------                 
    1          5      50 UNASSIGNED
    1          6      50 UNASSIGNED                                             
    1          7      50 UNASSIGNED                                            
    2          8      50 UNASSIGNED                                            
    2          9      50 UNASSIGNED                                            
    2         10      50 UNASSIGNED                                            

                4. Modify Data Guard related init Parameters.

    @RACDB_1> ALTER SYSTEM SET LOG_ARCHIVE_CONFIG='DG_CONFIG=(rac_db,paris)' scope=both;
    -- Destinations
    ALTER SYSTEM SET LOG_ARCHIVE_CONFIG='DG_CONFIG=(RAC_DB,PARIS)' scope=both;
    ALTER SYSTEM set LOG_ARCHIVE_DEST_1='LOCATION=USE_DB_RECOVERY_FILE_DEST VALID_FOR=(ALL_LOGFILES,ALL_ROLES) DB_UNIQUE_NAME=RAC_DB' scope=both;

    ALTER SYSTEM set LOG_ARCHIVE_DEST_2='SERVICE=paris ASYNC VALID_FOR=(ONLINE_LOGFILES,PRIMARY_ROLE) DB_UNIQUE_NAME=PARIS' scope=both;
    ALTER SYSTEM SET DB_FILE_NAME_CONVERT='+DATA/RAC_DB/DATAFILE',
    '/u01/oradata/paris/data' scope=spfile;
    ALTER SYSTEM SET LOG_FILE_NAME_CONVERT='+FRA/RAC_DB/ONLINELOG',
    '/u01/oradata/paris/FRA', '+REDO/RAC_DB/ONLINELOG','/u01/oradata/paris/redo' scope=spfile;
    ALTER SYSTEM SET LOG_ARCHIVE_DEST_STATE_2=ENABLE scope=spfile; ALTER SYSTEM SET FAL_SERVER=paris  SCOPE=SPFILE; ALTER SYSTEM SET STANDBY_FILE_MANAGEMENT=AUTO SCOPE=SPFILE;
    -- Verify the new values 
    @RACDB_1> SELECT NAME, VALUE FROM V$SPPARAMETER WHERE UPPER(NAME) IN        ('REMOTE_LOGIN_PASSWORDFILE','STANDBY_FILE_MANAGEMENT','LOG_ARCHIVE_DEST_1','LOG_ARCHIVE_DEST_2','DB_FILE_NAME_CONVERT','LOG_FILE_NAME_CONVERT','FAL_SERVER');

    NAME                           VALUE ------------------------------ ------------------------------------------------- db_file_name_convert           +DATA/RAC_DB/DATAFILE db_file_name_convert           /u01/oradata/paris/data log_file_name_convert          +FRA/RAC_DB/ONLINELOG log_file_name_convert          /u01/oradata/paris/FRA log_file_name_convert          +REDO/RAC_DB/ONLINELOG log_file_name_convert          /u01/oradata/paris/redo
    log_archive_dest_1             LOCATION=USE_DB_RECOVERY_FILE_DEST VALID_FOR=
    (ALL_LOGFILES,ALL_ROLES)DB_UNIQUE_NAME=RAC_DB
    log_archive_dest_2             SERVICE=paris ASYNC VALID_FOR=(ONLINE_LOGFILES,PRIMARY_ROLE) DB_UNIQUE_NAME=PARIS fal_server                     PARIS standby_file_management        AUTO remote_login_passwordfile      EXCLUSIVE

                5. Backup the Database for Standby

    [oracle@london1]# rman target=/ 
    RMAN>BACKUP DATABASE PLUS  ARCHIVELOG;  

    • POSSIBLE ERROR:
      ORA-19809: limit exceeded for recovery files
      The limit for recovery files specified by the DB_RECOVERY_FILE_DEST_SIZE was exceeded.
      Fix:
       
             1)-  Increase DB_RECOVERY_FILE_DEST_SIZE.
                      SQL> ALTER SYSTEM SET DB_RECOVERY_FILE_DEST_SIZE=8G SCOPE=BOTH;
             2) - Delete files from recovery area using RMAN
                       RMAN> delete force noprompt archivelog all completed before 'sysdate-1';

                6. Update the tnsnames.ora.
               
    Add the tns alias PARIS and LONDON for each of the instances of the primary and standby database.

    PARIS =
       (DESCRIPTION =
         (ADDRESS = (PROTOCOL = TCP)(HOST = paris.evilcorp.com)(PORT = 1521))
         (CONNECT_DATA =
           (SERVER = DEDICATED)
           (SERVICE_NAME = PARIS.evilcorp.com) 
           (UR = A)
         )
       )
    LONDON =
       (DESCRIPTION =
        (ADDRESS_LIST =
       (ADDRESS = (PROTOCOL = TCP)(HOST =london1-vip.evilcorp.com)(PORT = 1521))
       (ADDRESS = (PROTOCOL = TCP)(HOST =london2-vip.evilcorp.com)(PORT = 1521)))  
    --two addresses need to be listed for rman duplicate and DG
         (CONNECT_DATA =
           (SERVER = DEDICATED)
           (SERVICE_NAME = RAC_DB.evilcorp.com)
         )
       )

           b. Standby site preparation                                                                                            Go to Top

                1. Copy/Create the password file for standby database.  

       - On the standby server run the following command

    [oracle@paris]# orapwd file=/u01/app/oracle/product/12.1.0.2/db_1/dbs/orapwPARIS password=racattack  ENTRIES=30 FORCE=Y  IGNORECASE=Y

      - Or  copy it from one of the the primary nodes :

    ASMCMD> pwcopy --dbuniquename rac_db  +DATA/RAC_DB/PASSWORD/pwdrac_db.284
    /u01/app/oracle/product/12.1.0.2/db_1/dbs/orapwPARIS ASMCMD> exit

    [oracle@london1]# scp /u01/app/oracle/product/12.1.0.2/db_1/dbs/orapwparis.ora paris.evilcorp.com:/u01/app/oracle/product/12.1.0.2/db_1/dbs/

      2. Create required directories for Standby database Instance.

    - Create standby database Directories 
    [oracle@paris]$ mkdir -p  /u01/app/oracle/admin/paris/adump [oracle@paris]$ mkdir -p  /u01/app/oracle/diag/rdbms/paris/paris/cdump [oracle@paris]$ mkdir -p  /u01/app/oracle/diag/rdbms/paris/paris/trace [oracle@paris]$ mkdir -p  /u01/app/oracle/audit/paris      
    [root@paris ]$ mkdir -p /u01/oradata/paris [root@paris ]$ chown -R oracle:oinstall /u01/oradata/paris [root@paris ]$ chmod -R 775 /u01/oradata/paris
    - Database Files directories
    [oracle@paris]$ mkdir –p /u01/oradata/paris/data [oracle@paris]$ mkdir  -p /u01/oradata/paris/redo
    [oracle@paris]$ mkdir  -p /u01/oradata/paris/FRA
                                                                                  

      3. Ora Net Configuration
       -  Add a static listener service in the listener.ora file of the standby host. The purpose to be able to see the database service while the standby DB is in nomount stage .the second service is related to the Broker configuration which will be discussed later .

    [oracle@paris ~]$ vi $ORACLE_SID/network/admin/listener.ora
    LISTENER =
       (DESCRIPTION_LIST =
         (DESCRIPTION =
          (ADDRESS = (PROTOCOL = TCP)(HOST = paris.evilcorp.com)
           (PORT = 1521))))                    
    SID_LIST_LISTENER =
    (SID_LIST =
        (SID_DESC =
        (GLOBAL_DBNAME=PARIS.evilcorp.com)
            (SID_NAME = PARIS)
            (ORACLE_HOME = /u01/app/oracle/product/12.1.0.2/db_1))
        (SID_DESC =
         (GLOBAL_DBNAME=PARIS_DGMGRL.evilcorp.com)
         (ORACLE_HOME = /u01/app/oracle/product/12.1.0.2/db_1) 
    -- For switchovers When former primary is Paris
            (SID_NAME = PARIS)
        )
    )
    ADR_BASE_LISTENER = /u01/app/oracle
    [oracle@paris ~]$lsnrctl reload 
    [oracle@paris ~]$ lnsrctl status
    Services Summary... Service "PARIS" has 1 instance(s).  
    Instance "PARIS", status UNKNOWN, has 1 handler(s) for this service...

    - Copy the tnsnames.ora from a Primary node 1 to standby database host .

    [oracle@london1]$scp $ORACLE_HOME/network/admin/tnsnames.ora paris:$ORACLE_HOME/network/admin/tnsnames.ora

    4. Create a parameter file on the standby host

    - add the bellow line to the temporary pfile

    [oracle@paris]$ vi  /u01/app/oracle/product/12.1.0.2/db_1/dbs/tempini.ora 
    db_name=PARIS

          c. RMAN duplicate (Create standby Database)                                                              Go to Top

                1.  start the database in NOMOUNT mode

    [oracle@paris]$ export ORACLE_SID=PARIS  
    [oracle@paris]$ sqlplus  '/ as sysdba' SQL> STARTUP PFILE='/u01/app/oracle/product/12.1.0.2/db_1/dbs/tempini.ora' NOMOUNT;

    2.  RMAN Connectivity Test

    [oracle@paris]$ rman target sys/racattack@london auxiliary sys/racattack@paris

    Recovery Manager: Release 12.1.0.2.0 - Production on Sat Jun 22 05:19:33 2019
    connected to target database: RAC_DB (DBID=2030859864)
    connected to auxiliary database: PARIS (not mounted)

    3.  Verify the PDB and temp files that will need to be renamed during the duplicate process

    RMAN> REPORT SCHEMA 
    List of Permanent Datafiles
    ===========================
    File Size(MB) Tablespace           RB segs Datafile Name

    ---- -------- -------------------- ------- ------------------------

    1    810      SYSTEM               YES     +DATA/RAC_DB/DATAFILE/system.270.975538023

    3    1390     SYSAUX               NO      +DATA/RAC_DB/DATAFILE/sysaux.283.975537987

    4    260      UNDOTBS1             YES     +DATA/RAC_DB/DATAFILE/undotbs1.296.975538069

    5    250      PDB$SEED:SYSTEM      NO      +DATA/RAC_DB/FD9AC20F64D24../DATAFILE/system.274.975538175

    6    5        USERS                NO      +DATA/RAC_DB/DATAFILE/users.269.975538067

    7    580      PDB$SEED:SYSAUX      NO      +DATA/RAC_DB/FD9AC20F64D24../DATAFILE/sysaux.282.975538175

    8    250      UNDOTBS2             YES     +DATA/RAC_DB/DATAFILE/undotbs2.272.975538737

    9    260      PDB:SYSTEM           NO      +DATA/RAC_DB/6BAA223C8EF96../DATAFILE/system.298.975539497

    10   600      PDB:SYSAUX           NO      +DATA/RAC_DB/6BAA223C8EF96../DATAFILE/sysaux.297.975539497

    11   5        PDB:USERS            NO      +DATA/RAC_DB/6BAA223C8EF96../DATAFILE/users.290.975539621

    List of Temporary Files
    =======================
    File Size(MB) Tablespace           Maxsize(MB) Tempfile Name
    ---- -------- -------------------- ----------- --------------------
    1    201      TEMP                 32767      +DATA/RAC_DB/TEMPFILE/temp.285.975538165
    2    100      PDB$SEED:TEMP        32767      +DATA/RAC_DB/FD9AC20F64D24../DATAFILE/pdbseed_temp-pm.dbf
    3    20       PDB:TEMP             32767      +DATA/RAC_DB/6BAA223C8EF96../TEMPFILE/temp.291.975539559

    5.  Create PDB Database directories

    [oracle@paris]$ mkdir –p /u01/oradata/paris/PDBSEED     ##PDB$SEED:
    [oracle@paris]$ mkdir -p /u01/oradata/paris/PDB         ##PDB: [root@paris ]$ chmod -R 775 /u01/oradata/paris

    6. Duplicate the primary database to the standby site

    RMAN> run
    {
    allocate channel prmy1 type disk;
    allocate channel prmy2 type disk;
    allocate auxiliary channel stby1 type disk;
    set newname for tempfile 1 to '/u01/oradata/paris/data/temp01.dbf';
    set newname for tempfile 2 to '/u01/oradata/paris/PDBSEED/temp01.dbf';
    set newname for tempfile 3 to '/u01/oradata/paris/PDB/temp01.dbf';
    set newname for datafile 5 to '/u01/oradata/paris/PDBSEED/system.dbf';
    set newname for datafile 7 to '/u01/oradata/paris/PDBSEED/sysaux.dbf';
    set newname for datafile 9 to '/u01/oradata/paris/PDB/system.dbf';
    set newname for datafile 10 to '/u01/oradata/paris/PDB/sysaux.dbf';
    set newname for datafile 11 to '/u01/oradata/paris/PDB/users.dbf';
    duplicate target database for standby from active database 
    #DORECOVER
    spfile
    parameter_value_convert 'RAC_DB','PARIS'
    set 'db_unique_name'='PARIS'
    set diagnostic_dest='/u01/app/oracle'
    set audit_file_dest='/u01/app/oracle/audit/paris'
    set core_dump_dest='/u01/app/oracle/diag/rdbms/paris/paris/cdump'
    set db_recovery_file_dest='/u01/oradata/paris/FRA'
    set db_create_file_dest='/u01/oradata/paris/data'
    set db_create_online_log_dest_1='/u01/oradata/paris/data'
    set db_create_online_log_dest_2='/u01/oradata/paris/FRA'
    set CONTROL_FILES='/u01/oradata/paris/FRA/control01.ctl'
    set CLUSTER_DATABASE='FALSE' 
    set 'Fal_server'='london'
    set log_Archive_dest_2='SERVICE=london ASYNC VALID_FOR=(ONLINE_LOGFILES,PRIMARY_ROLE) DB_UNIQUE_NAME=RAC_DB'
    nofilenamecheck;  }

    see complete output here : https://bit.ly/2LDnf2b

    7. Check the Standby Database status

    PARIS> select db_unique_name,database_role,open_mode from v$database;
    DB_UNIQUE_NAME  DATABASE_ROLE    OPEN_MODE --------------- ---------------- -------------------- PARIS           PHYSICAL STANDBY MOUNTED

    III. DATA GUARD BROKER CONFIGURATION                               Go to Top

      a. Primary Host

                1. Configure and Enable the broker parameter  

    LONDON> alter system set dg_broker_config_file1='+DATA/RAC_DB/dr1london.dat' scope=both sid='*';
    
    LONDON> alter system set dg_broker_config_file2='+FRA/RAC_DB/dr2london.dat' scope=both sid='*';
    
    LONDON >  alter system set dg_broker_start=true scope=both sid='*';

     2. Unset  the log_archive_dest_2 parameter to avoid  ORA-16698

    Clear existing LOG_ARCHIVE_DEST_n on every instances referencing network locations is a prerequisite to create a broker configuration.  

    LONDON> select name,value from v$parameter where value like '%SERVICE%' ;
    NAME                     VALUE
    ------------------------ -------------------------------------------------------
    log_archive_dest_2        SERVICE=paris SYNC REOPEN=15 VALID_FOR
    (ONLINE_LOGFILES,PRIMARY_ROLE) db_unique_name=PARIS
    LONDON> alter system set log_ARCHIVE_DEST_2='' scope=both; 

      b. Standby Host

    1. Configure and Enable the broker parameter  

    PARIS > alter system set dg_broker_start=true scope=both ;

    2. Unset  the log_archive_dest_2 parameter   

    PARIS> alter system set log_ARCHIVE_DEST_2='' scope=both; 

      c. Create Broker configuration

         1. Creation

           Execute the following in the DGMGRL window to create and enable the broker configuration

      $ dgmgrl sys/racattack@london
      DGMGRL> CREATE CONFIGURATION DG_RAC12 as primary database is RAC_DB connect identifier is london; 

      Configuration "DG_RAC12" created with primary database "RAC_DB"

      ## Add standby Database # Paris

      DGMGRL> add database PARIS as connect identifier is paris maintained as physical; 
      Database "paris" added

      ## enable configuration
      DGMGRL> enable configuration;
      Enabled.

    2. check the configuration    

    DGMGRL> show configuration
    Configuration - dg_rac12
    Protection Mode: MaxPerformance
      Members:
      rac_db - Primary database
        paris  - Physical standby database
    Fast-Start Failover: DISABLED
    Configuration Status:
    SUCCESS  
    DGMGRL> show database paris
    Database - paris
    Role:               PHYSICAL STANDBY
      Intended State:     APPLY-ON
      Transport Lag:      0 seconds (computed 0 seconds ago)
      Apply Lag:          0 seconds (computed 0 seconds ago)
      Average Apply Rate: 932.00 KByte/s
      Real Time Query:    OFF
      Instance(s):
        PARIS
    Database Status: SUCCESS
    DGMGRL> show database rac_db
    Database - rac_db
      Role:               PRIMARY
      Intended State:     TRANSPORT-ON
      Instance(s):
        RACDB_1
        RACDB_2
    Database Status:
    SUCCESS


    IV. DATA GUARD ADMINISTRATION USING ORACLE BROKER   

      a. Switchover to Paris                                                                                                             Go to Top

                1. validate the database prior to a role change

    DGMGRL> validate database paris
      Database Role:     Physical standby database
      Primary Database:  rac_db
      Ready for Switchover: Yes
      Ready for Failover:   Yes (Primary Running)
      Capacity Information:
        Database  Instances        Threads       
        rac_db    2                2             
        paris     1                2             
        Warning: the target standby has fewer instances than the
        primary database, this may impact application performance

      Flashback Database Status:
        rac_db:  Off
        paris:   Off 

               2. switchover to standby Database

    DGMGRL> SWITCHOVER TO 'paris'
    Performing switchover NOW, please wait...
    Operation requires a connection to instance "PARIS" on database "paris"
    Connecting to instance "PARIS"...
    Connected as SYSDBA.
    New primary database "paris" is opening...
    Oracle Clusterware is restarting database "rac_db" ...
    Switchover succeeded, new primary is "paris"
    DGMGRL> show configuration
    Configuration - dg_rac12
      Protection Mode: MaxPerformance
      Members:
      paris  - Primary database
        rac_db - Physical standby database
    Fast-Start Failover: DISABLED

    Configuration Status:
    SUCCESS   (status updated 21 seconds ago)
    DGMGRL> show  database  rac_db
    Database - rac_db
      Role:               PHYSICAL STANDBY
      Intended State:     APPLY-ON
      Transport Lag:      0 seconds (computed 1 second ago)
      Apply Lag:          0 seconds (computed 1 second ago)
      Average Apply Rate: 128.00 KByte/s
       Real Time Query:    OFF
      Instance(s):
        RACDB_1 (apply instance) --- In RAC only one instance applies redo
        RACDB_2
                  

      b. Change and verify the Apply instance

                1. change the APPLY-ON state from instance RACDB_1 to RACDB_2

        Only one RAC instance can run log-apply services at any time (Apply instance). The
        current apply instance is RACDB_1. Run the below command to update the Preferred Apply Instance:

    DGMGRL> EDIT DATABASE RAC_DB SET STATE='APPLY-ON' WITH APPLY INSTANCE=RACDB_2;  
    --------------------                                                           
    Succeeded.                                                                    

      Check the applied change

    DGMGRL> show database rac_db
    Database - rac_db
      Role:               PHYSICAL STANDBY
      Intended State:     APPLY-ON
      Transport Lag:      0 seconds (computed 0 seconds ago)
      Apply Lag:          0 seconds (computed 0 seconds ago)
      Average Apply Rate: 0 Byte/s
      Real Time Query:    OFF
      Instance(s):
        RACDB_1
        RACDB_2 (apply instance)
     
    Database Status: SUCCESS  

      c. Switch back to former primary RAC_DB                                                                           Go to Top

                Run this if no error was shown in the validate database rac_db command 

    DGMGRL> switchover to ‘rac_db’
    Performing switchover NOW, please wait...
    Operation requires a connection to instance "RACDB_1" on database "rac_db"
    Connecting to instance "RACDB_1"...
    Connected as SYSDBA.
    New primary database "rac_db" is opening...
    Operation requires start up of instance "PARIS" on database "paris"
    Starting instance "PARIS"...
    ORACLE instance started.
    Database mounted.
    Switchover succeeded, new primary is "rac_db"

                    Note : Additionally it’s always useful to keep an eye on the below logs for errors during switchovers

    -- RAC node 1
    tail -f /u01/app/oracle/diag/rdbms/rac_db/RACDB_1/trace/alert_RACDB_1.log
    tail -f /u01/app/oracle/diag/rdbms/rac_db/RACDB_1/trace/drcRACDB_1.log
    -- RAC node 2
    tail -f /u01/app/oracle/diag/rdbms/rac_db/RACDB_2/trace/alert_RACDB_2.log tail -f /u01/app/oracle/diag/rdbms/rac_db/RACDB_2/trace/drcRACDB_2.log

    -- Single instance Paris
    #tail -f /u01/app/oracle/diag/rdbms/paris/paris/trace/alert_PARIS.log
    #tail -f /u01/app/oracle/diag/rdbms/paris/paris/trace/drcPARIS.log


      e. Common mistakes

                1- Data Guard broker and RAC communication:
                  If you choose a custom service created with srvctl on the RAC Primary site in the tns description to access
                  the RAC primary instances (Connect Identifier).You will receive the below error while performing either
                 switchover or failover operation.

    DGMGRL> SWITCHOVER TO 'paris' verbose; 
      Performing switchover NOW, please wait...
    Operation requires a connection to instance "PARIS" on database "paris"
    Connecting to instance "PARIS"...
    Connected as SYSDBA.
    New primary database "paris" is opening...
    Oracle Clusterware is restarting database "rac_db" ...
    Unable to connect to database using london
    ORA-12514: TNS:listener does not currently know of service requested in connect descriptor

                  The reason behind it is that a switchover using the Data Guard broker causes the database role to be changed in the
                  OCR. At the service startup, the CRS agent will check the database ROLE attribute saved in the OCR, to see if the
                  database role is matching the service role or not, and if the mismatch (service role vs new role after switchover) has
                  been detected the service won’t start. Thus the Broker won’t be able to communicate with the new standby DB.

                  Solution: Always use the default database service created upon RAC installation as the DGConnectidentifier .
                  In my case I replaced the custom service by  the native one rac_db which allows dynamic registration.

    sys@RAC_DB.EVILCORP.COM> show parameter service_name
    NAME                                 TYPE        VALUE ------------------------------------ ----------- ------------------------------ service_names                        string      RAC_DB.evilcorp.com

    - Check the listener service registrations after switchover

    [root@london1]# lsnrctl services
    Service "RAC_DB_DGB.evilcorp.com" has 1 instance(s).
      Instance "RACDB_2", status READY, has 1 handler(s) for this service...
    ...
          2- Data Guard broker link with non grid based Oracle Database:
              Oracle Data Guard requires that you configure a static listener for the database and for the broker
              agent If neither Oracle restart nor Oracle clusterware are available (non GRID installation). Refer to   
              the “Primary site preparation” section upper in this guide.
               

      d. Conclusion

                 We’ve explored in this exercise how easy it became to setup a  “Maximum Availability Architecture – single instance
                  Physical Standby for a High-available (RAC)  primary environment” – using RMAN duplicate and Data Guard Broker
                  in simple steps . The major challenge in this lab was certainly the Oracle network configuration as I had to face
                  different errors while trying to figure the relevant setting .

                                                                                                                                                                              Go to Top