Intro
Catchy title I give you that, but there is more in this article than its title. Besides getting familiar with OCI-ClI, this lab will introduce another way to work with OCI API requests as described in the OCI Operations Associate exam(1Z0-1067) training.
The tutorial will not only walk you through the required steps to have an instance spun in the cloud, but you will be able do it elegantly, through interactive shell scripts that’ll transform your infrastructure as code experience. Although it won’t replace solutions like terraform, it’s still an agile way to adopt your Cloud vendor’s IaC.
I.Overview
Some of you already know that OCI-CLI and JSON makes it challenging to manage resources without making mistakes with ocids and lookups syntax. That’s why you won’t see another post with random oci-cli commands thrown at you. Instead I created 7 interactive BASH scripts that will make the task easier and reusable. It took me few days instead of 2 hours to do this but I hope the scripts would help the beginners get introduced to oci-cli. Feel free to clone my GitHub repo before starting this tutorial.
Topology
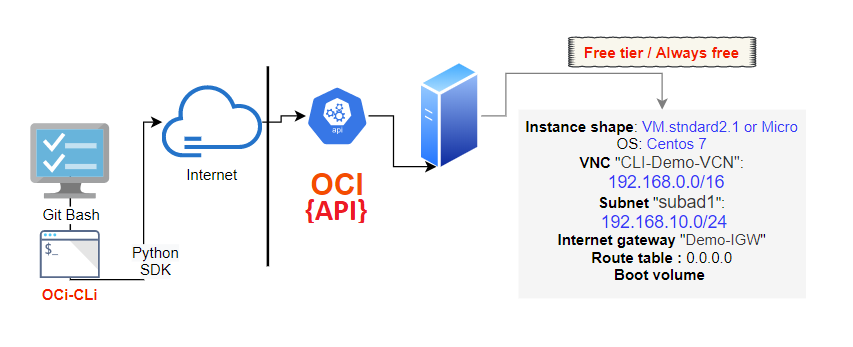
The following illustration shows the layers involved between your workstation an Oracle cloud infrastructure while running the oci-cli commands along with the instance attributes we will be provisioning (Some names might be changed).
CLI setup and assumptions
This is beyond the scope of this article but please follow my previous Blog post if you haven't configured your CLI environment yet . Also since I’m on windows I mainly used Gitbash (or WSL) as bash terminal client .
I will assume that the below elements are present/configured in your workstation
- The private API key and its fingerprint to authenticate oci-cli with your tenancy account
- The ssh key pair required when launching the compute
The oci config file: (refer to my Blog post for details on how to set it up)
$ cat /c/Users/brokedba/.oci/config
[DEFAULT]
user=ocid1.user.oc1..aaaaaaaayd2yf6ru5xxxxxxxxxx fingerprint=bf:3b:2e:48:a2:98:xx:xx:xx:xx:xx:xx:xx key_file=C:\Users\brokedba\.oci\oci_api_key.pem
tenancy=ocid1.tenancy.oc1..aaaaaaxxxx
region=ca-toronto-1    ## adapt the above info to your default OCI Profile
$ oci setup oci-cli-rc
# adds parameters such as command aliases and predefined queries
$ export OCI_CLI_SUPPRESS_FILE_PERMISSIONS_WARNING=True
Do a quick API call request to confirm your setup is valid (my region is Toronto):
$ oci iam availability-domain list --output table
+-----------------------------+------------------+------------------------+
|   compartment-id            |    id            |  name                  |
+-----------------------------+------------------+------------------------+
| ocid1.tenancy.oc1..aaaa5g4a | ocid1.availabili | BahF:CA-TORONTO-1-AD-1 |
+-----------------------------+------------------+------------------------+
II. Clone the repository
- Pick an area that is close to your oci directory on your file system and issue the following command.
$ git clone https://github.com/brokedba/oci-cli-examples.git
Note: You can also use Git GUI to clone it as shown below

- Create environment variables that store all your tenancy,user, and Compartment ocids so your oci commands would be shorter (can be a file that you’d source).
export T="ocid1.tenancy.oc1.xxxx"
export U="ocid1.user.oc1..xxx"
export C="ocid1.tenancy.oc1..xxx"
III. Deployment
CREATE A VCN
- As said before, all these scripts are interactive. Here, I added default values for the VCN Name/CIDR block along with checks on the IP/CIDR format. Each script is also clickable so you can see the content.
brokedba@ MINGW64> ./create_vcn.sh
  Enter the VCN name you wish to create [CLI-VCN]:
  selected VCN name : CLI-VCN
  Enter the VCN network CIDR to assign [192.168.0.0/16]: 192.168.0.0/20
  == VCN information ===
  VCN name = CLI-VCN
  CIDR = 192.168.0.0/20
  VCN Dns-Label = CLIVCN
  ==== Created VCN details ====
 +----------------+--------+----------------------+----------+
 | CIDR           | DNS    | DOMAIN_NAME          | VCN_NAME |
 +----------------+--------+----------------------+----------+
 | 192.168.0.0/20 | clivcn | clivcn.oraclevcn.com | CLI-VCN  |
 +----------------+--------+----------------------+----------+

Delete command ==> oci network vcn delete --vcn-id ocid1.vcn.oc1.ca-toronto-1.aq --force
Tip: click on the script to see its content.
A delete command is also included in each script so you could destroy/repeat without using the Web Console. CREATE A SUBNET WITHIN THE VCN
- Here, You can pick the right VCN and hit Enter for both subnet name and CIDR Block. My CIDR checker won't validate any complex subnetting. Hence If you want to choose a custom CIDR block make sure it's contained in the VCN and doesn’t overlap with any existing subnet (of the same VCN).
brokedba@ MINGW64> ./create_subnet.sh
+-----------------+--------+----------------------+----------+
| CIDR            | DNS    | DOMAIN_NAME          | VCN_NAME |
+-----------------+--------+----------------------+----------+
| 192.168.0.0/20  | clivcn | clivcn.oraclevcn.com | CLI-VCN  |
+-----------------+--------+----------------------+----------+
select the VCN you wish to attach your subnet to []: CLI-VCN
selected VCN name : CLI-VCN
Enter the subnet name you wish to create [CLI-SUB]:
selected SUBNET name : CLI-SUB
============ SUBNET CIDR ==========================
subnet CIDR must be contained in its VCN CIDR block 192.168.0.0/20  ===================================================
Enter the VCN network CIDR to assign [192.168.10.0/24]:
== Subnet information ===
  VCN name = CLI-VCN
  VCN CIDR =  192.168.0.0/20
  SUBNET name = CLI-SUB
  SUBNET CIDR = 192.168.10.0/24
==== Created SUBNET details ====
+---------+-----------------+-------------------+-----------------------------+
| SUBNAME | SUB_CIDR        | SUB_OCID          | subdomain                   |
+---------+-----------------+-------------------+-----------------------------+
| CLI-SUB | 192.168.10.0/24 | ocid1.subnet.xxxx | clisub.clivcn.oraclevcn.com |
+---------+-----------------+-------------------+-----------------------------+

delete command ==>  oci network subnet delete --subnet-id ocid1.subnet.oc1.ca-toronto-1.aaaaaaaaoly2q --force
Note: The script still checks if the entered CIDR for the subnet has a prefix that is between the VCN's and /30.
CREATE AN INTERNET GATEWAY
- This is pretty straightforward but I managed to tuck in a little check that exits if a gateway already exists.
brokedba@ MINGW64> ./create_igateway.sh
select the VCN you wish to add thye I-Gateway to []: CLI-VCN
selected VCN name : CLI-VCN
Creating a New Internet gateway
Enter the Internet gateway name you wish to create [CLI-IGW]:
+---------+---------------------------------------+----------+
| ENABLED | GTID                                  | GTW_NAME |
+---------+---------------------------------------+----------+
| True    | ocid1.internetgateway.oc1.ca-toronto-1| CLI-IGW  |
+---------+---------------------------------------+----------+

Delete command ==>  oci network internet-gateway delete --ig-id ocid1.internetgateway.oc1.ca-toronto-1.aaaaaaaasxx --force
SETUP ROUTE TABLE
- What you don't see here is a VCN list prompted by the script to allow you to choose the right VCN.
brokedba@ MINGW64> ./create_route.sh
select the VCN you wish to set the route table for []: CLI-VCN
selected VCN name : CLI-VCN
Internet gateway exists => Seting up the default Route table
 ...
 ==== Default Route table entries for CLI-VCN ====
 +-----------+------------------------+-----------------------+-----------+
 | CIDR      | RT_OCID                | Route                 | dest      |
 +-----------+------------------------+-----------------------+-----------+
 | 0.0.0.0/0 | ocid1.routetable.oc1.xx| Default Route CLI-VCN | 0.0.0.0/0 |
 +-----------+------------------------+-----------------------+-----------+
LIST IMAGES
- At this point I could have added a script to configure a security list with additional ingress rules for port 80 but we said 10 minutes right !! ;). Below menu returns the last available image per OS type.
brokedba@ MINGW64> ./check_image.sh
******* Oci Image Selecta ! ************
Choose your Destiny ||{**}||

1) Oracle-Linux            5) Windows
2) CentOS                  6) Exit?
3) Oracle Autonomus Linux  7) All
4) Ubuntu
Select an option and press Enter: 2
+-----------------------+-------------------------+--------+-------+------------+
| ImageName             | OCID                    | OS     | Size  | time       |
+-----------------------+-------------------------+--------+-------+------------+
| CentOS-7-2020.05.20-0 | ocid1.image.oc1.ca.aaaaa| CentOS | 47694 | 2020-05-26T|
+-----------------------+-------------------------+--------+-------+------------+
CREATE INSTANCE
- Here we are, ready for liftoff. Now that the network resources are all set we can give this launch a shot. You can choose from a list of available shapes. In my case I only have access to one shape since I'm on AlwaysFree so the default value is Micro. My script will ask you to retry if the VCN and Subnet don’t match.
brokedba@ MINGW64> ./create_instance.sh ******* Oci instance launch ! ************ Choose your Shape ||{**}|| +----------+--------+--------------------------+ | CPUcores | Memory | ShapeName | +----------+--------+--------------------------+ | 1.0 | 1.0 | VM.Standard.E2.1.Micro | +----------+--------+--------------------------+ Note: If VM.Standard2.1 is not listed that means that your FreeTier trial is over [Default option =Micro compute] Enter the Shape name you wish to create [VM.Standard.E2.1.Micro]: Enter the Path of your ssh key [/c/Users/brokedba/oci/.ssh/id_rsa.pub]: Enter the name of your new Instance [Demo-Cli-Instance]: Choose your Image ||{**}|| 1) Oracle-Linux 4) Ubuntu 2) CentOS 5) Windows 3) Oracle Autonomus Linux 6) Abort? Select an option and press Enter: 2 +-----------------------+----------------+--------+-------+ | ImageName | OCID | OS | Size | +-----------------------+----------------+--------+-------+ | CentOS-7-2020.05.20-0 | ocid1.image.oc | CentOS | 47694 | +-----------------------+----------------+--------+-------+ ****************** Network ******************* +-----------------+--------+----------------------+----------+ | CIDR | DNS | DOMAIN_NAME | VCN_NAME | +-----------------+--------+----------------------+----------+ | 192.168.0.0/20 | clivcn | clivcn.oraclevcn.com | CLI-VCN | +-----------------+--------+----------------------+----------+ select the VCN for your new instance []: CLI-VCN selected VCN name : CLI-VCN
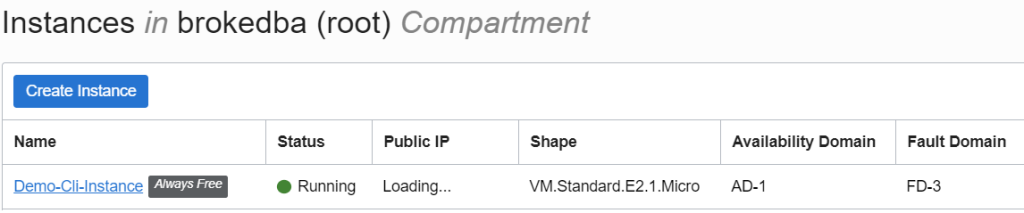
+---------+-----------------+----------------------------+ | SUBNAME | SUB_CIDR | SUB_OCID | +---------+-----------------+----------------------------+ | CLI-SUB | 192.168.10.0/24 | ocid1.subnet.oc1.xxxxxxxx. | +---------+-----------------+----------------------------+ Select The Subnet for your new instance [CLI-SUB]: ===== Instance Deployment Detail ======== selected Subnet name : CLI-SUB selected Instance name : Demo-Cli-Instance selected shape: VM.Standard.E2.1.Micro selected public key: /c/Users/brokedba/oci/.ssh/id_rsa.pub Action completed. Waiting until the resource has entered state: ('RUNNING') ==================================== Check the status of the new Instance ==================================== +------------+------------------+------------------+----------------------+---------+ | FD | id | name | shape | state | +------------+------------------------------------------------------------+---------+ | FAULT-DO-3 | ocid1.instance.xx|Demo-Cli-Instance |VM.Standard.E2.1.Micro| RUNNING | +----------------+--------------------------------------------------------+---------+ +-------------------+--------------+-----------------+ | Instance | private | public | +-------------------+--------------+-----------------+ | Demo-Cli-Instance | 192.168.10.2 | 132.145.111.128 | +-------------------+--------------+-----------------+ Termination command ==> oci compute instance terminate --instance-id ocid1.instance.oc1.ca-toronto-1.an2g6ljrajjjavactxqkdwztgublv2okiaa --force CONNECTION TO THE INSTANCE AND CHECK THE STATUS
- Grab the public IP above and issue the following command from the directory where your ssh key is located
$ ssh -i .ssh/id_rsa opc@132.145.111.128 [opc@hostcli-demo ~]$ cat /etc/redhat-release CentOS Linux release 7.8.2003 (Core) - I have also added other scripts in my GitHub repo>> to list the images and the current instances details
brokedba@ MINGW64> ./check_instance.sh
CONCLUSION & IMPROVEMENTS
- We just saw how oci-cli can perfectly fit in with Cloud practitioners’ daily activities, so long as we take the time to integrate its flexibility with familiar artifacts such as shell scripting. Moreover, the painful handling of long OCIDs and JSON query syntax errors are here eliminated.
- Improvement : Adding security lists and a cloud-init function during the launch (--user-data-file)
- Feel free to fork the repository and adapt your own version of these scripts
- The colors aren’t visible in my scripts output yet but will be configured later this week.
No comments:
Post a Comment