Showing posts with label RAC. Show all posts

Sunday, December 20, 2020

Convert local listeners to Oracle Grid managed listeners


Intro

One of the advantages of Oracle grid Infrastructure is to restart all managed resources (databases, asm, listeners,…etc)  automatically whenever you (re)start the cluster service (crs) or reboot the whole server.

I recently had to patch an oda where the client still had few listeners (with non default ports) managed locally and not through grid. This means that anytime there is maintenance or a reboot those listeners would require a manual restart. I ,hence, needed to convert them into Clusterware resources so we wouldn’t worry about restarting them manually after the patch.

Downtime? 

Existing connections won’t be interrupted but new connections will wait for the database services to register back to the new listeners recreated in the Clusterware as the old ones will be stopped during the process. We obviously can’t add a listener when another listener is running with the same port.  


Use case

This was done on a single node ODA where single instance databases were deployed but still managed by the grid infrastructure software. There were 3 listeners(1522,1523,1524) defined with a non default port and a couple of instance configured to be registered to those listeners.

Service registration

The mentioned instances services were registered to the non default listeners using local_listener parameter. Normally, you don't have to set listener parameters, neither local_listener nor remote_listener because the background process LREG will register services with the default local and remote 1521 listener automatically. With a different port,however, local_listener must be set to point to the listeners’ addresses (i.e port 1522).

- In my case each of the instances had the local_listener set to a similar entry to the below, depending on the port.

SQL>  show parameter local_listener
NAME                                 TYPE        VALUE
------------------------------------ ----------- --------------------------------------
local_listener                       string      (ADDRESS=(PROTOCOL=TCP)(HOST=odaprd1)
(PORT=1522))

Note: You can also resolve the LOCAL_LISTENER address to a listener alias defined in the tnsnames file on the database host

THE STEPS :
 Below steps were ran as grid user but in case of  a single ownership (oracle user) for grid and database software you can use oracle.

1. Backup  the existing listener file

[grid@odaprd] cp $GRID_HOME/network/admin/listener.ora ~/listener.ora.bkp

2. Stop the listeners in question

[grid@odaprd1]$ export ORACLE_HOME=/u01/app/18.0.0.0/grid
[grid@odaprd1]$ lsnrctl stop LISTENER_1522
[grid@odaprd1]$ lsnrctl stop LISTENER_1523
[grid@odaprd1]$ lsnrctl stop LISTENER_1524

3. Edit the listener file

[grid@odaprd] vi $ORACLE_HOME/network/admin/listener.ora

Delete the entries related to the listeners we stopped to avoid conflicts with the ones created via srvctl add listener

LISTENER_1522=(DESCRIPTION_LIST=...
ENABLE_GLOBAL_DYNAMIC_ENDPOINT_LISTENER_1522=ON

...
LISTENER_1523=(DESCRIPTION_LIST=...
ENABLE_GLOBAL_DYNAMIC_ENDPOINT_LISTENER_1523=ON
...
LISTENER_1524=(DESCRIPTION_LIST=...
ENABLE_GLOBAL_DYNAMIC_ENDPOINT_LISTENER_1524=ON


4. Add the listeners resources in the crs

Now we can add the listeners at clusterware level. Note that -p argument is likely deprecated and replaced with –endpoints 

[grid@odaprd] srvctl add listener -l LISTENER_1522 -o /u01/app/18.0.0.0/grid -p 1522
[grid@odaprd] srvctl add listener -l LISTENER_1523 -o /u01/app/18.0.0.0/grid -p 1523
[grid@odaprd] srvctl add listener -l LISTENER_1524 -o /u01/app/18.0.0.0/grid -p 1524

5.  Confirm that the changes are now effective

There are few ways to verify the status of the newly created listeners. lsnrctl status is one of them and will show the database services that were initially registered to the previous local listeners. The status can also be checked using srvctl  


[grid@odaprd] srvctl status listener -l LISTENER_1522
Listener LISTENER_1522 is enabled
Listener LISTENER_1524 is running on node(s): odaprd

[grid@odaprd] srvctl status listener -l LISTENER_1523
Listener LISTENER_1523 is enabled
Listener LISTENER_1523 is running on node(s): odaprd

[grid@odaprd] srvctl status listener -l LISTENER_1524
Listener LISTENER_1524 is enabled
Listener LISTENER_1524 is running on node(s): odaprd

Or you can run Fred Denis’ famous rac-cluster.sh script that shows you the graphical display of your grid resources

[grid@odaprd] ./rac-status.sh -e

This image has an empty alt attribute; its file name is image-1.png

Conclusion

It is very easy to move existing listeners defined with non default ports to the clusterware as long as the local_listener parameter is defined. Although I haven’t tried to run srvctl add listener without pre-emptively removing the old entries defined the listener.ora but I am pretty sure that would lead to a conflict and would trigger an error.

Friday, December 18, 2020

Add SCAN VIPs to Oracle RAC with zero “listener” downtime


Intro

Infrastructure teams are usually more keen to maintain a network stability rather than altering their existing configuration every other day.This means that once the application and database hosts are provisioned and running, the DBA won't witness a topology change unless a migration of the servers/applications are in the pipes. But for highly available environment like Oracle RAC, the DBA’s help can still be required when the network changes impact the related clusterware resources.

In my case my client had a RAC one Node database in an ODA with only one scan IP address (don’t ask me why) which made the whole environment a bit too shaky. Hence the DNS configuration had to add another IP for SCAN entry

What would be the downtime in order to update RAC with a newly added scan VIP in the DNS server? 

The short answer is “0”, but I needed to refresh my memory, so I checked few resources and articles online but all of them were mentioning a mandatory stop/start for both scan and scan listener during the change.
My guts were telling otherwise as I remember that some srvctl modify commands could apply changes online. In this particular case, as long as you are not changing the IP address/port of an existing SCAN[listener] there is no need to stop anything.

To see how it works, I did a test in a two node RAC Cluster lab but it works the same on a RAC-One node.


Check the 3rd VIP added in the DNS server

$ nslookup  ecl-oda-scan
Server: 10.10.2.2
Address: 10.10.2.2#53
Name: ecl-oda-scan.evilcorp.com
Address: 10.10.30.49, Address: 10.10.30.48,Address: 10.10.30.50 <== added IP

Check the existing scan configuration in the cluster

$ srvctl config scan
SCAN name: ecl-oda-scan, Network: 1
Subnet IPv4: 10.10.30.0/255.255.255.0/bond0, static
SCAN 1 IPv4 VIP: 10.10.30.49
SCAN VIP is enabled.
SCAN 2 IPv4 VIP: 10.10.30.48
SCAN VIP is enabled
$ srvctl status scan_listener
SCAN listener LISTENER_SCAN1 is running on node ecl-oda-0
SCAN listener LISTENER_SCAN2 is running on node ecl-oda-1


Check the existing scan listener configuration in the cluster

$ srvctl config  scan_listener
SCAN Listeners for network 1:
Registration invited nodes:
Registration invited subnets:
Endpoints: TCP:1521
SCAN Listener LISTENER_SCAN1 exists and enabled
SCAN Listener LISTENER_SCAN2 exists and enabled
$ srvctl status scan_listener
SCAN listener LISTENER_SCAN1 is running on node ecl-oda-0
SCAN listener LISTENER_SCAN2 is running on node ecl-oda-1

 Note:  Now we can start updating the change at clusterware level.


1. Run srvctl modify scan command to create additional SCAN VIP resources

There’s no need to stop/restart the existing scan resources since we just added a new scan VIP in the DNS zones  

$ srvctl modify scan -scanname ecl-oda-scan  

$ srvctl config scan
SCAN name: ecl-oda-scan, Network: 1
Subnet IPv4: 10.10.30.0/255.255.255.0/bond0, static
SCAN 1 IPv4 VIP: 10.10.30.49
SCAN VIP is enabled.
SCAN 2 IPv4 VIP: 10.10.30.48
SCAN VIP is enabled

SCAN 3 IPv4 VIP: 10.10.30.50
SCAN VIP is enabled.
$ srvctl status  scan
SCAN VIP scan1 is enabled
SCAN VIP scan1 is running on node ecl-oda-0
SCAN VIP scan2 is enabled
SCAN VIP scan2 is running on node ecl-oda-1
SCAN VIP scan3 is enabled
SCAN VIP scan3 is not running


2. Create Oracle Clusterware resource for the additional SCAN listener to go with the additional SCAN VIP  

Here again, no need to stop any of the existing scan listeners first

$ srvctl modify scan_listener -update
$ srvctl status  scan_listener
SCAN Listener LISTENER_SCAN1 is enabled
SCAN listener LISTENER_SCAN1 is running on node ecl-oda-0
SCAN Listener LISTENER_SCAN2 is enabled
SCAN listener LISTENER_SCAN2 is running on node ecl-oda-1
SCAN Listener LISTENER_SCAN3 is enabled
SCAN listener LISTENER_SCAN3 is not running


3. Start the 3rd scan resource added to the clusterware 

The trick is to only start the added scan by using the scan number as argument

Syntax (19c)
  srvctl start scan [-scannumber ordinal_number] [-node node_name]

$ srvctl start scan -scannumber 3
SCAN VIP scan3 is running on node ecl-oda-0
$ srvctl modify scan_listener -update


4. Start the 3rd scan listener resource added to the clusterware 

$ srvctl start scan_listener -i 3
SCAN listener LISTENER_SCAN3 is running on node ecl-oda-0

5. Confirm that the changes are now effective.

$ srvctl status  scan
SCAN VIP scan1 is enabled SCAN VIP scan1 is running on node ecl-oda-0 SCAN VIP scan2 is enabled SCAN VIP scan2 is running on node ecl-oda-1 SCAN VIP scan3 is enabled SCAN VIP scan3 is running on node ecl-oda-0
$ srvctl status scan_listener
SCAN Listener LISTENER_SCAN1 is enabled
SCAN listener LISTENER_SCAN1 is running on node ecl-oda-0
SCAN Listener LISTENER_SCAN2 is enabled
SCAN listener LISTENER_SCAN2 is running on node ecl-oda-1
SCAN Listener LISTENER_SCAN3 is enabled
SCAN listener LISTENER_SCAN3 is running on node ecl-oda-0


Conclusion

This example confirms that not all SCAN modifications require a shutdown of your scan/listener resources. If it’s a new scan VIP that is added then the downtime is equal to zero as the new resources can be started independently (using -scannumber and -i arguments). 
Just make sure you are using the right syntax according to the version of the Grid software you are running :
- 18c

srvctl modify scan –n  [scan_name] 
srvctl modify scan_listener -u

- 19c

srvctl modify scan –scanname [scan_name]
srvctl modify scan_listener -update


Thursday, August 15, 2019

Clone a RAC 12c VM environment with Virtualbox (import/export)


Intro

Have you ever finished a lab in your laptop with several virtual machines connected to each other and thought “Well that was neat! but how can I create a backup in my external hard drive and run it again at work or in any other computer?” The answer lays in this very article. For those of you who have finished any RAC environment lab (i.e Racattack) in VirtualBox, saving images of the created Oracle RAC system and hand it over to another location for a restore could be done in a matter of minutes! 
As matter of fact, Oracle VM VirtualBox can import and export virtual machines in Open Virtualization Format (OVF) which is an industry-standard format that we are going to use in this tutorial.

This tutorial will describe the steps to export then import a RAC environment in Virtualbox through import/export Appliance tools and other commands.

Considerations

The export of a VM is a straightforward process and saving RAC images would be an easy task if it weren’t for the shared asm disks.Therefore asm disks needed a bit more care than the guest systems but all was done in a timely manner. Furthermore, make sure your new computer’s VirtualBox Host Only Ethernet Adapter has the same IP segment than your Vms before importing them.

Note:
The directory path names used during the export/import (C:/,D;/) should be adapted to your own environment.

Follow the below steps and try the GUI alternatives if you find it easier than the command line options.


1. Export Shared disks

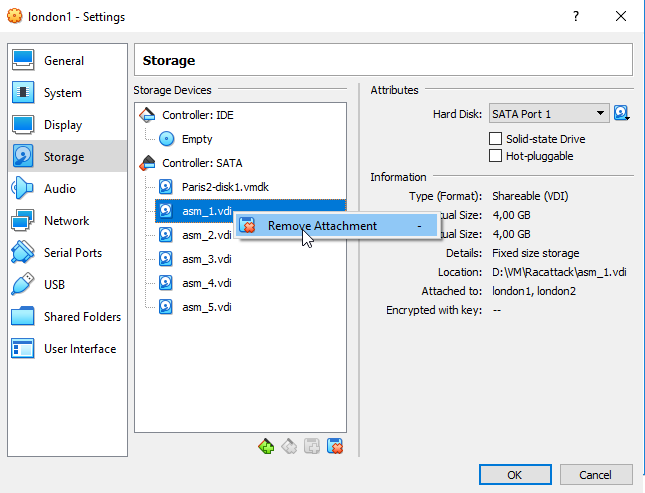
     - Detach the disks from RAC VMs:

image
     - Export them to a new location
"C:\Program Files\Oracle\VirtualBox\VBoxManage.exe" clonemedium disk "C:\VM\RAC lab\london1\asm_1.vdi" "H:\OS\ORACLE\Lab Oracle\asm_1.vdi" --format VDI --variant Fixed
"C:\Program Files\Oracle\VirtualBox\VBoxManage.exe" clonemedium disk "C:\VM\RAC lab\london1\asm_2.vdi" "H:\OS\ORACLE\Lab Oracle\asm_2.vdi" --format VDI --variant Fixed
"C:\Program Files\Oracle\VirtualBox\VBoxManage.exe" clonemedium disk "C:\VM\RAC lab\london1\asm_3.vdi" "H:\OS\ORACLE\Lab Oracle\asm_3.vdi" --format VDI --variant Fixed
"C:\Program Files\Oracle\VirtualBox\VBoxManage.exe" clonemedium disk "C:\VM\RAC lab\london1\asm_4.vdi" "H:\OS\ORACLE\Lab Oracle\asm_4.vdi" --format VDI --variant Fixed
"C:\Program Files\Oracle\VirtualBox\VBoxManage.exe" clonemedium disk "C:\VM\RAC lab\london1\asm_5.vdi" "H:\OS\ORACLE\Lab Oracle\asm_5.vdi" --format VDI --variant Fixed

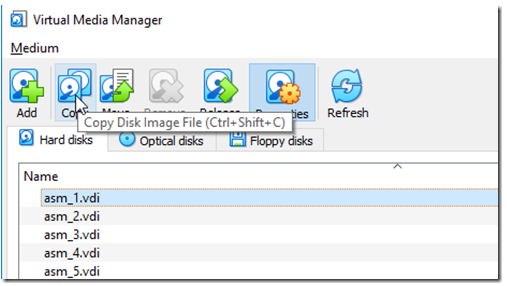
  Note: You can also start Disk Copying Wizard which is a GUI equivalent to the above.

image

2. Export the VMs to ovf templates

     - List VMs

"C:\Program Files\Oracle\VirtualBox\VBoxManage.exelist vms
"london1" {45ae6298-7e95-4ef1-864d-85c995cb46ff}                             
"london2" {3c6a0e27-74f0-47ea-b3d7-ac9c253bb03b}                             

     - Export the VMs
    The OVA extension encapsulates all OVF folder content (.ovf,.mf*.vhd or *.vmdk) into a single zipped file

"C:\Program Files\Oracle\VirtualBox\VBoxManage.exe" export "london1" -o  "H:\OS\ORACLE\Lab Oracle\london1.ova"  --ovf10     
"C:\Program Files\Oracle\VirtualBox\VBoxManage.exe" export "london2" -o  "H:\OS\ORACLE\Lab Oracle\london2.ova"  --ovf10                         

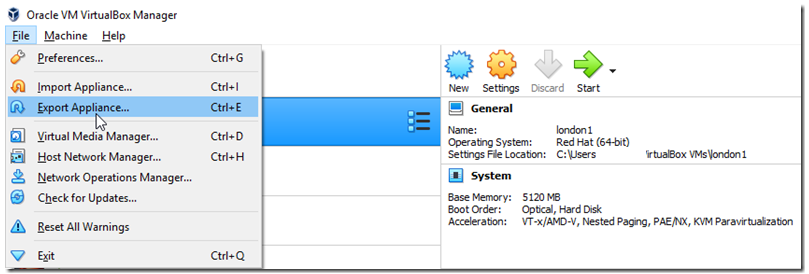
  Note: You can also start Export Appliance Wizard for each VM which is the GUI equivalent to the above commands.

image

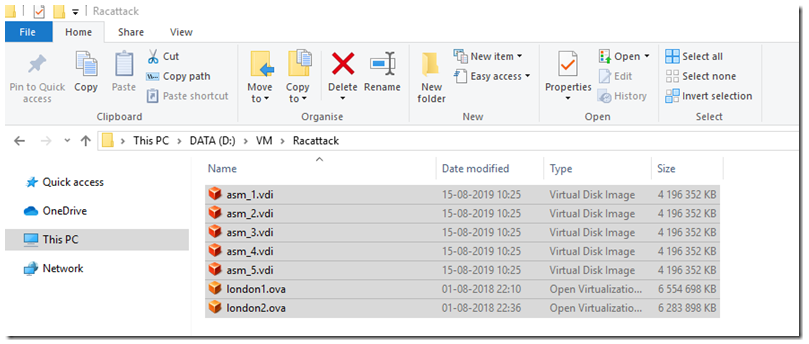
3. Copy the shared disks and exported VMs to a new Host

image


4. Import both VMS

"C:\Program Files\Oracle\VirtualBox\VBoxManage.exe" import "D:\VM\Racattack\london1.ova"     --options keepallmacs 
"C:\Program Files\Oracle\VirtualBox\VBoxManage.exe" import "D:\VM\Racattack\london2.ova"     --options keepallmacs   
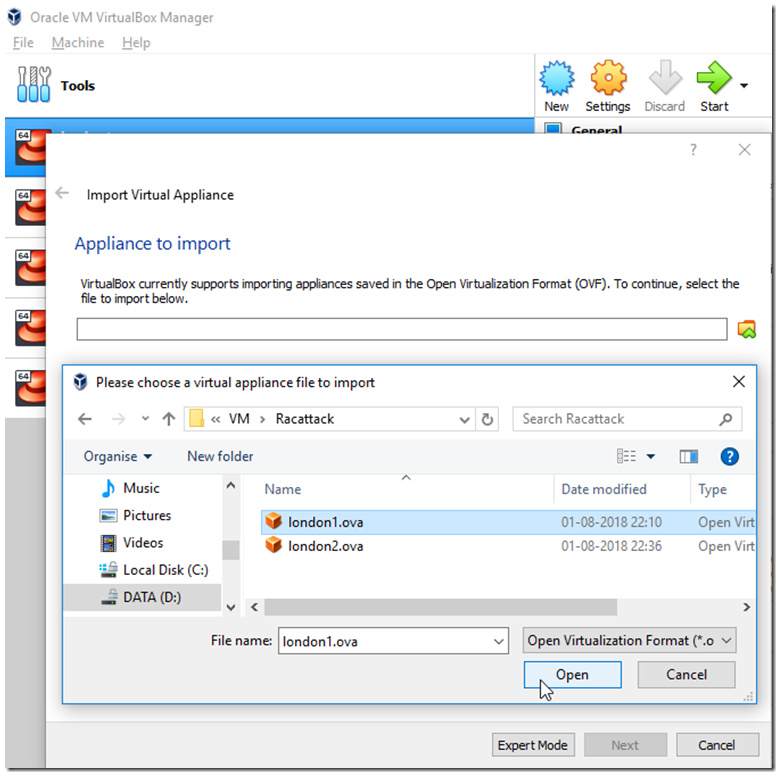
Note: You can also start Import Appliance Wizard for VM which is the GUI equivalent to the above commands.
 *** Make sure your new computer’s VirtualBox Host Only Ethernet Adapter has the same IP segment than your Vms (example in my lab :192.168.78.1)

image

5. Change asm disks to shared

"C:\Program Files\Oracle\VirtualBox\VBoxManage.exe" modifymedium disk "D:\VM\Racattack\asm_1.vdi" –type shareable
"C:\Program Files\Oracle\VirtualBox\VBoxManage.exe" modifymedium disk "D:\VM\Racattack\asm_2.vdi"  --type shareable "C:\Program Files\Oracle\VirtualBox\VBoxManage.exe" modifymedium disk "D:\VM\Racattack\asm_3.vdi"  --type shareable                          
"C:\Program Files\Oracle\VirtualBox\VBoxManage.exe" modifymedium disk "D:\VM\Racattack\asm_4.vdi"  --type shareable                          
"C:\Program Files\Oracle\VirtualBox\VBoxManage.exe" modifymedium disk "D:\VM\Racattack\asm_5.vdi"  --type shareable                          

   Note: You can also do the above through Virtual Media Manager  (GUI equivalent).

6. Attach the asm disks to both RAC VMs

"C:\Program Files\Oracle\VirtualBox\VBoxManage.exe" storageattach london1 --storagectl "SATA" --port 1  --device 0 --type hdd --medium "D:\VM\Racattack\asm_1.vdi" --mtype shareable  
"C:\Program Files\Oracle\VirtualBox\VBoxManage.exe" storageattach london1 --storagectl "SATA" --port 2  --device 0 --type hdd --medium "D:\VM\Racattack\asm_2.vdi" --mtype shareable                                 
"C:\Program Files\Oracle\VirtualBox\VBoxManage.exe" storageattach london1 --storagectl "SATA" --port 3  --device 0 --type hdd --medium "D:\VM\Racattack\asm_3.vdi" --mtype shareable
"C:\Program Files\Oracle\VirtualBox\VBoxManage.exe" storageattach london1 --storagectl "SATA" --port 4  --device 0 --type hdd --medium "D:\VM\Racattack\asm_4.vdi" --mtype shareable
"C:\Program Files\Oracle\VirtualBox\VBoxManage.exe" storageattach london1 --storagectl "SATA" --port 5  --device 0 --type hdd --medium "D:\VM\Racattack\asm_5.vdi" --mtype shareable
"C:\Program Files\Oracle\VirtualBox\VBoxManage.exe" storageattach london2 --storagectl "SATA" --port 1  --device 0 --type hdd --medium "H:\OS\ORACLE\Lab Oracle\asm_1.vdi" --mtype shareable       
"C:\Program Files\Oracle\VirtualBox\VBoxManage.exe" storageattach london2 --storagectl "SATA" --port 2  --device 0 --type hdd --medium "D:\VM\Racattack\asm_2.vdi" --mtype shareable      
"C:\Program Files\Oracle\VirtualBox\VBoxManage.exe" storageattach london2 --storagectl "SATA" --port 3  --device 0 --type hdd --medium "D:\VM\Racattack\asm_3.vdi" --mtype shareable      
"C:\Program Files\Oracle\VirtualBox\VBoxManage.exe" storageattach london2 --storagectl "SATA" --port 4  --device 0 --type hdd --medium "D:\VM\Racattack\asm_4.vdi" --mtype shareable      
"C:\Program Files\Oracle\VirtualBox\VBoxManage.exe" storageattach london2 --storagectl "SATA" --port 5  --device 0 --type hdd --medium "D:\VM\Racattack\asm_5.vdi" --mtype shareable
        image

7. ReConfigure the asm disks in each RAC nodes

   Since udev Device Mapping configuration got somehow lost during the import we will have to redo that again.
    On each VM do the following:

7.1 Create partition from above added disks
   - As root user use fdisk command to partition the attached disks. Repeat the steps below for all the disks (sdb, sdc, sdd,
   sde,sdf). 

 [root@london1 ~]# fidsk /dev/sd*     
      >> n    -- new
      > p     -- primary
      > 1     -- 1 partition
      > w     -- write the change for all the disks
      [root@london1 ~]# ls -l /dev/sd?1
      brw-rw---- 1 root disk 8,  1 Jul 19 05:34 /dev/sda1
      brw-rw---- 1 root disk 8, 17 Jul 19 05:52 /dev/sdb1
      brw-rw---- 1 root disk 8, 33 Jul 19 05:53 /dev/sdc1
      brw-rw---- 1 root disk 8, 49 Jul 19 05:54 /dev/sdd1
      brw-rw---- 1 root disk 8, 65 Jul 19 05:54 /dev/sde1
      brw-rw---- 1 root disk 8, 65 Jul 19 05:54 /dev/sdf1   


7.2 Verify scsi_id configuration 

   - The content of /etc/scsi_id.config should include the option -g for the scsi_id command to expect an UUID from the
    shared devices. if not run the below in one line 

printf  "options=-g --whitelisted --replace-whitespace"  > /etc/scsi_id.config
   - Check if the the symbolic link for scsi_id is still there (RHEL 7 only)            
ln -s  '/usr/lib/udev/scsi_id'   '/sbin/scsi_id'

7.3 Rebuild the Udev rules in the /etc/udev/rules.d/99-oracle-asmdevices.rules file

  - Run the following script as root

i=1
cmd="/sbin/scsi_id -g -u -d"
for disk in sdb sdc sdd sde sdf; do
cat <<EOF >> /etc/udev/rules.d/99-oracle-asmdevices.rules KERNEL=="sd?1",SUBSYSTEM=="block", PROGRAM=="$cmd /dev/\$parent", \
RESULT=="`$cmd /dev/$disk`", SYMLINK+="asm-disk$i", OWNER="grid", GROUP="dba", MODE="0660"
EOF i=$(($i+1)) done
7.4 Reload the udev rules and restart udev:
# /sbin/partprobe /dev/sdb1 /dev/sdc1 /dev/sdd1 /dev/sde1 /dev/sdf1                                                                                                               
# /sbin/udevadm test /block/sdb/sdb1                              
# /sbin/udevadm test /block/sdc/sdc1                              
# /sbin/udevadm test /block/sdd/sdd1                              
# /sbin/udevadm test /block/sde/sde1                        
# /sbin/udevadm test /block/sde/sdf1     
# /sbin/udevadm control --reload-rules                                 
   - Check the generated sim links
[root@london1 ~]# ls -l /dev/asm-*                                   
brw-rw---- 1 grid dba 8, 17 Jul 19 07:28 /dev/asm-disk1           
brw-rw---- 1 grid dba 8, 33 Jul 19 07:28 /dev/asm-disk2           
brw-rw---- 1 grid dba 8, 49 Jul 19 07:28 /dev/asm-disk3           
brw-rw---- 1 grid dba 8, 65 Jul 19 07:28 /dev/asm-disk4 
brw-rw---- 1 grid dba 8, 65 Jul 19 07:28 /dev/asm-disk4

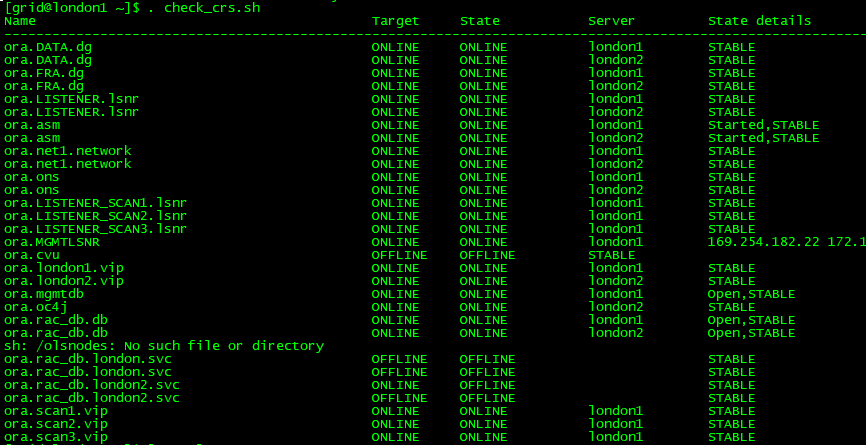
8. Restart The clusterware on both new VMs and voila   

image

Sunday, June 30, 2019

MAA setup– Creating Single instance Physical Standby for RAC Primary - 12c

Introduction:

Oracle provides many options for preventing downtime and data loss, all of which make up the Maximum Availability Architecture (MAA). The Oracle Maximum Availability Architecture offers a set of standard reference architectures--Bronze, Silver, Gold, and Platinum Solutions-- that comply with Customer Business Objectives. With multiple instances, the RAC system gives a transparent HA and scalability environment, while Data guard delivers a real-time data protection with near zero to zero data loss. One of the (MAA) principles we are going to explore in this lab is the combination of both Oracle RAC and Active Data Guard.  This guide will take you through the steps to configure a Data Guard --single instance-- physical standby Database for a RAC Primary Database. Data Broker configuration and administration tasks (swicthover,validate..) will also be covered in this paper .

Premise :

This document assumes the following conditions :

  • Existing RAC Primary database with two instances (RACDB_1, RACDB_2) utilizing ASM for data file storage.
  • Primary RAC cluster based on my previous VirtualBox RACattack lab on Redhat 7  -> see post Deploying Oracle RAC Database 12c Lab on Red Enterprise Linux 7.  (Copies of the vms are available upon request). 
  • Grid and Oracle Restart won’t be available on the standby site since it’s a non ASM standby database setup
  • Oracle software on the standby host have already been installed/created.
  • Throughout this document, the below naming conventions (database name, database unique name, Oracle net services, instances and the hostnames ) have been used . 

What will be covered ? In this post we will focus on the following content:

I. OVERVIEW

    a. Topology

                                                Fig 1- Gold MAA reference architecture
    The Gold MAA reference architure is ideal for service level requirement that can’t tolerate site failures. It is based on the clustered architecture pattern for the silver reference architecture With Oracle RAC , and adds a remote synchronized copy of the production database using Oracle Data Guard. This provide a combination of the transparent high availability and scalability of Oracle RAC with real-time data protection and availability or Oracle Data Guard.

    b. Environment

     
    You need 2 RAC nodes (4G min memory) and a third virtual machine for the physical standby host.
                              PRIMARY
                                   STANDBY

    Clusterware

    12c R1 Grid Infrastructure (12.1.0.2) 

          N/A

    Domain name

    evilcorp.com

    evilcorp.com

    Cluster Nodes/Host

    london1evilcorp.com
    london2.evilcorp.com

    paris.evilcorp.com

    IP adresses

    london1 : 192.168.78.51 (DNS master)london2 : 192.168.78.52 (DNS slave)            

                   paris: 192.168.78.53            

    SCAN

    london-cluster-scan.evilcorp.com

    N/A


    SCAN listener Host/port
     
    SCAN VIPs : 192.168.78.251/252/253
    (port 1525)

    N/A

    VIPs

    london1-vip: 192.168.78.61
    london2-vip: 192.168.78.62

    N/A

    DB_UNIQUE_NAME                         RAC_DB                                   PARIS

    DB_NAME

                                RAC_DB

                                   RAC_DB

    DB Instances

                     RACDB_1, RACDB_2

                                          PARIS

    DB LISTENER

                               LISTENER

                                        LISTENER

    DB Listener Host/port
     

        london1-vip, london2-vip (port 1521)

                            paris (port 1521)

    DB STORAGE

                                  ASM

                                    FileSystem

    File Management

                                 OMF

                           Hybrid (OMF/Manual) 

    Location for DB files

                               +DATA

                      /u01/oradata/paris/data

    Fast Recovery Area
                           +FRA
                      /u01/oradata/paris/FRA

    ORACLE_HOME

    /u01/app/oracle/product/12.1.0.2/db_1

          /u01/app/oracle/product/12.1.0.2/db_1

    Oracle DB software version

                              12.1.0.2

                                     12.1.0.2

    OS

           Red Hat Enterprise Linux 7.1 (64 bit)

              Red Hat Enterprise Linux 7.1 (64 bit) 

    GRID_HOME

         /u01/app/grid/product/12.1.0.2/grid


    Pluggable database

        PDB

                                  PDB

    1) Standby Host preparation :
    I will keep this to the minimum and spare you the borring/redundant Oracle installation print screens. For all OS/Oracle related preparation (sysctl.conf/shell limits/swap/rpms/users..) please refere to my previous post Deploying Oracle RAC Database 12c Lab on Red Enterprise Linux 7. (vm copies are available upon request). 

          - Network Interface

[root@localhost ~]# nmcli dev show eth0
GENERAL.DEVICE:                         eth0
...
IP4.ADDRESS[1]:                         192.168.78.53/24
IP4.DNS[1]:                             192.168.78.51     ---- Master DNS Zone
IP4.DNS[2]:                             192.168.78.52     ---- SLave  DNS Zone
...

          - Hostname :

[root@localhost]# hostnamectl set-hostname paris.evilcorp.com 
[root@localhost ~]# hostnamectl status
   Static hostname: paris.evilcorp.com
         Icon name: computer            Chassis: n/a        
Virtualization: kvm
Operating System: Red Hat Enterprise Linux Server 7.1 (Maipo)       
CPE OS Name: cpe:/o:redhat:enterprise_linux:7.1:GA:server            
Kernel: Linux 3.10.0-229.el7.x86_64       Architecture: x86_64

            -  Standby DNS configuration  : add the following line on the DNS server london1 as root:

A- At the bottom of the Forward Zone file :

[root@london1 ~]# vi /var/named/evilcorp.com  
paris         A   192.168.78.53 

B- At the bottom of the Backward Zone file:

[root@london1 ~]# vi  /var/named/evilcorp.com.re 
53.78.168.192  PTR paris.evilcorp.com.


Check the the resolution:         

[root@paris ~]# nslookup london1 
Name:   london1.evilcorp.com
Address: 192.168.78.51
[root@paris ~]# nslookup london2
Name:   london2.evilcorp.com
Address: 192.168.78.52        
[root@paris ~]# nslookup london-cluster-scan.evilcorp.com
Name:   london-cluster-scan.evilcorp.com Address: 192.168.78.253                
Address: 192.168.78.252
Address: 192.168.78.251               

II. PREPARATION                                                                             Go to Top

    a. Primary site preparation

            1. Enable Force Logging.  

  - Run the below on one of the RAC_DB instances to ensure all changes generate redo .        

SYS@RACDB_1> alter database force logging;  

            2. Enable Archivelog Mode.

[root@london1]# srvctl stop instance  -db RAC_DB –i RACDB_2
[root@london1]# srvctl stop instance  -db RAC_DB -i RACDB_1 [root@london1]# srvctl start instance -db RAC_DB -i RACDB_1 -node london1 -startoption mount  
[root@london1]# sqlplus sys/racattack@RAC_DB as sysdba
sys@RACDB_1> alter database archivelog;  
exit     
sys@RACDB_1> alter database open;
                                                

            3. Create the SLRs (Standby Redo Logs)..
            - Create the standby log files on the primary DB so the RMAN duplicate process  will automatically create them on the
              standby site. nbr standby redo logs groups =  [nbr primary redo log files (2 ) + 1] x 2Nodes =6

sys@RACDB_1> ALTER DATABASE ADD STANDBY LOGFILE THREAD 1 size 50m ; -- x3 Times 
sys@RACDB_1> ALTER DATABASE ADD STANDBY LOGFILE THREAD 2 size 50m ; -- x3 Times
sys@RACDB_1> SELECT THREAD#,GROUP#, BYTES/1024/1024 MB,STATUS from V$STANDBY_LOG;                
THREAD#  GROUP#  MB STATUS                 
--------- ------ ---- ----------                 
1          5      50 UNASSIGNED
1          6      50 UNASSIGNED                                             
1          7      50 UNASSIGNED                                            
2          8      50 UNASSIGNED                                            
2          9      50 UNASSIGNED                                            
2         10      50 UNASSIGNED                                            

            4. Modify Data Guard related init Parameters.

@RACDB_1> ALTER SYSTEM SET LOG_ARCHIVE_CONFIG='DG_CONFIG=(rac_db,paris)' scope=both;
-- Destinations
ALTER SYSTEM SET LOG_ARCHIVE_CONFIG='DG_CONFIG=(RAC_DB,PARIS)' scope=both;
ALTER SYSTEM set LOG_ARCHIVE_DEST_1='LOCATION=USE_DB_RECOVERY_FILE_DEST VALID_FOR=(ALL_LOGFILES,ALL_ROLES) DB_UNIQUE_NAME=RAC_DB' scope=both;

ALTER SYSTEM set LOG_ARCHIVE_DEST_2='SERVICE=paris ASYNC VALID_FOR=(ONLINE_LOGFILES,PRIMARY_ROLE) DB_UNIQUE_NAME=PARIS' scope=both;
ALTER SYSTEM SET DB_FILE_NAME_CONVERT='+DATA/RAC_DB/DATAFILE',
'/u01/oradata/paris/data' scope=spfile;
ALTER SYSTEM SET LOG_FILE_NAME_CONVERT='+FRA/RAC_DB/ONLINELOG',
'/u01/oradata/paris/FRA', '+REDO/RAC_DB/ONLINELOG','/u01/oradata/paris/redo' scope=spfile;
ALTER SYSTEM SET LOG_ARCHIVE_DEST_STATE_2=ENABLE scope=spfile; ALTER SYSTEM SET FAL_SERVER=paris  SCOPE=SPFILE; ALTER SYSTEM SET STANDBY_FILE_MANAGEMENT=AUTO SCOPE=SPFILE;
-- Verify the new values 
@RACDB_1> SELECT NAME, VALUE FROM V$SPPARAMETER WHERE UPPER(NAME) IN        ('REMOTE_LOGIN_PASSWORDFILE','STANDBY_FILE_MANAGEMENT','LOG_ARCHIVE_DEST_1','LOG_ARCHIVE_DEST_2','DB_FILE_NAME_CONVERT','LOG_FILE_NAME_CONVERT','FAL_SERVER');

NAME                           VALUE ------------------------------ ------------------------------------------------- db_file_name_convert           +DATA/RAC_DB/DATAFILE db_file_name_convert           /u01/oradata/paris/data log_file_name_convert          +FRA/RAC_DB/ONLINELOG log_file_name_convert          /u01/oradata/paris/FRA log_file_name_convert          +REDO/RAC_DB/ONLINELOG log_file_name_convert          /u01/oradata/paris/redo
log_archive_dest_1             LOCATION=USE_DB_RECOVERY_FILE_DEST VALID_FOR=
(ALL_LOGFILES,ALL_ROLES)DB_UNIQUE_NAME=RAC_DB
log_archive_dest_2             SERVICE=paris ASYNC VALID_FOR=(ONLINE_LOGFILES,PRIMARY_ROLE) DB_UNIQUE_NAME=PARIS fal_server                     PARIS standby_file_management        AUTO remote_login_passwordfile      EXCLUSIVE

            5. Backup the Database for Standby

[oracle@london1]# rman target=/ 
RMAN>BACKUP DATABASE PLUS  ARCHIVELOG;  

  • POSSIBLE ERROR:
    ORA-19809: limit exceeded for recovery files
    The limit for recovery files specified by the DB_RECOVERY_FILE_DEST_SIZE was exceeded.
    Fix:
     
           1)-  Increase DB_RECOVERY_FILE_DEST_SIZE.
                    SQL> ALTER SYSTEM SET DB_RECOVERY_FILE_DEST_SIZE=8G SCOPE=BOTH;
           2) - Delete files from recovery area using RMAN
                     RMAN> delete force noprompt archivelog all completed before 'sysdate-1';

            6. Update the tnsnames.ora.
           
Add the tns alias PARIS and LONDON for each of the instances of the primary and standby database.

PARIS =
   (DESCRIPTION =
     (ADDRESS = (PROTOCOL = TCP)(HOST = paris.evilcorp.com)(PORT = 1521))
     (CONNECT_DATA =
       (SERVER = DEDICATED)
       (SERVICE_NAME = PARIS.evilcorp.com
       (UR = A)
     )
   )
LONDON =
   (DESCRIPTION =
    (ADDRESS_LIST =
   (ADDRESS = (PROTOCOL = TCP)(HOST =london1-vip.evilcorp.com)(PORT = 1521))
   (ADDRESS = (PROTOCOL = TCP)(HOST =london2-vip.evilcorp.com)(PORT = 1521)))  
--two addresses need to be listed for rman duplicate and DG
     (CONNECT_DATA =
       (SERVER = DEDICATED)
       (SERVICE_NAME = RAC_DB.evilcorp.com)
     )
   )

       b. Standby site preparation                                                                                            Go to Top

            1. Copy/Create the password file for standby database.  

   - On the standby server run the following command

[oracle@paris]# orapwd file=/u01/app/oracle/product/12.1.0.2/db_1/dbs/orapwPARIS password=racattack  ENTRIES=30 FORCE=Y  IGNORECASE=Y

  - Or  copy it from one of the the primary nodes :

ASMCMD> pwcopy --dbuniquename rac_db  +DATA/RAC_DB/PASSWORD/pwdrac_db.284
/u01/app/oracle/product/12.1.0.2/db_1/dbs/orapwPARIS ASMCMD> exit

[oracle@london1]# scp /u01/app/oracle/product/12.1.0.2/db_1/dbs/orapwparis.ora paris.evilcorp.com:/u01/app/oracle/product/12.1.0.2/db_1/dbs/

  2. Create required directories for Standby database Instance.

- Create standby database Directories 
[oracle@paris]$ mkdir -p  /u01/app/oracle/admin/paris/adump [oracle@paris]$ mkdir -p  /u01/app/oracle/diag/rdbms/paris/paris/cdump [oracle@paris]$ mkdir -p  /u01/app/oracle/diag/rdbms/paris/paris/trace [oracle@paris]$ mkdir -p  /u01/app/oracle/audit/paris      
[root@paris ]$ mkdir -p /u01/oradata/paris [root@paris ]$ chown -R oracle:oinstall /u01/oradata/paris [root@paris ]$ chmod -R 775 /u01/oradata/paris
- Database Files directories
[oracle@paris]$ mkdir –p /u01/oradata/paris/data [oracle@paris]$ mkdir  -p /u01/oradata/paris/redo
[oracle@paris]$ mkdir  -p /u01/oradata/paris/FRA
                                                                              

  3. Ora Net Configuration
   -  Add a static listener service in the listener.ora file of the standby host. The purpose to be able to see the database service while the standby DB is in nomount stage .the second service is related to the Broker configuration which will be discussed later .

[oracle@paris ~]$ vi $ORACLE_SID/network/admin/listener.ora
LISTENER =
   (DESCRIPTION_LIST =
     (DESCRIPTION =
      (ADDRESS = (PROTOCOL = TCP)(HOST = paris.evilcorp.com)
       (PORT = 1521))))                    
SID_LIST_LISTENER =
(SID_LIST =
    (SID_DESC =
    (GLOBAL_DBNAME=PARIS.evilcorp.com)
        (SID_NAME = PARIS)
        (ORACLE_HOME = /u01/app/oracle/product/12.1.0.2/db_1))
    (SID_DESC =
     (GLOBAL_DBNAME=PARIS_DGMGRL.evilcorp.com)
     (ORACLE_HOME = /u01/app/oracle/product/12.1.0.2/db_1) 
-- For switchovers When former primary is Paris
        (SID_NAME = PARIS)
    )
)
ADR_BASE_LISTENER = /u01/app/oracle
[oracle@paris ~]$lsnrctl reload 
[oracle@paris ~]$ lnsrctl status
Services Summary... Service "PARIS" has 1 instance(s).  
Instance "PARIS", status UNKNOWN, has 1 handler(s) for this service...

- Copy the tnsnames.ora from a Primary node 1 to standby database host .

[oracle@london1]$scp $ORACLE_HOME/network/admin/tnsnames.ora paris:$ORACLE_HOME/network/admin/tnsnames.ora

4. Create a parameter file on the standby host

- add the bellow line to the temporary pfile

[oracle@paris]$ vi  /u01/app/oracle/product/12.1.0.2/db_1/dbs/tempini.ora 
db_name=PARIS

      c. RMAN duplicate (Create standby Database)                                                              Go to Top

            1.  start the database in NOMOUNT mode

[oracle@paris]$ export ORACLE_SID=PARIS  
[oracle@paris]$ sqlplus  '/ as sysdba' SQL> STARTUP PFILE='/u01/app/oracle/product/12.1.0.2/db_1/dbs/tempini.ora' NOMOUNT;

2.  RMAN Connectivity Test

[oracle@paris]$ rman target sys/racattack@london auxiliary sys/racattack@paris

Recovery Manager: Release 12.1.0.2.0 - Production on Sat Jun 22 05:19:33 2019
connected to target database: RAC_DB (DBID=2030859864)
connected to auxiliary database: PARIS (not mounted)

3.  Verify the PDB and temp files that will need to be renamed during the duplicate process

RMAN> REPORT SCHEMA 
List of Permanent Datafiles
===========================
File Size(MB) Tablespace           RB segs Datafile Name

---- -------- -------------------- ------- ------------------------

1    810      SYSTEM               YES     +DATA/RAC_DB/DATAFILE/system.270.975538023

3    1390     SYSAUX               NO      +DATA/RAC_DB/DATAFILE/sysaux.283.975537987

4    260      UNDOTBS1             YES     +DATA/RAC_DB/DATAFILE/undotbs1.296.975538069

5    250      PDB$SEED:SYSTEM      NO      +DATA/RAC_DB/FD9AC20F64D24../DATAFILE/system.274.975538175

6    5        USERS                NO      +DATA/RAC_DB/DATAFILE/users.269.975538067

7    580      PDB$SEED:SYSAUX      NO      +DATA/RAC_DB/FD9AC20F64D24../DATAFILE/sysaux.282.975538175

8    250      UNDOTBS2             YES     +DATA/RAC_DB/DATAFILE/undotbs2.272.975538737

9    260      PDB:SYSTEM           NO      +DATA/RAC_DB/6BAA223C8EF96../DATAFILE/system.298.975539497

10   600      PDB:SYSAUX           NO      +DATA/RAC_DB/6BAA223C8EF96../DATAFILE/sysaux.297.975539497

11   5        PDB:USERS            NO      +DATA/RAC_DB/6BAA223C8EF96../DATAFILE/users.290.975539621

List of Temporary Files
=======================
File Size(MB) Tablespace           Maxsize(MB) Tempfile Name
---- -------- -------------------- ----------- --------------------
1    201      TEMP                 32767      +DATA/RAC_DB/TEMPFILE/temp.285.975538165
2    100      PDB$SEED:TEMP        32767      +DATA/RAC_DB/FD9AC20F64D24../DATAFILE/pdbseed_temp-pm.dbf
3    20       PDB:TEMP             32767      +DATA/RAC_DB/6BAA223C8EF96../TEMPFILE/temp.291.975539559

5.  Create PDB Database directories

[oracle@paris]$ mkdir –p /u01/oradata/paris/PDBSEED     ##PDB$SEED:
[oracle@paris]$ mkdir -p /u01/oradata/paris/PDB         ##PDB: [root@paris ]$ chmod -R 775 /u01/oradata/paris

6. Duplicate the primary database to the standby site

RMAN> run
{
allocate channel prmy1 type disk;
allocate channel prmy2 type disk;
allocate auxiliary channel stby1 type disk;
set newname for tempfile 1 to '/u01/oradata/paris/data/temp01.dbf';
set newname for tempfile 2 to '/u01/oradata/paris/PDBSEED/temp01.dbf';
set newname for tempfile 3 to '/u01/oradata/paris/PDB/temp01.dbf';
set newname for datafile 5 to '/u01/oradata/paris/PDBSEED/system.dbf';
set newname for datafile 7 to '/u01/oradata/paris/PDBSEED/sysaux.dbf';
set newname for datafile 9 to '/u01/oradata/paris/PDB/system.dbf';
set newname for datafile 10 to '/u01/oradata/paris/PDB/sysaux.dbf';
set newname for datafile 11 to '/u01/oradata/paris/PDB/users.dbf';
duplicate target database for standby from active database 
#DORECOVER
spfile
parameter_value_convert 'RAC_DB','PARIS'
set 'db_unique_name'='PARIS'
set diagnostic_dest='/u01/app/oracle'
set audit_file_dest='/u01/app/oracle/audit/paris'
set core_dump_dest='/u01/app/oracle/diag/rdbms/paris/paris/cdump'
set db_recovery_file_dest='/u01/oradata/paris/FRA'
set db_create_file_dest='/u01/oradata/paris/data'
set db_create_online_log_dest_1='/u01/oradata/paris/data'
set db_create_online_log_dest_2='/u01/oradata/paris/FRA'
set CONTROL_FILES='/u01/oradata/paris/FRA/control01.ctl'
set CLUSTER_DATABASE='FALSE' 
set 'Fal_server'='london'
set log_Archive_dest_2='SERVICE=london ASYNC VALID_FOR=(ONLINE_LOGFILES,PRIMARY_ROLE) DB_UNIQUE_NAME=RAC_DB'
nofilenamecheck;  }

see complete output here : https://bit.ly/2LDnf2b

7. Check the Standby Database status

PARIS> select db_unique_name,database_role,open_mode from v$database;
DB_UNIQUE_NAME  DATABASE_ROLE    OPEN_MODE --------------- ---------------- -------------------- PARIS           PHYSICAL STANDBY MOUNTED

III. DATA GUARD BROKER CONFIGURATION                               Go to Top

    a. Primary Host

            1. Configure and Enable the broker parameter  

LONDON> alter system set dg_broker_config_file1='+DATA/RAC_DB/dr1london.dat' scope=both sid='*';

LONDON> alter system set dg_broker_config_file2='+FRA/RAC_DB/dr2london.dat' scope=both sid='*';

LONDON >  alter system set dg_broker_start=true scope=both sid='*';

 2. Unset  the log_archive_dest_2 parameter to avoid  ORA-16698

Clear existing LOG_ARCHIVE_DEST_n on every instances referencing network locations is a prerequisite to create a broker configuration.  

LONDON> select name,value from v$parameter where value like '%SERVICE%' ;
NAME                     VALUE
------------------------ -------------------------------------------------------
log_archive_dest_2        SERVICE=paris SYNC REOPEN=15 VALID_FOR
(ONLINE_LOGFILES,PRIMARY_ROLE) db_unique_name=PARIS
LONDON> alter system set log_ARCHIVE_DEST_2='' scope=both; 

    b. Standby Host

1. Configure and Enable the broker parameter  

PARIS > alter system set dg_broker_start=true scope=both ;

2. Unset  the log_archive_dest_2 parameter   

PARIS> alter system set log_ARCHIVE_DEST_2='' scope=both; 

    c. Create Broker configuration

       1. Creation

         Execute the following in the DGMGRL window to create and enable the broker configuration

    $ dgmgrl sys/racattack@london
    DGMGRL> CREATE CONFIGURATION DG_RAC12 as primary database is RAC_DB connect identifier is london; 

    Configuration "DG_RAC12" created with primary database "RAC_DB"

    ## Add standby Database # Paris

    DGMGRL> add database PARIS as connect identifier is paris maintained as physical; 
    Database "paris" added

    ## enable configuration
    DGMGRL> enable configuration;
    Enabled.

2. check the configuration    

DGMGRL> show configuration
Configuration - dg_rac12
Protection Mode: MaxPerformance
  Members:
  rac_db - Primary database
    paris  - Physical standby database
Fast-Start Failover: DISABLED
Configuration Status:
SUCCESS  
DGMGRL> show database paris
Database - paris
Role:               PHYSICAL STANDBY
  Intended State:     APPLY-ON
  Transport Lag:      0 seconds (computed 0 seconds ago)
  Apply Lag:          0 seconds (computed 0 seconds ago)
  Average Apply Rate: 932.00 KByte/s
  Real Time Query:    OFF
  Instance(s):
    PARIS
Database Status: SUCCESS
DGMGRL> show database rac_db
Database - rac_db
  Role:               PRIMARY
  Intended State:     TRANSPORT-ON
  Instance(s):
    RACDB_1
    RACDB_2
Database Status:
SUCCESS


IV. DATA GUARD ADMINISTRATION USING ORACLE BROKER   

    a. Switchover to Paris                                                                                                             Go to Top

            1. validate the database prior to a role change

DGMGRL> validate database paris
  Database Role:     Physical standby database
  Primary Database:  rac_db
  Ready for Switchover: Yes
  Ready for Failover:   Yes (Primary Running)
  Capacity Information:
    Database  Instances        Threads       
    rac_db    2                2             
    paris     1                2             
    Warning: the target standby has fewer instances than the
    primary database, this may impact application performance

  Flashback Database Status:
    rac_db:  Off
    paris:   Off 

           2. switchover to standby Database

DGMGRL> SWITCHOVER TO 'paris'
Performing switchover NOW, please wait...
Operation requires a connection to instance "PARIS" on database "paris"
Connecting to instance "PARIS"...
Connected as SYSDBA.
New primary database "paris" is opening...
Oracle Clusterware is restarting database "rac_db" ...
Switchover succeeded, new primary is "paris"
DGMGRL> show configuration
Configuration - dg_rac12
  Protection Mode: MaxPerformance
  Members:
  paris  - Primary database
    rac_db - Physical standby database
Fast-Start Failover: DISABLED

Configuration Status:
SUCCESS   (status updated 21 seconds ago)
DGMGRL> show  database  rac_db
Database - rac_db
  Role:               PHYSICAL STANDBY
  Intended State:     APPLY-ON
  Transport Lag:      0 seconds (computed 1 second ago)
  Apply Lag:          0 seconds (computed 1 second ago)
  Average Apply Rate: 128.00 KByte/s
   Real Time Query:    OFF
  Instance(s):
    RACDB_1 (apply instance) --- In RAC only one instance applies redo
    RACDB_2
              

    b. Change and verify the Apply instance

            1. change the APPLY-ON state from instance RACDB_1 to RACDB_2

    Only one RAC instance can run log-apply services at any time (Apply instance). The
    current apply instance is RACDB_1. Run the below command to update the Preferred Apply Instance:

DGMGRL> EDIT DATABASE RAC_DB SET STATE='APPLY-ON' WITH APPLY INSTANCE=RACDB_2
--------------------                                                           
Succeeded.                                                                    

  Check the applied change

DGMGRL> show database rac_db
Database - rac_db
  Role:               PHYSICAL STANDBY
  Intended State:     APPLY-ON
  Transport Lag:      0 seconds (computed 0 seconds ago)
  Apply Lag:          0 seconds (computed 0 seconds ago)
  Average Apply Rate: 0 Byte/s
  Real Time Query:    OFF
  Instance(s):
    RACDB_1
    RACDB_2 (apply instance)
 
Database Status: SUCCESS  

    c. Switch back to former primary RAC_DB                                                                           Go to Top

            Run this if no error was shown in the validate database rac_db command 

DGMGRL> switchover to ‘rac_db’
Performing switchover NOW, please wait...
Operation requires a connection to instance "RACDB_1" on database "rac_db"
Connecting to instance "RACDB_1"...
Connected as SYSDBA.
New primary database "rac_db" is opening...
Operation requires start up of instance "PARIS" on database "paris"
Starting instance "PARIS"...
ORACLE instance started.
Database mounted.
Switchover succeeded, new primary is "rac_db"

                Note : Additionally it’s always useful to keep an eye on the below logs for errors during switchovers

-- RAC node 1
tail -f /u01/app/oracle/diag/rdbms/rac_db/RACDB_1/trace/alert_RACDB_1.log
tail -f /u01/app/oracle/diag/rdbms/rac_db/RACDB_1/trace/drcRACDB_1.log
-- RAC node 2
tail -f /u01/app/oracle/diag/rdbms/rac_db/RACDB_2/trace/alert_RACDB_2.log tail -f /u01/app/oracle/diag/rdbms/rac_db/RACDB_2/trace/drcRACDB_2.log

-- Single instance Paris
#tail -f /u01/app/oracle/diag/rdbms/paris/paris/trace/alert_PARIS.log
#tail -f /u01/app/oracle/diag/rdbms/paris/paris/trace/drcPARIS.log


    e. Common mistakes

            1- Data Guard broker and RAC communication:
              If you choose a custom service created with srvctl on the RAC Primary site in the tns description to access
              the RAC primary instances (Connect Identifier).You will receive the below error while performing either
             switchover or failover operation.

DGMGRL> SWITCHOVER TO 'paris' verbose; 
  Performing switchover NOW, please wait...
Operation requires a connection to instance "PARIS" on database "paris"
Connecting to instance "PARIS"...
Connected as SYSDBA.
New primary database "paris" is opening...
Oracle Clusterware is restarting database "rac_db" ...
Unable to connect to database using london
ORA-12514: TNS:listener does not currently know of service requested in connect descriptor

              The reason behind it is that a switchover using the Data Guard broker causes the database role to be changed in the
              OCR. At the service startup, the CRS agent will check the database ROLE attribute saved in the OCR, to see if the
              database role is matching the service role or not, and if the mismatch (service role vs new role after switchover) has
              been detected the service won’t start. Thus the Broker won’t be able to communicate with the new standby DB.

              Solution: Always use the default database service created upon RAC installation as the DGConnectidentifier .
              In my case I replaced the custom service by  the native one rac_db which allows dynamic registration.

sys@RAC_DB.EVILCORP.COM> show parameter service_name
NAME                                 TYPE        VALUE ------------------------------------ ----------- ------------------------------ service_names                        string      RAC_DB.evilcorp.com

- Check the listener service registrations after switchover

[root@london1]# lsnrctl services
Service "RAC_DB_DGB.evilcorp.com" has 1 instance(s).
  Instance "RACDB_2", status READY, has 1 handler(s) for this service...
...
        2- Data Guard broker link with non grid based Oracle Database:
            Oracle Data Guard requires that you configure a static listener for the database and for the broker
            agent If neither Oracle restart nor Oracle clusterware are available (non GRID installation). Refer to   
            the “Primary site preparation” section upper in this guide.
             

    d. Conclusion

             We’ve explored in this exercise how easy it became to setup a  “Maximum Availability Architecture – single instance
              Physical Standby for a High-available (RAC)  primary environment” – using RMAN duplicate and Data Guard Broker
              in simple steps . The major challenge in this lab was certainly the Oracle network configuration as I had to face
              different errors while trying to figure the relevant setting .

                                                                                                                                                                          Go to Top