Showing posts with label Oracle Database. Show all posts

Saturday, December 23, 2023

What Autoupgrade won't Catch for you when moving to 19c Part1: Ghost OLAP

Granny Fight GIF - KungFuPanda3 Training Slow GIFs

Intro


So far, I have used Oracle AutoUpgrade, many times in 3 different OS’. Yet the more you think you’ve seen it all and reached the highest confidence level, another Upgrade will come byte you in the butt. The truth is every maintenance in any software or platform is unique, Oracle databases are no exception.
Automation will not solve all your problems which means organizations will still need humans when things get nasty.


This is my last series on AutoUpgrade troubleshooting as I anticipate reduced work on DBs in the near future. but I wanted to document few fixes to save your production upgrade from blowing up.   Enjoy


AutoUpgrade is still the best

Despite some issues, AutoUpgrade remains the best option to upgrade databases to 19c and it’s easy to agree, after checking the below methods available to upgrade/migrate to 19c in this migration white paper.


The environment

In my case, I needed to migrate my 12c CDB to 19c, while preserving the Data Guard setup & reducing downtime. 

PlatformSource CDB database SITarget CDB SIGrid /ASM   Dataguard
Linux RHEL 812.1.0.2 Enterprise Edition19.17.0.0 Enterprise Edition Yes YES


AutoUpgrade

19c jdk              autoupgrade.jar
1.8.0_201     Build.version 22.4.220712 


The Upgrade strategy


While the upgrade process itself isn't covered here, I’ll mention the steps required to reproduce our AutoUpgrade in a Data Guard protected environment. If you want to look further into the steps, check out the excellent article by Daniel Overby Hansen called How to Upgrade with AutoUpgrade and Data Guard.
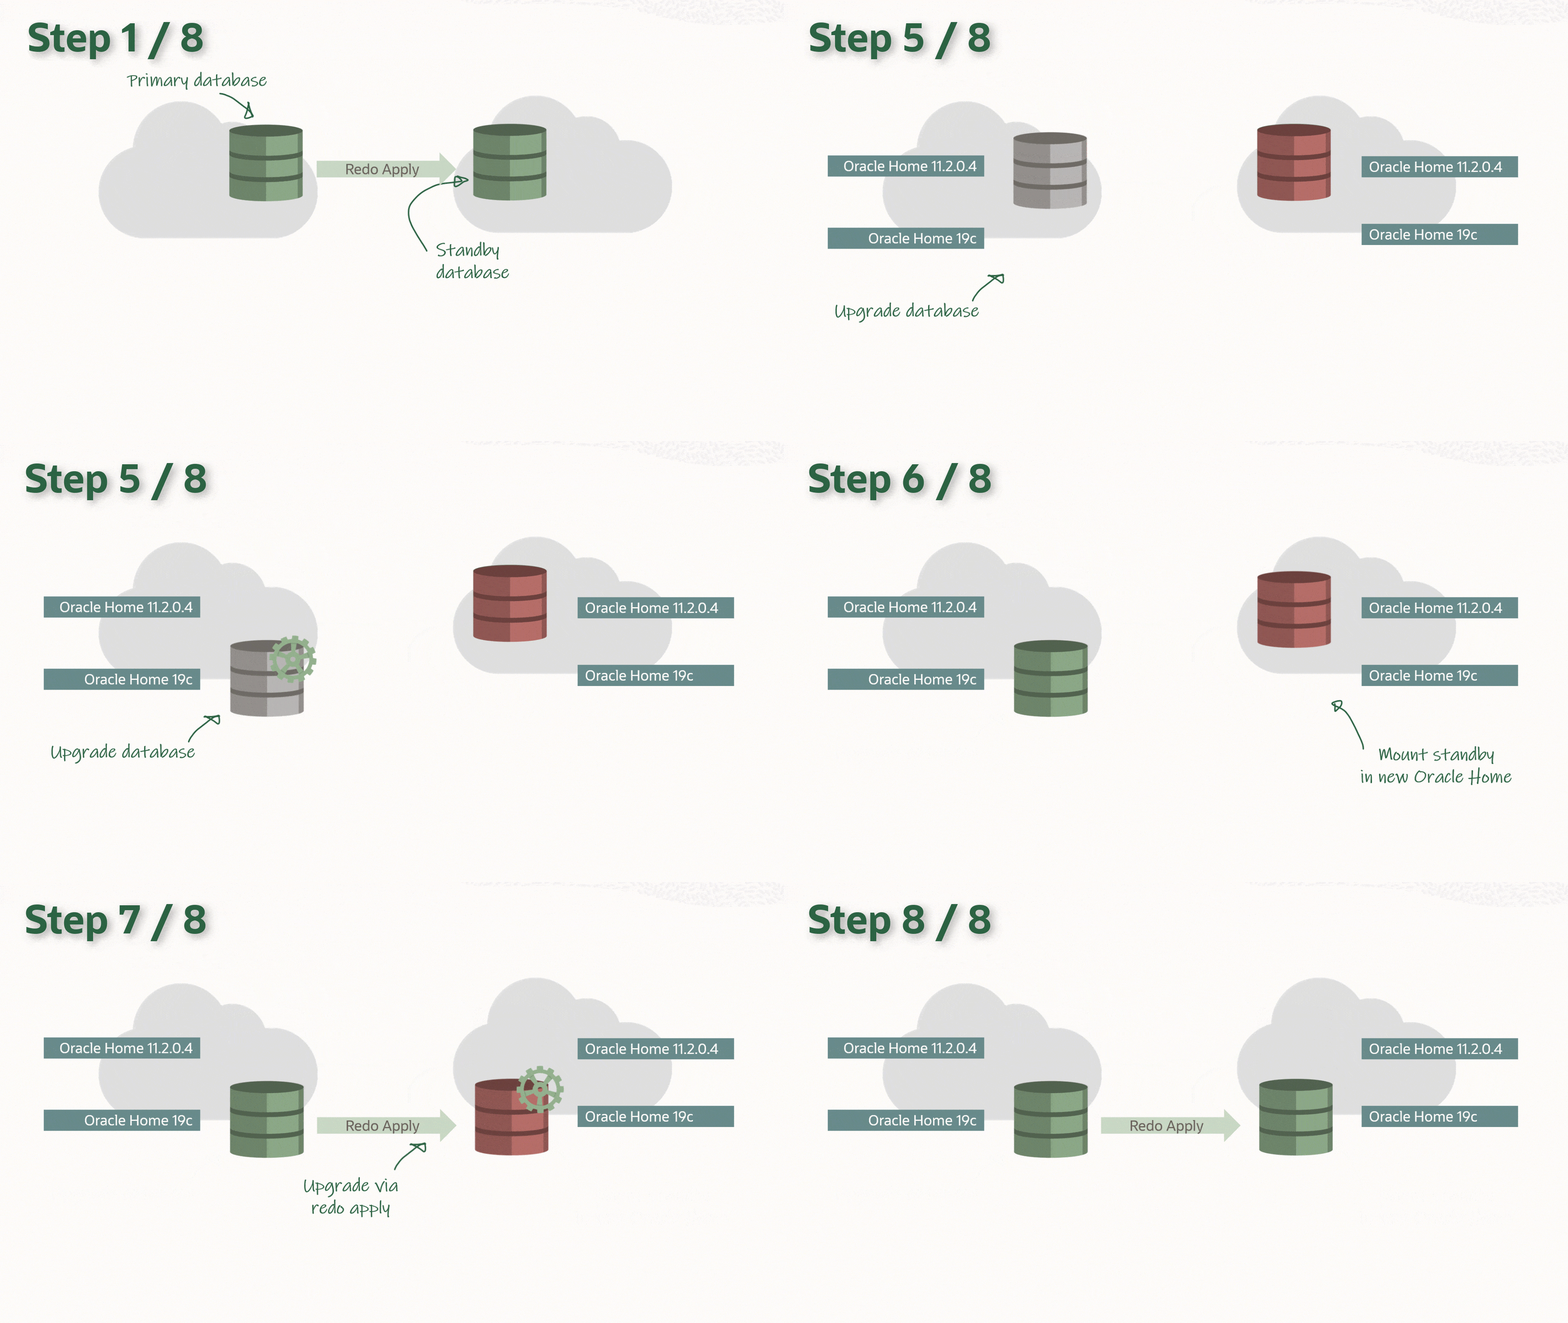
Overview of upgrade with a data guard
Prerequisites

The following is assumed to be already completed on both primary and standby hosts:

  • Install and patch a new 19c Oracle Database Home to the latest RU

  • Installing and patching a new 19c grid infrastructure to the latest RU

  • Upgrading the existing 12c grid into the new one (19c)

The steps

  • Stop Standby Database

  • Upgrade the primary DB

    • Run AutoUpgrade with the appropriate Config file [analyze, fixups, deploy]

  • After Upgrade

    • Restart Data Guard

      • Update the listener and /etc/oratab on the standby host.

      • Upgrade the DB by updating the Oracle Home information (srvctl upgrade database)

      • Re-enable Data Guard

      • Update RMAN catalog to new 19c client’s version

Reproduce the issue

After running AutoUpgrade Analyze to clear all warnings from the prechecks. The deploy unfortunately crashed.


The Configuration

-  The Config file as shown below, can defer redo transport & stop Data Guard broker automatically if in use.

#Global configurations global.autoupg_log_dir=/u01/install/Autoupgrade/UPG_logs ################### # Database number 1 ################### upgd1.sid=PROD upgd1.source_home=/u01/app/oracle/product/12.2.0.1/dbhome_1 upgd1.target_home=/u01/app/oracle/product/19.0.0/dbhome_1 upg1.log_dir=/u01/install/Autoupgrade/UPG_logs/PROD upg1.run_utlrp=yes upg1.source_tns_admin_dir=/u01/app/oracle/product/12.2.0.1/dbhome_1/network/admin upg1.timezone_upg=yes upg1.restoration=yes

1. Autoupgrade analyze

C:\> java -jar autoupgrade.jar -config UP19_PROD.cfg -mode analyze

2. Autoupgrade deploy

The environment was ready for a go so I launched the deploy phase

C:\> java -jar autoupgrade.jar -config UP19_PROD.cfg -mode deploy
... An hour later
upg> lsj
+----+-------+---------+---------+-------+--------------+--------+------------+
|Job#|DB_NAME| STAGE |OPERATION| STATUS| START_TIME | UPDATED| MESSAGE |
+----+-------+---------+---------+-------+--------------+--------+------------+
| 110| PROD |DBUPGRADE|STOPPED | ERROR | Nov 02 16:42 | |UPG-1400 |
+----+-------+---------+---------+-------+--------------+--------+------------+
upg>
----------------------------------------------
Errors in database [PROD-MYPDB1] Stage [DBUPGRADE]
Operation [STOPPED] Status [ERROR]
Info [ Error: UPG-1400 UPGRADE FAILED [FSUAT]
Cause: Database upgrade failed with errors
REASON: ORA-00604: error occurred at recursive SQL level 1


The OLAP Error

The upgrade phase never finished but most of the PDBs  were having issues halfway through the upgrade (incomplete catalog)
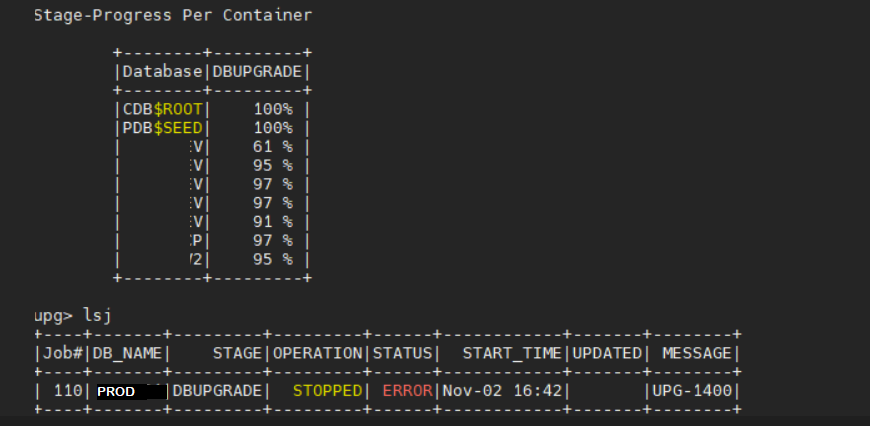

This is just an example for one of the error received by most of the PDBs  in the source 12c  CDB
ORA-00604
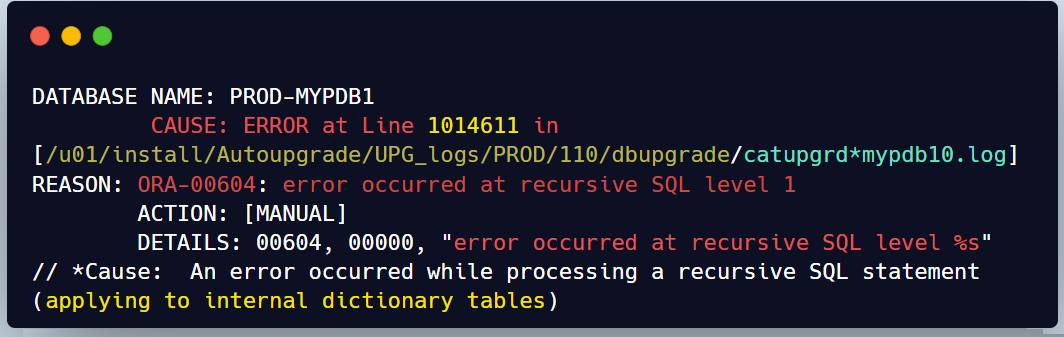

When I check the line described in the error in catupgrd log file we can see the below excerpt
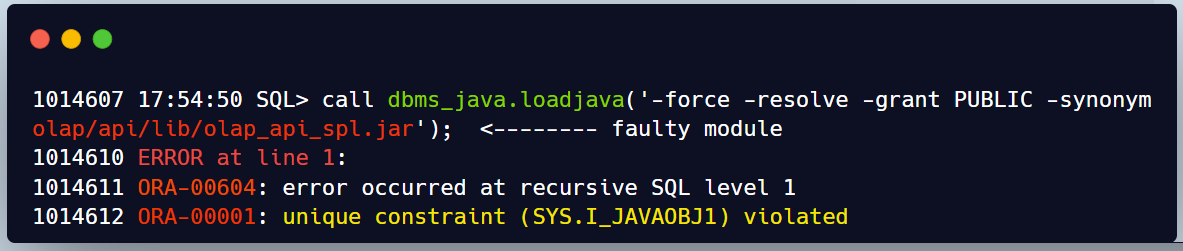

When we look at the status of the components on those impacted PDBs we can see that OLAP API is Invalid
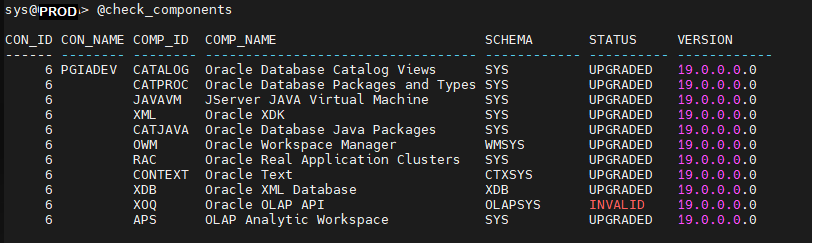

Furthermore if we check the plugging database violations for these PDBs we find 2 OLAP culprits

NAME CAUSE MESSAGE STATUS -------- -------- ------------------------------------------------------- --------- MYPDB1 OPTION Database option APS mismatch:PDB installed version PENDING 19.0.0.0.0. CDB in stalled version NULL. MYPDB1 OPTION Database option XOQ mismatch: PDB installed version PENDING 19.0.0.0.0. CDB in stalled version NULL.


Explanation


Cause

This occurred because their previous upgrade from 11g to 12c didn't properly remove the deprecated 11g OLAP component from their PDBs after the conversion to multitenant. Refer to the preupgrade run note below.


Indeed looking back at the Autoupgrade prechecks , we can notice that most PDBs have APS (Analytic Workspace)and XOQ (OLAP API) components that are there but market as ‘OPTION OFF’.
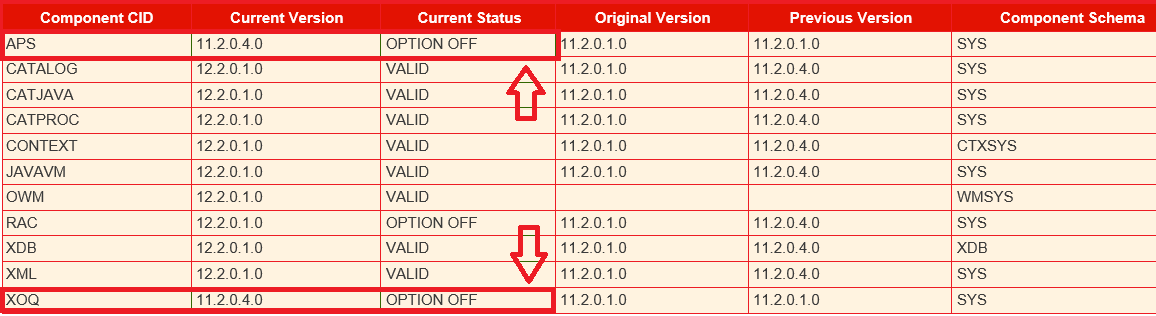

Expectation


This is where the AutoUpgrade should come in and flag these sort of issues as critical right from the early Analyze stage to help DBAs avoid upgrade crash during a production upgrade. Opening an SR is already a loss in terms of planned downtime.   


Solution


We’ll have to manually cleanup OLAP remnants before resuming the upgrade as described in  Doc ID 1940098.1

I have gathered all the sequenced commands in 2 scripts olap_remove.sql along with remove_olap_leftovers.sql

$ vi olap_remove.sql

col  name new_val pdb_name  noprint
select name from v$pdbs;
spool &pdb_name..log

prompt  ----> Remove OLAP Catalog
@?/olap/admin/catnoamd.sql
prompt  ----> Remove OLAP API
@?/olap/admin/olapidrp.plb
@?/olap/admin/catnoxoq.sql

prompt  ----> Deinstall APS - OLAP AW component
@?/olap/admin/catnoaps.sql
@?/olap/admin/cwm2drop.sql

prompt  ----> cleanup leftovers and Recompile invalids
@remove_olap_leftovers.sql
@?/rdbms/admin/utlrp.sql
spool off

Run the cleanup script for each PDB 

SQL> alter session set container=MYPDB1; @olap_remove
@remove_olap_leftovers.sql
alter session set container=MYPDB2; @olap_remove
@remove_olap_leftovers.sql

------ Repeat for all PDBs


Checks

Once the removal performed , we should verify that is no conflicting OLAP issue is left in the environment    

------ Repeat for all PDBs

1. The status of the components
SQL> select COMP_ID, COMP_NAME, VERSION, STATUS from dba_registry;
---- No OLAP component should be listed (Valid 19c options only)

2. Confirm there is no violations remaining
SQL> SELECT name, cause, message,status
FROM pdb_plug_in_violations
where STATUS != 'RESOLVED' ORDER BY time;

Resume the job

upg> resume -job 110

After this the Autoupgrade completed successfully and the standby database was re-enabled as expected in the remaining steps.


CONCLUSION

  • While automation tools like AutoUpgrade are powerful, they can't predict and fix all potential bottlenecks.

  • Staying vigilant and utilizing troubleshooting skills remains crucial.

  • However, the integrated flagging of known issues would go a long way into improving the user experience of DBAs fostering greater adoption in the future.


Thanks for reading  

Wednesday, December 21, 2022

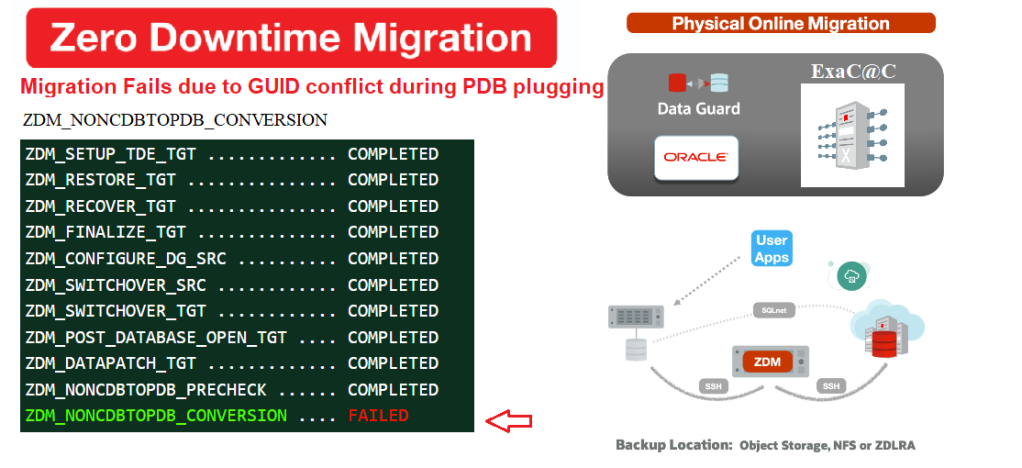
ZDM troubleshooting part 4: NONCDBTOPDB_CONVERSION fails (GUID conflicts with existing PDB)

This image has an empty alt attribute; its file name is image-3.png
Intro

Every time I think I’m done with my ZDM troubleshooting series, a new topic pops up :). I have also learned that every migration is distinct and brings its own unique challenges, so I have decided to keep the series open-ended. In this post, we will discuss the steps you should take when a conversion of a non-CDB to a PDB fails during a ZDM migration to identify the root cause, and get your migration back on track. So, let's dive in!

Note: you ca always explore the other ZDM troubleshooting related post below:
- Migration failing at ZDM_CONFIGURE_DG_SRC
- Migration failing at ZDM_SWITCHOVER_SRC plus hack 

My ZDM environment

  • ZDM: 21.3 build

Property                                                  Source                                              Target                                      
RAC NOYES
Encrypted NO YES
CDB NO YES
Release 12.212.2
PlatformOn prem LinuxExaCC


Prerequisites

All the prerequisites related to the ZDM VM, the Source and Target Database system were satisfied before running the migration.

Responsefile

Prepare a responsefile for a Physical Online Migration with the required parameters (see excerpt). I will just point out that ZDM 21.3 now supports Data Guard Broker configuration .

$ cat physical_online_demo.rsp | grep -v ^#
TGT_DB_UNIQUE_NAME=TGTCDB
MIGRATION_METHOD=ONLINE_PHYSICAL
DATA_TRANSFER_MEDIUM=DIRECT
PLATFORM_TYPE=EXACC
...etc


Run migration until the DG config –step1

As usual Irun the migrate command with the -pauseafter ZDM_CONFIGURE_DG_SRC to stop when the replication is configured in order to resume the full migration a later time. 

$ZDM_HOME/bin/zdmcli migrate database –sourcedb SRCDB \ -sourcenode srcHost -srcauth zdmauth \ -srcarg1 user:zdmuser \ -targetnode tgtNode \ -tgtauth zdmauth \ -tgtarg1 user:opc \ -rsp ./physical_online_demo.rsp –ignore ALL -pauseafter ZDM_CONFIGURE_DG_SRC

Resume migration  –step2

Now that the Data guard Configuration is complete. It’s time to resume the full migration to the end. 

$ zdmservice resume job –jobid 1

Querying job status

As you can see, It didn’t take long before noticing that the Switchover step failed. 

$ zdmservice query job –jobid 1
zdmhost.domain.com: Audit ID: 39
Job ID: 1
User: zdmuser
Client: zdmhost
Job Type: "MIGRATE"
Current status: FAILED
Result file path: "/u01/app/oracle/zdmbase/chkbase/scheduled/job-1-*log" ...
Job execution elapsed time: 1 hours 25 minutes 41 seconds
ZDM_GET_SRC_INFO .............. COMPLETED
ZDM_GET_TGT_INFO .............. COMPLETED
ZDM_PRECHECKS_SRC ............. COMPLETED
ZDM_PRECHECKS_TGT ............. COMPLETED
ZDM_SETUP_SRC ................. COMPLETED
ZDM_SETUP_TGT ................. COMPLETED
ZDM_PREUSERACTIONS ............ COMPLETED
ZDM_PREUSERACTIONS_TGT ........ COMPLETED
ZDM_VALIDATE_SRC .............. COMPLETED
ZDM_VALIDATE_TGT .............. COMPLETED
ZDM_DISCOVER_SRC .............. COMPLETED
ZDM_COPYFILES ................. COMPLETED
ZDM_PREPARE_TGT ............... COMPLETED
ZDM_SETUP_TDE_TGT ............. COMPLETED
ZDM_RESTORE_TGT ............... COMPLETED
ZDM_RECOVER_TGT ............... COMPLETED
ZDM_FINALIZE_TGT .............. COMPLETED
ZDM_CONFIGURE_DG_SRC .......... COMPLETED
ZDM_SWITCHOVER_SRC ............ COMPLETED
ZDM_SWITCHOVER_TGT ............ COMPLETED
ZDM_POST_DATABASE_OPEN_TGT .... COMPLETED
ZDM_DATAPATCH_TGT ............. COMPLETED
ZDM_NONCDBTOPDB_PRECHECK ...... COMPLETED
ZDM_NONCDBTOPDB_CONVERSION .... FAILED
ZDM_POST_MIGRATE_TGT .......... PENDING
ZDM_POSTUSERACTIONS ........... PENDING
ZDM_POSTUSERACTIONS_TGT ....... PENDING
ZDM_CLEANUP_SRC ............... PENDING
ZDM_CLEANUP_TGT ............... PENDING


Troubleshooting the error

To determine the content of the error message, the best approach is to check the $ZDM_BASE logs hosted locally on the target node “$ORACLE_BASE/zdm/zdm_targetDB_$jobID/zdm/log

-- Target node
$ cd $ORACLE_BASE/zdm/zdm_TGTCDB_1/zdm/log

$ tail ./zdm_noncdbtopdb_conversion_*.log
[jobid-1][2022-12-14][mZDM_Queries.pm:556]:[DEBUG] Output is :
SQL*Plus: Release 12.2.0.1.0 Production on Wed Dec 14 2022 ..
Connected to: Oracle Database 12c EE Extreme Perf Release 12.2.0.1.0 - 64bit Production
CREATE PLUGGABLE DATABASE zdm_aux_SRCDB using '/tmp/zdm_aux_SRCDB.xml' NOCOPY
TEMPFILE REUSE

 *  ERROR at line 1:

 ORA-65122: Pluggable database GUID conflicts with the GUID of an existing  container.

[jobid-1][2022-12-14][mZDM_convert_noncdb2pdb.pl:522]:[ERROR
failed to create the PDB 'zdm_aux_SRCDB'

As you can see above, the issue is related to the new PDB created in the target CDB from the auxiliary database


What Happened


In an online physical migration from a non-CDB database to a PDB on a target container, ZDM creates an auxiliary standby database in the background to ensure replication consistency before the final switchover. After the switchover is complete, a data patch is applied and an unplug and plug operation is done to convert the auxiliary DB into a PDB on the target container database (CDB).


Why is ZDM failing to create the new PDB?


Turns out, ZDM attempted to construct a new PDB from the generated XML manifest but was unsuccessful, as Oracle had assigned a default GUID from another PDB in the CDB. I wouldn't say this happens for all instances of target CDBs with existing PDBs (I already completed such migrations in the past), but in this case, two databases had already been migrated to the same target CDB before this one.

Subsidiary question
Why  did the CREATE PLUGGABLE DATABASE command use an existing GUID instead of generating a new one?
I don’t have the answer to this yet but we chose to open an SR and see if there was a workaround for this issue.


SOLUTION: ZDM pl script rewrite

 
Force ZDM to use the clone option :

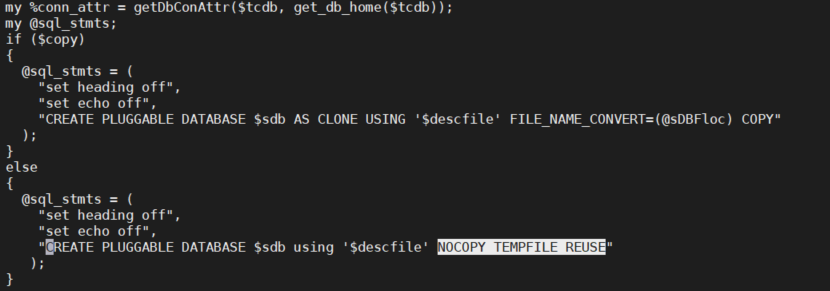
  • ZDM uses a PDB plugin script called mZDM_convert_noncdb2pdb.pl to perform the PDB conversion

  • All we need to do is to update the script at the plugin section and add AS CLONE  to the create pluggable database command

Location : Make a copy of the below file on he ZDM host before the change

    cp $ZDM_HOME/rhp/zdm/mZDM_convert_noncdb2pdb.pl mZDM_convert_noncdb2pdb.pl.old

    The perl script contains variables replacing the PDB name & XML manifest, but the error here occurred because the script had a "NOCOPY" statement without an "AS CLONE" clause.   

    This image has an empty alt attribute; its file name is image-2.pngTo fix the issue, we just need amend it and add the missing clone part.

      …else
      {
      @slq_stmts =(
      ...

      CREATE PLUGGABLE DATABASE $sdb AS CLONE USING '$descfile' NOCOPY TEMPFILE REUSE);
      }


      Note:

      • It is only advised to perform the below change in this particular case or when asked by Oracle support.


      Resume the job

      this is it, ZDM will now create the PDB as clone implying a new GUID after resuming the job to complete the rest of our online physical migration 

      $ zdmservice resume job –jobid 1
      $ zdmservice query job –jobid 1
      ...
      ZDM_CONFIGURE_DG_SRC .......... COMPLETED
      ZDM_SWITCHOVER_SRC ............ COMPLETED
      ZDM_SWITCHOVER_TGT ............ COMPLETED
      ZDM_POST_DATABASE_OPEN_TGT .... COMPLETED
      ZDM_DATAPATCH_TGT ............. COMPLETED
      ZDM_NONCDBTOPDB_PRECHECK ...... COMPLETED
      ZDM_NONCDBTOPDB_CONVERSION .... COMPLETED
      ZDM_POST_MIGRATE_TGT .......... PENDING
      ZDM_POSTUSERACTIONS ........... PENDING
      ZDM_POSTUSERACTIONS_TGT ....... PENDING
      ZDM_CLEANUP_SRC ............... PENDING
      ZDM_CLEANUP_TGT ............... PENDING


      Conclusion

      • We learned that ZDM may sometimes try to reuse an existing GUID while converting DB to PDB 
      • This may be fixed natively in future releases of ZDM.    
      • I can’t assume this behavior would be the same in all cases, because I already moved databases to a CDB with many PDBs without any problem in the past
      • Oracle documentation is explicit about the "AS CLONE" clause. Nevertheless, I don't think the same DB was migrated in the past to the same destination.
        Specifying AS CLONE also ensures that Oracle Database generates new identifiers(GUID,DBID) if the target CDB already contains a PDB that was created using the same set of data files
      • You might not run into the same error, but this is the quickest fix in case it happens. 

              Thank you for reading

      Monday, December 5, 2022

      What's ODABR snapshot & how to efficiently use it to patch ODA from 18 to 19.x

      This image has an empty alt attribute; its file name is image-1.png


      Intro

      Although most of the focus, nowadays, has shifted to migration of on-premises workloads into the Cloud, companies still leverage Oracle databases engineered systems like Oracle database appliance to run their databases on-prem. As a matter of fact ,ODA is a low entry pricing and flexible CPU licensing platform that can still host workloads that aren’t mature enough to go to the cloud. Until then, system updates fall under the customer’s responsibility. In today’s use case, patching your ODA software version from 18.8 to 19.x will require to upgrade your OS from Linux Enterprise 6 to 7. But how does Oracle make that move seamless and safe in case of failure?This is why I chose to discuss a tool called ODABR that allows rollback capability during OS upgrade on ODAs.

      BACKUP BEFORE YOU PATCH
      It will be especially interesting to learn how to effectively use it with reduced available storage when patching an ODA to 19.6. Read more about ODA release matrix in the official Oracle blog 


      Patching process to ODA 19.6

      The upgrade from 18.8 to 19.6 has two main stages :

      1. A first pass to upgrade the Linux from OEL 6 to OEL 7.

      2. A second to update the ODA binaries (DCS and Grid) as for previous versions.


      What’s ODABR

      ODA backup & recovery is a utility developed by Oracle engineer Ruggero Citton, which allows to backup and recover an ODA node using consistent & incremental System backups on Bare metal ODAs as described in Oracle support Note ID 2466177.1. ODABR is a perquisite for the 1st stage (OS upgrade to OEL7) as it will save a disk restore point in case of rollback after ODA patching  failure (precheck will even fail if the tool is not installed).

      ODA backups

      System Node Backup includes following filesystems:

      • / : Root file system

      • /boot : Boot partition

      • /opt : opt file system (OAK/DCS,TFA, OWG, ASR)

      • /u01: Grid Infrastructure, RDBMS binaries

      • Grid Infrastructure OCR file

      There are 2 types of backups with ODABR but only one is needed when patching the ODA to 19.6

      • Consistent backup is guarantee by the LVM snapshot feature (used during patching)

      • Incremental backup managed automatically using rsync features (physical copy to specified destination)


      LVM snapshot used by ODABR

      ODABR is just reusing Linux LVM snapshot feature that create two copies of the same logical Volume, where one is used for backup purposes while the other continues in operation. The delta is tracked since snapshot creation

      • Snapshot creation is quick & doesn’t need stopping the server.

      • A Snapshot will use only the space needed to accommodate the difference between the two LVs (delta also called Copy-on-Write (CoW) )

      ODABR installation
      Download and install the rpm: >> odabr-2.0.1

      [root@odadev1~]# rpm -Uvh odabr-2.0.1-62.noarch.rpm 
      odabr-2.0.1.62 has been installed on /opt/odabr succesfully!


      Backup Syntax

      Usage:
      odabr backup [-snap] [-destination <dest path> [-dryrun][-silent]] | [-mgmtdb]
             [-osize <opt snapsize>][-rsize <root snapsize>][-usize <u01 snap size>]

      odabr infosnap --- show available snapshots
      odabr delsnap --- delete all snapshots

      The backup syntax is pretty straightforward with  -snap & -destination (nfs/local path or ssh/rsync) as main option 


      Patching to 19.6 challenge with limited Free space

       
      Before upgrading the OS, ODABR will create LVM snapshots for the file systems that need 190GB of free space:

      root LVM snapshot  30Gb
      opt  LVM snapshot  60Gb
      u01  LVM snapshot 100Gb

      But in most situations, old systems unused space is lower.
      Example:  A node with only 78GB unused space which will cause an error during the patching prechecks

      [root@odadev2 ~]# df -Ph / /u01 /opt
      Filesystem                          Size  Used Avail Use% Mounted on
      /dev/mapper/VolGroupSys-LogVolRoot   30G  6.9G   22G  25% /
      /dev/mapper/VolGroupSys-LogVolU01   148G  104G   37G  75% /u01  
      /dev/mapper/VolGroupSys-LogVolOpt    59G   38G   19G  68% /opt
      === 78GB available only

      PRECHECK ERROR

      # odacli create-prepatchreport -v 19.6.0.0.0 -os
      # odacli describe-prepatchreport -i 12d61cda-1cef-40b9-ad7d-8e087007da23v

      Patch pre-check report
      ------------------------------------------------------------------------
      Job ID: 666f7269-7f9a-49b1-8742-2447e94fe54e
      Description: Patch pre-checks for [OS]
      Status: FAILED
      Created: November 7, 2022 5:30:42 PM CEST
      Result: One or more pre-checks failed for [OS]
      Pre-Check Status Comments
      ----------------------- -------- --------------------------------------
      Validate LVM free space Failed Insufficient space to create LVM
      snapshots on node: odadev1.

      Expected free space(GB): 190, available space GB): 78.


      Workarounds  

      In case of limited Free space we have 2 options

      1. Cowboy

      My Oracle ACE peer Fernando Simon explains a drastic way to reduce the /u01 footprint in his excellent blogpost- Patch ODA from 18.3 to 19.8. Part 2 by unmounting the disk and using both resize2fs & lvreduce to claim free space.


      2. Manual OADR backup with custom snapshot size 

      A snapshot will require as much storage space as changes made in the logical volume, meaning the OS upgrade change will be the main source of all the changes stored in the snapshots.
      Solution: run a manual backup by specifying lower size required for /, /opt, and /u01 snapshots , but you need to run the patchreport at least one time.
      Example

      With only 98G free space, we can run adapt the FS snapshots to lower sizes (opt=30g , root=5g,  u01=70G)

      [root@odadev1 ~]# df -Ph / /opt /u01

      Filesystem                          Size  Used Avail Use% Mounted on /dev/mapper/VolGroupSys-LogVolRoot   30G  7.6G   21G  28% / /dev/mapper/VolGroupSys-LogVolOpt    59G   41G   16G 73% /opt /dev/mapper/VolGroupSys-LogVolU01   148G   80G   61G  57% /u01

      -- Actual free space

      [root@odadev1 ~]# pvs  

      PV         VG          Fmt  Attr PSize   PFree   /dev/md
      1   VolGroupSys lvm2 a--u 446.00g 98.00g

      Note: specify lower values for the lvm snapshots size than the actual filesystem usage.
      - odacli update-server command will use these custom snapshots (98GB) during the upgrade instead of creating larger ones automatically which would take 190GB. 

      [root@odadev1 ~]# /opt/odabr/odabr backup -snap -osize 30 -rsize 5 -usize 70

      ¦¦¦¦¦¦¦¦¦¦¦¦¦¦¦¦¦¦¦¦¦¦¦¦¦¦¦¦¦¦¦¦¦¦¦¦¦¦¦¦¦¦¦¦¦¦¦¦¦¦¦¦¦¦¦¦¦¦  odabr - ODA node Backup Restore - Version: 2.0.1-62 Copyright Oracle, Inc. 20  --------------------------------------------------------                       Author: Ruggero Citton <ruggero.citton@oracle.com> RAC Pack, Cloud Innovation ¦¦¦¦¦¦¦¦¦¦¦¦¦¦¦¦¦¦¦¦¦¦¦¦¦¦¦¦¦¦¦¦¦¦¦¦¦¦¦¦¦¦¦¦¦¦¦¦¦¦¦¦¦¦¦¦¦¦
      SUCCESS
      : 2022-11-7 12:10:18:...snapshot backup for 'opt' created successfully SUCCESS: 2022-11-7 12:10:20:...snapshot backup for 'u01' created successfully SUCCESS: 2022-11-7 12:10:20:...snapshot backup for 'root' created successfully SUCCESS: 2022-11-7 12:10:20: LVM snapshots backup done successfully


      -- Check the created LVM snapshots

      [root@odadev02 ~]# /opt/odabr/odabr infosnap LVM snap name         Status                COW Size              Data% -------------         ----------            ----------            ------ root_snap             active                5.00 GiB              0.05% opt_snap              active                30.00 GiB             0.02% u01_snap              active                70.00 GiB             0.02%

      As shown above and below, the size of the snapshot will only contain the changes written during the OS upgrade.

      [root@odadev1 ~]# lvs
        LV         VG          Attr       LSize   Pool Origin     Data% Meta% Move Log
        LogVolDATA VolGroupSys -wi-a-----  10.00g
        LogVolOpt  VolGroupSys owi-aos---  60.00g
        LogVolRECO VolGroupSys -wi-a-----  10.00g
        LogVolRoot VolGroupSys owi-aos---  30.00g
        LogVolSwap VolGroupSys -wi-ao----  24.00g
        LogVolU01  VolGroupSys owi-aos--- 150.00g
       
      opt_snap   VolGroupSys swi-a-s---  30.00g      LogVolOpt  0.01 <— snapshot
        root_snap  VolGroupSys swi-a-s---   5.00g      LogVolRoot 0.04 <— snapshot
        u01_snap   VolGroupSys swi-a-s---  70.00g      LogVolU01  0.02 <- snapshot


      ODABR tips when patching

      • You can use the "odabr –dryrun” option before choosing the right size .

      • When custom snapshots already exist on the system during odacli create-prepatchreport run, the precheck fails, because it expects to create these snapshots itself. However, odacli update-server –c OS still continues with the upgrade. 

      • Use -force option during upgrade to skip the auto backup.

        # odacli update-server -v 19.6.0.0.0 -c os --local --force Verifying OS upgrade Current OS base version: 6 is lessthan target OS base version: 7 OS needs to upgrade to 7.7

      • Run ODABR backup right after the repository update in order to avoid extracting the patch a second time

        $  odacli update-repository –f oda-asm-zipfile1,zipfile2,zipfile3,zipfile4


            You can now follow the rest of the guided steps to patch ODA from 18.8 to 19.9

      • When Running the post upgrade checks: You’ll be asked to delete the snapshots

        [root@odadev1]# ./odacli update-server-postcheck -v 19.6.0.0.0
        Comp Pre-Check Status Comments
        ---- --------------- -------- ---------------------------------
        OS ODABR snapshot WARNING ODABR snapshot found. Run 'odabr delsnap'

        -- Delete the snapshots
        [root@odadev1]# /opt/odabr/odabr delsnap
        INFO: 2022-11-07 20:44:55: Removing LVM snapshots
        SUCCESS: 2022-11-07 20:44:55: ...snapshot for 'opt' removed successfully
        SUCCESS: 2022-11-07 20:44:55: ...snapshot for 'u01' removed successfully
        SUCCESS: 2022-11-07 20:44:56: ...snapshot for 'root' removed successfully


      Recovering from a Failed Operating System Upgrade

      In case things go south, we can always rollback sine we have a restore point.

      1. Download ODARescue Live Disk ISO image for the 19.6 release to enable booting the node on which the OS upgrade failed: See Oracle Support Note 2495272.1:This image has an empty alt attribute; its file name is image.png
        Then Configure the ODA system on Oracle ILOM to boot from the ISO image

      2. Specify the NFS location, including the IP address and path with file name, for the ISO image.

        -set /SP/services/kvms/host_storage_device/remote server_URI=nfs://10.10.1.1:/export/iso/ODARescue_LiveDisk.iso
      3. Configure the ISO image from the Oracle ILOM Service Processor (SP) serial console so that you can use the ISO image to boot the Oracle Database Appliance system.

        -> set /SP/services/kvms/host_storage_device/ mode=remote -> set /HOST boot_device=cdrom

      4. Reboot the ODA host from ILOM using ODARescue ISO image.

      5. Login as root user with password "welcome1" ( user "odalive" can also be used).

      6. If you decide to revert to the Oracle Linux 6 configuration after troubleshooting, then run the below 

        # odarescue ol6restore
        ol6restore will restore:
        boot/efi partition
        LVM snapshots (root, opt, u01)
        grub v1

        This command restores the Oracle Linux 6 configuration using the snapshots that were taken using ODABR.

      Conclusion

      • ODABR is a very convenient tool that can help you backup & recover your server from OS corruption
      • We also learned how to reduce the snapshot footprint before upgrading the ODA from 18.8 to 19.6
      • With this in mind, you can patch your ODA to 19.6 safely even if your free space is lower than 190GB
      • I hope this can help learn more about this tool which got me curious back when I first patched ODA to 19.6 couple of years ago 

              Thank you for reading

      Monday, September 12, 2022

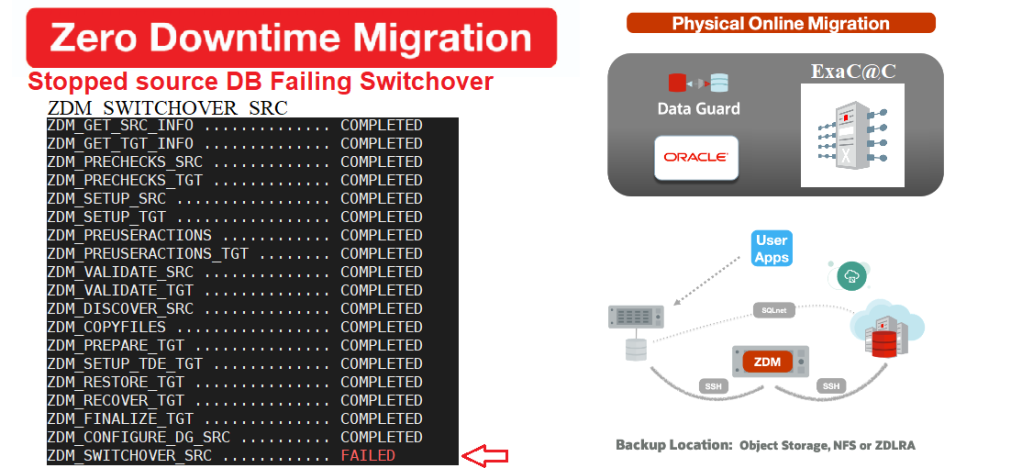
      ZDM troubleshooting part 3: Migration failing at ZDM_SWITCHOVER_SRC/ hack

      This image has an empty alt attribute; its file name is image-4.png
      Intro

      This is the last of my troubleshooting series related to ZDM where I have accidentally become an unofficial QA tester for ZDM :). After describing scenarios in previous posts where ZDM service was crashing or DG configuration was failing. I will, in this article, explain why my broker switchover step failed the online physical migration and share a sneaky hack to skip a ZDM task during a zdmcli resume, after fixing it manually  
      (user discretion is advised).  

      My ZDM environment

      • ZDM: 21.3 build

      Property                                                  Source                                              Target                                      
      RAC NOYES
      Encrypted NO YES
      CDB NO YES
      Release 12.212.2
      PlatformOn prem LinuxExaCC


      Prerequisites

      All the prerequisites related to the ZDM VM, the Source and Target Database system were satisfied before running the migration.

      Responsefile

      Prepare a responsefile for a Physical Online Migration with the required parameters (see excerpt). I will just point out that ZDM 21.3 now supports Data Guard Broker configuration .

      $ cat physical_online_demo.rsp | grep -v ^#
      TGT_DB_UNIQUE_NAME=TGTCDB
      MIGRATION_METHOD=ONLINE_PHYSICAL
      DATA_TRANSFER_MEDIUM=DIRECT
      PLATFORM_TYPE=EXACC
      ZDM_USE_DG_BROKER=TRUE
      ...etc


      Run migration until the DG config –step1

      It is very common to run the migrate command with the -pauseafter ZDM_CONFIGURE_DG_SRC to stop when the replication is configured in order to resume the full migration a later time. 

      $ZDM_HOME/bin/zdmcli migrate database –sourcedb SRCDB \ -sourcenode srcHost -srcauth zdmauth \ -srcarg1 user:zdmuser \ -targetnode tgtNode \ -tgtauth zdmauth \ -tgtarg1 user:opc \ -rsp ./physical_online_demo.rsp –ignore ALL -pauseafter ZDM_CONFIGURE_DG_SRC

      Resume migration  –step2

      Now that the Data guard Configuration is complete. It’s time to resume the full migration to the end. 

      $ zdmservice resume job –jobid 2

      Querying job status

      As you can see, It didn’t take long before noticing that the Switchover step failed. 

      $ zdmservice query job –jobid 2
      zdmhost.domain.com: Audit ID: 39
      Job ID: 2
      User: zdmuser
      Client: zdmhost
      Job Type: "MIGRATE"
      Current status: FAILED
      Result file path: "/u01/app/oracle/zdmbase/chkbase/scheduled/job-2-*log" ...
      Job execution elapsed time: 1 hours 25 minutes 41 seconds
      ZDM_GET_SRC_INFO .............. COMPLETED
      ZDM_GET_TGT_INFO .............. COMPLETED
      ZDM_PRECHECKS_SRC ............. COMPLETED
      ZDM_PRECHECKS_TGT ............. COMPLETED
      ZDM_SETUP_SRC ................. COMPLETED
      ZDM_SETUP_TGT ................. COMPLETED
      ZDM_PREUSERACTIONS ............ COMPLETED
      ZDM_PREUSERACTIONS_TGT ........ COMPLETED
      ZDM_VALIDATE_SRC .............. COMPLETED
      ZDM_VALIDATE_TGT .............. COMPLETED
      ZDM_DISCOVER_SRC .............. COMPLETED
      ZDM_COPYFILES ................. COMPLETED
      ZDM_PREPARE_TGT ............... COMPLETED
      ZDM_SETUP_TDE_TGT ............. COMPLETED
      ZDM_RESTORE_TGT ............... COMPLETED
      ZDM_RECOVER_TGT ............... COMPLETED
      ZDM_FINALIZE_TGT .............. COMPLETED
      ZDM_CONFIGURE_DG_SRC .......... COMPLETED
      ZDM_SWITCHOVER_SRC ............ FAILED
      ZDM_SWITCHOVER_TGT ............ PENDING
      ZDM_POST_DATABASE_OPEN_TGT .... PENDING
      ZDM_DATAPATCH_TGT ............. PENDING
      ZDM_NONCDBTOPDB_PRECHECK ...... PENDING
      ZDM_NONCDBTOPDB_CONVERSION .... PENDING
      ZDM_POST_MIGRATE_TGT .......... PENDING
      ZDM_POSTUSERACTIONS ........... PENDING
      ZDM_POSTUSERACTIONS_TGT ....... PENDING
      ZDM_CLEANUP_SRC ............... PENDING
      ZDM_CLEANUP_TGT ............... PENDING


      Troubleshooting

      I usually like to dig into the specific $ZDM_BASE logs hosted locally in the src node, but the result file here is enough to investigate the failure as the log is pretty detailed. 

      $ tail /u01/app/oracle/zdmbase/chkbase/scheduled/job-2-*log

      Executing Oracle Data Guard Broker switchover to database "zdm_aux_SRCDB"
      on database "SRCDB" ... ####################################################################

      PRGZ-3605 : Oracle Data Guard Broker switchover to database "zdm_aux_SRCDB"
      on database "DB" failed.
      Unable to connect to database using (DESCRIPTION=(ADDRESS=(PROTOCOL=TCP)
      (HOST=srcnode)(PORT=1531)) …

      Please complete the following steps to finish switchover:
      start up and mount instance "SRCDB" of database "SRCDB"

      To be honest I am half surprised, since we used the DG Broker here and it’s known to be unstable at times during switchovers (had many failed switchovers due to tight connection timeouts on the old primary on ExaCC).


      What Happened

      The switchover actually completed but the source database didn’t restart after the role conversion. At least the suggested action is self explanatory and we don’t have to dig more to proceed with the rest of the migration. 


      Restart the new standby 

        SQL> startup mount;


        Resume the job after restarting the new standby(src) ?

        After confirming that the old primary (now standby) has restarted in mount mode, we can resume our job.

          $ zdmservice resume job –jobid 2

          Unfortunately, the job fails again at the same phase as before.

            $ zdmservice query job –jobid 2
            Type: "MIGRATE"
            Current status: FAILED

            ZDM_SWITCHOVER_SRC ............ FAILED


            Why is ZDM failing after the Resume ?


            It turns out ZDM was trying to restart the switchover again even if it was already done. This stopped the migration right there since the source Database role wasn’t Primary. But how do we
            skip a step in ZDM upon resume??

              --- On the source
              $ cd $ORACLE_BASE/zdm/zdm_SRCDB_$jobID/zdm/log

              $ tail -f ./zdm_is_switchover_ready_src_29038.log
              [mZDM_Queries.pm:564]:[DEBUG] Output is:qtag:PHYSICAL STANDBY:qtag: [mZDM_helper:240]:[ERROR] Database 'SRCDB' is not a PRIMARY database.


              Solution: ZDM hack


              ---------------------------------------------DISCLAIMER----------------------------------------------------

              • Although the option to skip a migration step might be available in future releases of ZDM.

              • You should not perform the following on production unless explicitly advised by Oracle support.


              Undocumented hack:

              • ZDM uses a checkpoint file to synchronize the status of each step between all members of the migration

              • It’s a simple xml file that is updated each time a phase state is changed. This file is also checked by ZDM anytime a resume command is called.   

                $ZDM_BASE/chkbase/GHcheckpoints/<source host>+<source db>+<target host>/

                Example : cd $ZDM_BASE/chkbase/GHcheckpoints/srcNode+SRCDB+targetNode/
                $ vi srcNode+SRCDB+targetNode.xml

                <CHECKPOINT LEVEL="MAJOR" NAME="ZDM_SWITCHOVER_SRC" DESC="ZDM_SWITCHOVER_SRC"
                STATE="START"/> ---> REPLACE STATE AS FOLLOWS <CHECKPOINT LEVEL="MAJOR" NAME="ZDM_SWITCHOVER_SRC" DESC="ZDM_SWITCHOVER_SRC"
                STATE="SUCCESS"/>


                Resume the job

                Voila, ZDM will now skip the switchover after resuming the job to complete the rest of our online physical migration 

                $ zdmservice resume job –jobid 2
                $ zdmservice query job –jobid 2
                ...
                ZDM_CONFIGURE_DG_SRC .......... COMPLETED
                ZDM_SWITCHOVER_SRC ............ COMPLETED
                ZDM_SWITCHOVER_TGT ............ PENDING
                ZDM_POST_DATABASE_OPEN_TGT .... PENDING
                ZDM_DATAPATCH_TGT ............. PENDING
                ZDM_NONCDBTOPDB_PRECHECK ...... PENDING
                ZDM_NONCDBTOPDB_CONVERSION .... PENDING
                ZDM_POST_MIGRATE_TGT .......... PENDING
                ZDM_POSTUSERACTIONS ........... PENDING
                ZDM_POSTUSERACTIONS_TGT ....... PENDING
                ZDM_CLEANUP_SRC ............... PENDING
                ZDM_CLEANUP_TGT ............... PENDING


                Conclusion

                • In this scenario, we tricked ZDM into skipping the switchover stage as it was already done
                • Big thanks to ZDM team for being very responsive on my migration qualms as always   
                • This is an interesting scenario because ZDM usually has only a rerun feature but not a skip option
                • Also, I didn’t have this problem when DG_BROKER wasn’t enabled in another ZDM migration 
                • Like l said I’ve been told the introduction of such feature is most likely in the future, so stay tuned
                • Hope this will help anyone who runs into the same error to quickly fix it and go on with the migration

                        Thank you for reading

                Monday, September 5, 2022

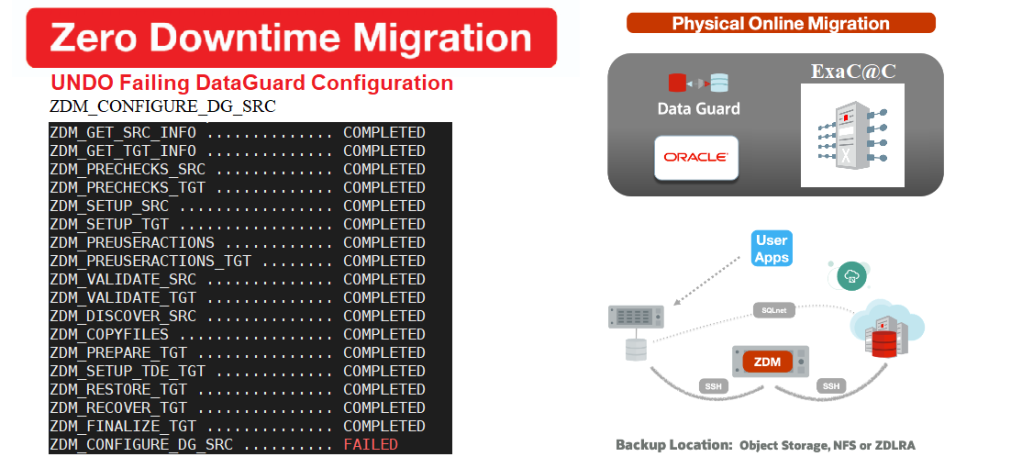
                ZDM troubleshooting part 2: Migration failing at ZDM_CONFIGURE_DG_SRC

                This image has an empty alt attribute; its file name is image-3.png


                Intro

                I didn’t anticipate to have a series of posts around ZDM, but I had few issues that were worth sharing so here I am. This post will describe what caused a failure of an online physical migration ExaCC right at the Data guard configuration phase. The good thing about ZDM, is as soon as any detected issue is fixed manually, the resume job action will get you going which is the perfect design for a migration solution.


                1. My ZDM environment

                • ZDM: 21.3 build

                Property                                                  Source                                              Target                                      
                RAC NO YES
                Encrypted NO YES
                CDB NO YES
                Release 12.212.2
                PlatformOn prem LinuxExaCC


                Prerequisites

                All the prerequisites related to the ZDM VM, the Source and Target Database system were satisfied before running the migration

                Responsefile

                Prepare a responsefile for a Physical Online Migration with the required parameters.The parameters themselves are not important in our case. I will just point out that ZDM 21.3 now supports Data Guard Broker configuration

                $ cat physical_online_demo.rsp | grep -v ^#
                TGT_DB_UNIQUE_NAME=TGTCDB
                MIGRATION_METHOD=ONLINE_PHYSICAL
                DATA_TRANSFER_MEDIUM=DIRECT
                PLATFORM_TYPE=EXACC
                ZDM_USE_DG_BROKER=TRUE
                ...


                Run ZDMCLI Eval command

                • The eval command successfully ran all prechecks to ensure migration readiness, so we’re good to go

                $ZDM_HOME/bin/zdmcli migrate database –sourcedb SRCDB \ -sourcenode srcHost -srcauth zdmauth \ -srcarg1 user:zdmuser \ -targetnode tgtNode \ -tgtauth zdmauth \ -tgtarg1 user:opc \ -rsp ./physical_online_demo.rsp –eval


                Run migration until the DG config

                Now, It’s time to run the migrate command with the -pauseafter ZDM_CONFIGURE_DG_SRC because the goal is to stop when the replication is configured in order to resume the full migration a later time. 

                $ZDM_HOME/bin/zdmcli migrate database –sourcedb SRCDB \ -sourcenode srcHost -srcauth zdmauth \ -srcarg1 user:zdmuser \ -targetnode tgtNode \ -tgtauth zdmauth \ -tgtarg1 user:opc \ -rsp ./physical_online_demo.rsp –ignore ALL -pauseafter ZDM_CONFIGURE_DG_SRC

                Querying job status

                As you can see even if the standby was prepared successfully the Data guard configuration failed. 

                $ zdmservice query job –jobid 2
                zdmhost.domain.com: Audit ID: 39
                Job ID: 2
                User: zdmuser
                Client: zdmhost
                Job Type: "MIGRATE"
                Current status: FAILED
                Result file path: "/u01/app/oracle/zdmbase/chkbase/scheduled/job-2-*log" ...
                Job execution elapsed time: 1 hours 25 minutes 41 seconds
                ZDM_GET_SRC_INFO .............. COMPLETED
                ZDM_GET_TGT_INFO .............. COMPLETED
                ZDM_PRECHECKS_SRC ............. COMPLETED
                ZDM_PRECHECKS_TGT ............. COMPLETED
                ZDM_SETUP_SRC ................. COMPLETED
                ZDM_SETUP_TGT ................. COMPLETED
                ZDM_PREUSERACTIONS ............ COMPLETED
                ZDM_PREUSERACTIONS_TGT ........ COMPLETED
                ZDM_VALIDATE_SRC .............. COMPLETED
                ZDM_VALIDATE_TGT .............. COMPLETED
                ZDM_DISCOVER_SRC .............. COMPLETED
                ZDM_COPYFILES ................. COMPLETED
                ZDM_PREPARE_TGT ............... COMPLETED
                ZDM_SETUP_TDE_TGT ............. COMPLETED
                ZDM_RESTORE_TGT ............... COMPLETED
                ZDM_RECOVER_TGT ............... COMPLETED
                ZDM_FINALIZE_TGT .............. COMPLETED
                ZDM_CONFIGURE_DG_SRC .......... FAILED
                ZDM_SWITCHOVER_SRC ............ PENDING
                ZDM_SWITCHOVER_TGT ............ PENDING
                ZDM_POST_DATABASE_OPEN_TGT .... PENDING
                ZDM_DATAPATCH_TGT ............. PENDING
                ZDM_NONCDBTOPDB_PRECHECK ...... PENDING
                ZDM_NONCDBTOPDB_CONVERSION .... PENDING
                ZDM_POST_MIGRATE_TGT .......... PENDING
                ZDM_POSTUSERACTIONS ........... PENDING
                ZDM_POSTUSERACTIONS_TGT ....... PENDING
                ZDM_CLEANUP_SRC ............... PENDING
                ZDM_CLEANUP_TGT ............... PENDING


                Troubleshooting

                We can check the result file to investigate the error, but I always like to dig into the specific ZDM_BASE logs hosted locally in specific src/target nodes. Here it’s in the source server (see below)

                --- On the source
                $ cd $ORACLE_BASE/zdm/zdm_SRCDB_$jobID/zdm/log
                $ tail -f ./zdm_configure_dg_src_5334.log
                [mZDM_Queries.pm:6136]:[DEBUG] None of DB_CREATE_FILE_DEST,
                DB_CREATE_ONLINE_LOG_DEST_%,DB_RECOVERY_FILE_DEST is configured for SRCDB

                [mZDM_Queries.pm:*]:[DEBUG] Will be running following sql as user: oracle:
                [mZDM_Queries.pm:3377]:[ERROR] unable to created undo tablespace UNDOTBS2
                CREATE UNDO TABLESPACE UNDOTBS2 DATAFILE '/oradata/undotbs2.dbf' SIZE 98300M
                AUTOEXTEND ON

                *
                ERROR at line 1: ORA-01144: File size (12582400 blocks)
                exceeds maximum of 4194303 blocks

                Looks like ZDM wanted to create a large second UNDO tablespace in the source, with one Data file that’s greater than 32GB. But why does ZDM need to create a second undo tablespaces in source DB.


                Why is a second UNDO needed ?

                In the 21.3 release Note, you’ll find that:
                `ZDM adds UNDO tablespaces to the production database to match target instance count
                , if source database has fewer instances` 

                • Hence, an ExaCC 2 node RAC will require ZDM to create a 2nd UNDO tablespaces in the source     


                What really Happened


                Ok so far it makes sense, but what really caused our failure is that ZDM tried to create a 2nd UNDO with a datafile of 98GB. Let’s check our source UNDO tablespace to learn more.

                  SRCDB> @check_tbs UNDO

                  TABLESPACE_NAME  ALLOCATED_MB MAX_SIZE_MB  FREE_PCT ---------------- ------------ ------------ ----------
                  UNDO              98301         97681         99
                    

                  FILE_NAME               Size ---------------------- ------ /oradata/undo_1.dbf     32GB /oradata/undo_2.dbf     32GB /oradata/undo_3.dbf     32GB

                  Root cause:
                  It turns out ZDM was trying to create a second UNDO tablespace based on the total size of the tablespace using one datafile which would have not triggered an error if the total tablespace size was lower than 32GB. 


                  Solution: Recreate as Bigfile


                  Although an ER has already been filed by Oracle support after I told them about it, I still needed a quick fix.
                  So here’s what I did: (On Source DB)

                  • Create a new dummy UNDO tablespaces (Ideally same size as the original UNDO)

                      SQL> CREATE UNDO TABLESPACE UNDOTBS3 DATAFILE '/oradata/undotbs3.dbf' SIZE 10G; SQL> ALTER SYSTEM SET UNDO_TABLESPACE = UNDOTBS3 SCOPE=BOTH;
                      SQL> SELECT tablespace_name, status, count(*) from dba_rollback_segs
                      group by tablespace_name, status;
                      TABLESPACE_NAME                STATUS         COUNT(*) ------------------------------ ------------ ---------- UNDOTBS3                       ONLINE               10 UNDO                           OFFLINE              24 <--- ready to be dropped

                    1. When the old Undo tablespace is of status OFFLINE, drop it

                        SQL> DROP TABLESPACE UNDO including contents and datafiles;

                      1. Now recreate the old UNDO using one Bigfile datafile   

                          CREATE BIGFILE UNDO TABLESPACE UNDO DATAFILE '/oradata/undotbs.dbf' SIZE 90G;
                          ALTER SYSTEM SET UNDO_TABLESPACE = UNDO SCOPE=BOTH;

                        1. Drop the dummy UNDO tablespace

                            SQL> DROP TABLESPACE UNDOTBS3 including contents and datafiles;

                            Note: I have not named it UNDOTBS2 because ZDM will use it when creating the second UNDO later. 


                          Resume the job

                          Now that we have one bigfile in the UNDO tablespace we can resume the ZDM job and the phase will not complain

                          $ zdmservice resume job –jobid 2
                          $ zdmservice query job –jobid 2
                          ...
                          ZDM_CONFIGURE_DG_SRC .......... COMPLETED
                          ZDM_SWITCHOVER_SRC ............ PENDING
                          ZDM_SWITCHOVER_TGT ............ PENDING
                          ZDM_POST_DATABASE_OPEN_TGT .... PENDING
                          ZDM_DATAPATCH_TGT ............. PENDING
                          ZDM_NONCDBTOPDB_PRECHECK ...... PENDING
                          ZDM_NONCDBTOPDB_CONVERSION .... PENDING
                          ZDM_POST_MIGRATE_TGT .......... PENDING
                          ZDM_POSTUSERACTIONS ........... PENDING
                          ZDM_POSTUSERACTIONS_TGT ....... PENDING
                          ZDM_CLEANUP_SRC ............... PENDING
                          ZDM_CLEANUP_TGT ............... PENDING

                          Pause After Phase: "ZDM_CONFIGURE_DG_SRC"

                          Tip:

                                 Best way to avoid this issue is to convert the source UNDO into Big file in the first place .


                          Conclusion

                          • Although ZDM allows you to run one command to automate the entire migration you still need to troubleshoot issue that might occur here and there  
                          • The automation with a resume option in case failure makes the process more reassuring to us DBAs
                          • Hope this will help anyone who runs into the same error to quickly fix it and go on with the migration
                          • On my next post I’ll be talking about another issue I faced which required a little hack, stay tuned

                                  Thank you for reading