Showing posts with label OCI. Show all posts

Friday, December 8, 2023

OCI FortiGate HA Cluster - Reference Architecture: Code review & Fixes

Intro


OCI Quick Start repositories on GitHub are collections of Terraform scripts and configurations provided by Oracle. These repositories are designed to help orgs quickly deploy common infrastructure setups on OCI Platform.
Each Quick Start focuses on a specific use case or workload, which simplify the process of provisioning on OCI using Terraform. A sort of IaC based reference architecture.


Today, we will code review one of those reference architecture which is a Fortinet firewall Solution deployed in OCI.
Note: This article won’t discuss the architecture, but will rather address its terraform code flaws and fixes.


Why some errors never get to your OCI Resource Manager stack?


  • Certain Terraform errors may not reach your RM stack due to its design. For instance, RM allows the hardcoding of specific variables, like availability domains, directly in its interface. This sidesteps the need for these variables to be checked by native conditions in the TF code.

  • Moreover, RM reads these variables from the schema.yaml file, altering the behavior compared to local Terraform CLI execution. This approach can result in certain errors being handled or bypassed within the RM environment, creating a distinction from standard Terraform workflows.


The stack: FortiGate HA Cluster using DRG - Reference Architecture


The stack is a result of the collaboration of both Oracle and Fortinet. This architecture is based on a Hub & Spoke topology, using FortiGate firewall from OCI Marketplace. I actually deployed it while working on one of my projects.


For details of the architecture, see Set up a hub-and-spoke network topology.


The repository


You will find this terraform config under the main oci-fortinet github repository. But not in the root directory.


The Errors


At the time of writing this, the errors were still not fixed despite opening issues and sharing the fix. You can see that the last commit goes back to 2 years. You will need to clone the repo and cd to the drg-ha-use-case subdirectory 

$ git clone https://github.com/oracle-quickstart/oci-fortinet.git

$ cd use-cae/drg—ha-use-case

$ terraform init


1.  Data source error in Regions with unique AD


You will face this issue on a region with only one availability domain (i.e ca-toronto-1) as the data source of the availability domain will fail the terraform execution plan.


CAUSE:  See issue #8 

  • In the above error terraform complains about the availability data source having only one element

  • This impacts 2 of the “oci_core_instance resource” blocks (2 web-vms, 2 db-vms).

  •  Problem? 

    • count.index for the data source block will always be equal 0 on single AD regions (1 element).
      See data_source.tf line 8-10. This configuration hasn’t been tested in single AD regions.

      $ vi data_source.tf

      # ------ Get list of availability domains
      8 data "oci_identity_availability_domains" "ADs" { 9  compartment_id = var.tenancy_ocid 10 }


  • Reason:

    • In terraform the count.index always starts at 0, if you have a resource with a count of 4, the count.index object will be 0, 1, 2, and 3.

    • Let’s take for example the "web-vms" oci_core_instance block in compute.tf > line 235

    • If we run the condition:
      - The variable availability_domaine_name is empty
      - The ads data source length = 1 element. That means that the AD name will be equal to
      ads data_source collection with an index value of [0+1] =

    • data…ads.availability_domains[1] doesn’t exist as it only contains 1 element
       

Solution 

Complete the full availability domain conditional expression on line 235 and line 276 (web-vms/db-vms)

  • Add the case where data source ads.availability_domains has 1 element (the region has one AD only)


Bad logic 

Seeking the name of the count.index+1 availability domain is still wrong when the region has more than 1 AD

  • Example: say you want to create 3 vms and your region has 2 Availability domains >1 .

    • The first iteration [0] will set count.index+1 = 1 ( 2nd data source element = AD2) 

    • Then the second iteration sets a count.index+1 = 2 ( 3rd data source element=AD3)

    • The 2nd and 3rd iteration will always fail because there’s only 2 ADs (index list [0,1]).


2. Wrong compartment argument in the security list data sources


Another issue you will run into is a failure to deploy subnets due to data source collection being empty (no element).


CAUSE:  See issue #9 

  • In the above error terraform complains that {allow_all_security} data source is empty

    • This impacts all fortigate subnets blocks in the config as they all share the same security lists.

Reason:

  • In this configuration there are 2 compartments , one for compute and another for network resources

  • If you take a look at  "allow_all_security"  block in datasource.tf > line 64-to-74

  • You’ll notice a wrong compartment ID in the security lists data source (compute instead of network)


    Solution 
     

    This was a silly mistake, but took me a day to figure out while delving through a pile of new terraform files.

    All you need to do is replace the compute compartment variable by var.network_compartment_ocid

    Edit network.tf line 64-74

    # ------ Get the Allow All Security Lists for Subnets in Firewall VCN

    data
    "oci_core_security_lists" "allow_all_security" {
      compartment_id = var.network_compartment_ocid    <--- // CORRECT Compartment
      vcn_id         = local.use_existing_network ? var.vcn_id: oci_core_vcn.hub.0.id
    ...


    3. More code inconsistencies


    I wasn’t done debugging as I found other misplaced compartment variables in some vnic attachments data sources

    • See datasource.tf : line 103-115 &118-130, you need to replace them by var.compute_compartment_ocid 


    Conclusion & recommendations

    • This type of undetected code issues ,is why I never trust the first deployment in Resource Manager.
      In order to avoid problems in the future, especially if you decide to migrate out of RM at some point, I suggest the following workflow:

      1. Run locally and validate any code bug

      2. Run on Resource Manager

      3. Store to git repo (blue print with eventual versioning)

    • I hope this was helpful as the issues I opened are still unsolved for over a year in their GitHub repo.  


    Thursday, October 19, 2023

    Farewell to ClickOps: OCI CLI seamless Data Guard Replication for ExaC@C


    Intro

    Since the very beginning, everyone got introduced to  Cloud services through the console as it’s very quick. But the cloud CLI tooling provides a stronger, yet user-friendly way to automate tasks, often covering features not even available in the console. Moreover, DBAs often assume that the CLI is primarily designed for managing compute-based services, overlooking its potential benefits for their database fleet. In this tutorial, we'll demonstrate how to automate the Data Guard association of your database between two Exadata Cloud at Customer infrastructures in separate regions.
    On top of it, I’ll show you where to look and the type of logs that are generated if you need to troubleshoot.


    Using the API to Enable Data Guard on ExaC@C

    REST API Endpoint
    Obviously, Rest APIs provided by the Cloud platform is the core vehicle that allows anything (infrastructure resource, or cloud services) to be created, deleted or managed.
    This why the best thing to explore a new feature is to check the REST API Endpoint.
    In our case the endpoint is
    CreateDataGuardAssociation

    POST /20160918/databases/{databaseId}/dataGuardAssociations

    You can check more details here CreateDataGuardAssociationDetails 


    API method for a Data guard association using existing cluster


    Below is the configuration details for creating a Data Guard association for a ExaCC Vmcluster database


    The attributes are as below


    API Attributes
    Attributes Required Description Value
    creationType Yes Other Options: WithNewDbSystem, ExistingDbSystem ExistingVmCluster
    databaseAdminPassword Yes The admin password and the TDE password must be the same.
    isActiveDataGuardEnabled No True if active Data Guard is enabled. True
    peerDbUniqueName No
  • DB_UNIQUE_NAME of peer DB to be created.
  • Unique across the fleet/tenancy
  • Defaults to
    <db_name>_<3 char>_<region-name>.
    peerSidPrefix No DB SID prefix to be created. unique in the VM cluster
    instance # is auto appended to the SID prefix
    protectionMode Yes MAXIMUM_AVAILABILITY
    MAXIMUM_PERFORMANCE
    MAXIMUM_PROTECTION
    MAXIMUM_PERFORMANCE
    transportType Yes SYNC
    ASYNC
    FASTSYNC
    ASYNC
    peerDbHomeId No Supply this value to create standby DB with an existing DB home
    databaseSoftwareImageId No The database software image OCID


    API request Examples


    Here is a basic API call example for Database system which slightly differs from the Exadata Cloud implantation.


    Response Body


    The response body will contain a single DataGuardAssociation resource.


    Using OCI CLI to Enable Data Guard on ExaCC

    Now that we’ve explored REST API structure, we can move to a practical example using OCI CLI. Both Exada Cloud@Customer (Edge DB service) are located in different regions in Canada in 2 DataCenters.   

    Usage

    $ oci db data-guard-association create from-existing-vm-cluster [OPTIONS]

    Generate a sample json file to be used with this command option.

    The best way to leverage OCI CLI with a complex structure is to generate a full command JSON construct. 

    # oci db data-guard-association create from-existing-vm-cluster \
    --generate-full-command-json-input > dg_assoc.json
    {
      "databaseAdminPassword": "string",
      "databaseId": "string",
      "databaseSoftwareImageId": "string",
      "peerDbHomeId": "string",
      "peerDbUniqueName": "string",
      "peerSidPrefix": "string",
      "peerVmClusterId": "string",
      "protectionMode":"MAXIMUM_AVAILABILITY|MAXIMUM_PERFORMANCE|MAXIMUM_PROTECTION"
    ,"transportType": "SYNC|ASYNC|FASTSYNC" }


    Practical Example

    Here we will configure a Data guard setup from an ExaC@C site to another with no existing standby DB home.

    • Below template matches a DG association without a peer Database Home in the standby VM Cluster

    # vi dg_assoc_MYCDB_nodbhome.json

    {
    "databaseAdminPassword": "Mypassxxxx#Z",      
    "databaseId": "ocid1.database.oc1.ca-toronto-1.xxxxx",   <--- primary DB
    "databaseSoftwareImageId": null,
    "peerDbHomeId": null,
    "peerDbUniqueName": "MYCDB_Region2",   <--- Standby DB
    "peerSidPrefix": "MYCDB",
    "peerVmClusterId": "ocid1.vmcluster.oc1.ca-toronto-1.xxxxxx", <--- DR cluster
    "protectionMode": "MAXIMUM_PERFORMANCE", "transportType": "ASYNC", "isActiveDataGuardEnabled": true   
    }

    • Now we can run the full command with the adjusted JSON template

    # oci db data-guard-association create from-existing-vm-cluster \
    --from-json file://dg_assoc_MYCDB_nodbhome.json


    Response Body


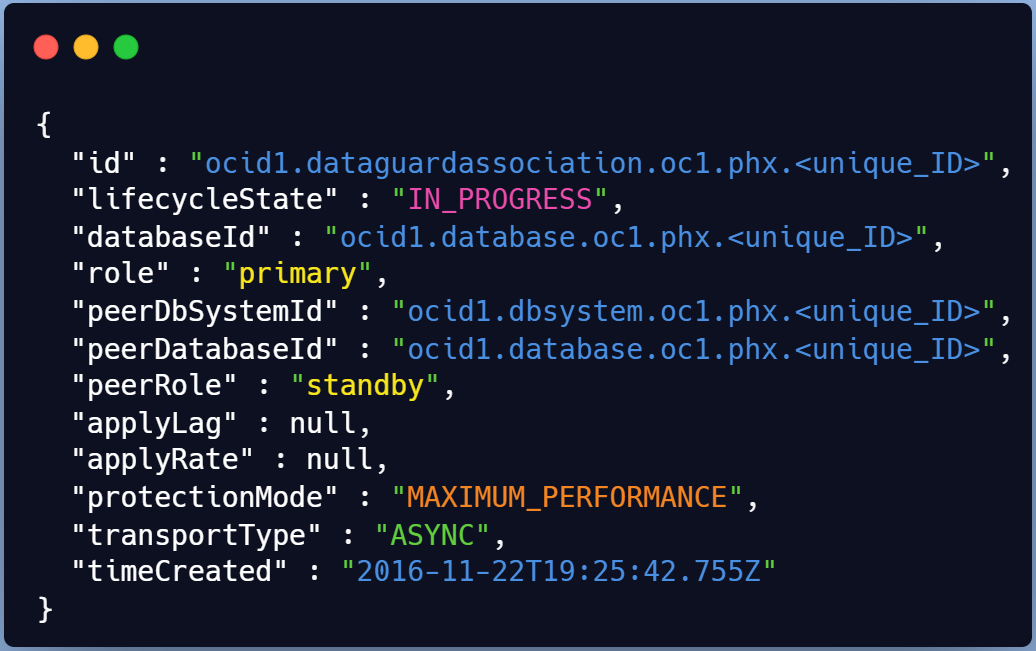
    Right after the run you’ll have the provisioning starting and the work request assigned

    • You will need the id to check the status (Check for SUCCESS or FAILURE)

    # export workreq_id=ocid1.coreservicesworkrequest.xxxxx
    # oci work-requests work-request get --work-request-id $workreq_id \
    --query data.status


    Troubleshooting


    Automating tasks with CLI provides the advantage of not leaving you in the dark when things go awry. Here are some valuable troubleshooting insights when using OCI CLI
    : 

    • The work request status and error detail is easily accessible using get command for troubleshooting 

    • API based operations on existing systems like DB replications, offer comprehensive logs that are invaluable for diagnosing issues inside the target servers (i.e Exadata Cloud VM clusters).

    • Oracle Data Guard association ensures clean rollbacks for quick retries in case of failures - a significant advantage over manual cleanup which we all hated back in on-premises setups.


    Work request


    The very first thing to check is the status of the request and the details of the error in case of failure.

    • Even without a work request ID, the below query allows you to list all previous data guard association jobs

    # oci work-requests work-request list -c $comp_id –-query \
    data[?\"operation-type\"=='Create Data Guard'].\
    {status:status,operation:\"operation-type\",percent:\"percent-complete\",
    \"workreq_id\":id
    }"
    --output table

    • The output will look like the below .

    • You want to display details about the error ? Sure there is an oci command for that 

    # oci work-requests work-request-error list --work-request-id $workreq_id –all \
    --query "data[].[code,message]"
    --output table

    • You can see few insights on the stage where your DG association failed for instance


    Logs in your ExaData Cloud@Customer


    When a database related operation is performed on an
    ExaC@C VM , log files from the operation are stored in subdirectories of /var/opt/oracle/log.


    check logs

    Running below find command while your Data guard association is running can help you list the modified logs

    $ find $1 -type f -print0 | xargs -0 stat --format '%Y :%y %n'| sort –nr \
    | cut -d: -f2- | head


    PRIMARY

    let’s see what logs are created on the primary side

    dg folder

    This will likely contain below files. 

    $ ls /var/opt/oracle/log/GRSP2/dbaasapi/db/dg dbaasapi_SEND_WALLET_*.log dbaasapi_CONFIGURE_PRIMARY_*.log dbaasapi_NEW_DGCONFIG_*.log dbaasapi_VERIFY_DG_PRIMARY_*.log dbaasapi_SEND_WALLET_*.log

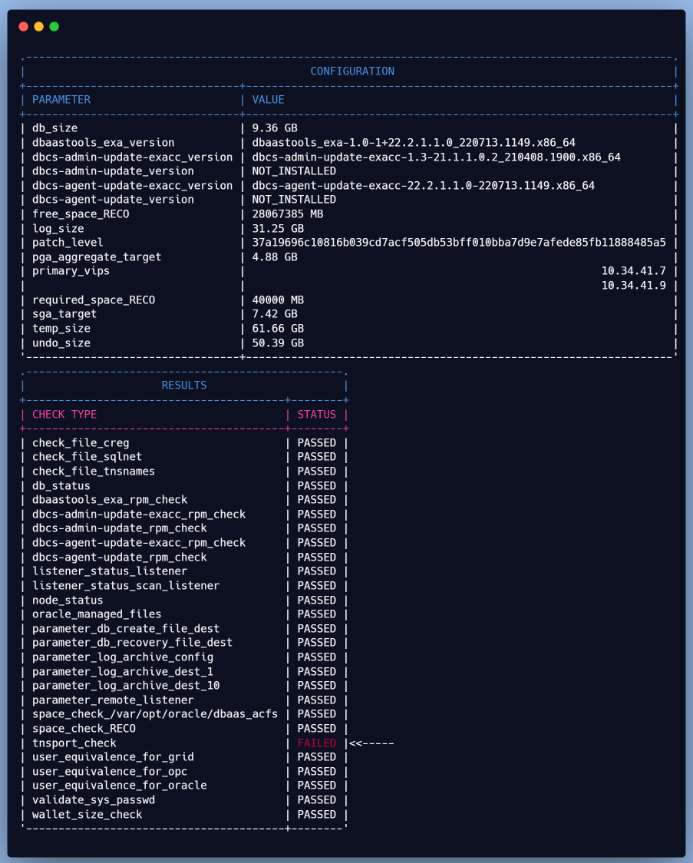
    1. VERIFY_DG_PRIMARY
    First file created is {log_dir}/<Database_Name>/dbaasapi/db/dg/
    dbaasapi_VERIFY_DG_PRIMARY*.log

    $ tail -f dbaasapi_VERIFY_DG_PRIMARY_2022-05-27_*.log
    ...
    Command: timeout 3 bash -c 'cat < /dev/null > /dev/tcp/clvmd01.domain.com/1521' Exit: 124 Command has no output
    ERROR: Listener port down/not reachable on node: clvmd01.domain.com:1521
    ...

    Below excerpt shows the precheck step that failed, which was fixed by running the oci cli command again


    2. PRIMARY_Configure
    After the second run, the prechecks passed, but now there's an issue with the primary configuration (se below).

    Let’s dig a bit deeper , but it seems it’s related to some service not being able to start.

    dgcc folder

    "dgcc" represents the Data Guard Configuration checker, which is responsible for checking the Data Guard status and configurations. Below logs contain information about the activities and status of dgcc on the ExaC@C

    $ ls /var/opt/oracle/log/MYCDB/dgcc dgcc_configure-sql.log dgcc_configure-cmd.log dgcc_configure.log

    dgdeployer folder

    DGdeployer, is the process that performs the DG configuration. The dgdeployer.log file should contain the root cause of a failure to configure the primary database mentioned earlier.

    $ ls /var/opt/oracle/log/MYCDB/dgdeployer
    dgdeployer.log
    dgdeployer-cmd.log

    As displayed here, we can see that the PDB service failed to start

     dgrops folder


    The dgrops  log file contains the output of the dgrops script, which includes the steps performed, the commands executed, and any errors or warnings encountered.
    This log helped identifying the issue which was that the PDB state wasn't saved in the primary CDB.

    Solution

    On the primary CDB, restart the PDB and save its state and voila.The DG association should now be successful.    

    $ alter pluggable database MYPDB_TEST close instances=all;
    $
    alter pluggable database MYPDB_TEST open instances=all; $ alter pluggable database MYPDB_TEST save state instances=all;


    STANDBY

    At this point, there are no troubleshooting steps left. But I though I’d add a list of available logs at the DR site.
     prep folder

    This will store logs about preparation of the standby including creating the DB home based on our previous example

    $ view /var/opt/oracle/log/MYCDB/prep/prep.log

     dg folder

    This folder will include logs pertaining to the standby database creation as shown below

    $ view /var/opt/oracle/log/MYCDB/dbaasapi/db/dg/dbaasapi_CREATE_STANDBY_*.log


    Conclusion

    This tutorial we learned to

    • Seamlessly automate Data Guard associations between diverse ExadataCloud@Customer systems. 
    • leverage OCI CLI & JSON templates to discover its extensive utility beyond compute services.
    • Additionally, you now have a clear understanding of where to access and how to interpret the logs, essential for troubleshooting potential issues.
    • Hope this will encourage every DBA to start using OCI CLI every day for their administration tasks 

    Thank you for reading

    Thursday, June 29, 2023

    How to Deploy Multi-Region Resources with Terraform: example(OCI Public IPs)

    This image has an empty alt attribute; its file name is terraform_multiregion.png


    Intro


    As with any software, terraform also has hidden gems waiting to be discovered, even after you've obtained your associate certification. Some features aren't always known until you need them, which is why we still a a lot to learn from the product. Today is one of those days!  In this post, I will show how to deploy Multi-Region Resources using something called provider aliases.


    Why multi region deploy isn’t that common ?

    The reason why the provider alias feature is not commonly used is that most users typically deploy resources in a single region at a time. Unless you have a setup that requires a DR configuration with regional failover or a distributed workload across several regions. The provider block, which is placed in the root module of a Terraform configuration, dictates the default location where all resources will be created.

    Understanding Provider Aliases


    To support multi region deployment, you can include multiple configurations for a given provider by including multiple provider blocks with the same provider name, but different alias meta-argument for each additional configuration. see Hashicorp’s example below

    # Default provider configuration #region1 (un-aliased)

    provider "aws" {
    region = "
    us-east-1" } }
    # Extra configuration for #region2 (“us-west-2”), reference this as `aws.west`.

    provider "aws" {
    alias = "west" <<--------------- our identifier
    region = "us-west-2"
    }

     How to reference it from a resource block 
    To use extra provider configuration for a resource or data source, set its provider argument to a <PROVIDER NAME>.<ALIAS> defined earlier:

    resource "aws_instance" "my_instance" {
    provider = aws.west <<---- reference allowing the instance creation in us-west-2

    }


    Practical Scenario: Deploying Public IPs in Multiple Regions in OCI


    Let's consider a scenario where a HA firewall setup (active-active) requires 4 public IP addresses in two different regions. We'll leverage provider aliases to achieve this multi-region deployment.

    • Toronto => primary site (default) while Montreal (aliased)  => failover region

    • 4 IPs per region will be deployed

      • Public IP for Firewall Primary VM management Interface

      • Public IP for Firewall Secondary VM management Interface

      • Floating Public IP for Firewall Untrust Interface

      • Floating Public IP for Firewall Untrust Interface inbound flow (frontend cluster ip)


    Clone the repository

    • This is my own github repo, Pick an area on your file system and run the clone command

    $ git clone https://github.com/brokedba/terraform-examples.git

    You will find our configuration under a subdirectory called terraform-provider-oci/publicIPs


    • Cd Into the subdirectory where our configuration resides and run the init

    $ cd   ~/terraform-examples/terraform-provider-oci/publicIPs
    $ terraform init

    • Here’s a tree of the files composing our configuration

    $ tree . |-- variables.tf ---> Resource variables needed for the deploy including locals
    |-- publicip.tf ---> Our main public IP resource declaration
    |-- output.tf ---> displays the IP resources detail at the end of the deploy
    |-- terraform.tfvars.template ---> environment_variables needed to authenticate to OCI

    Now let’s check how and where the aliases are defined and referenced  


    Provider block

    Here, I explicitly set an alias for the default configuration ‘primary'  but it’s not necessary. Only dr alias is needed. 

    # vi ./terraform-provider-oci/publicIPs/variables.tf

    provider "oci" { # OPtional since it’s the default config
    alias            = "primary" <<--- Default region Toronto
    tenancy_ocid     = var.tenancy_ocid
    user_ocid        = var.user_ocid
    fingerprint      = var.fingerprint
    private_key_path = var.private_key_path
    region           = var.region <<---- "ca-toronto-1"

    }


    provider "oci" {

    alias            = "dr" <<--- Alternative region Montreal


    }

    Resource based reference

    By using local variables, I stored the display names of all my public IPs. This allows me to leverage a single dynamic block and a for_each loop to create all the public IPs per region efficiently.

    This image has an empty alt attribute; its file name is image-5.png
    As explained before, alias reference easy through a simple provider argument.

    resource "oci_core_public_ip" "dr_firewall_public_ip" {    

    provider = oci.dr <<---- reference allowing IP creation in Montreal region
        for_each = local.ips.dr_site
        compartment_id = var.tenancy_ocid
        lifetime = "RESERVED"
        #Optional
        display_name = each.key }


    1. Execution plan (plan)


    • Under the working directory (terraform-provider-oci/publicIPs) update terraform.tfvars file

    • Run terraform plan (see below example of a public IP resource block  referencing Montreal region).

    #Adjust terraform.tfvars.template with authentication parameters & rename it to terraform.tfvars

    $ terraform plan .Terraform will perform the following actions:

    # oci_core_public_ip.dr_firewall_public_ip["dr-mgmt-public_ip-vm-c"] will be created
      + resource "oci_core_public_ip" "dr_firewall_public_ip" {
          + assigned_entity_id   = (known after apply)
          + assigned_entity_type = (known after apply)
          + availability_domain  = (known after apply)
          + compartment_id       = "ocid1.tenancy.oc1..aaaaaaaavxxxxxxxxxxxxx"
          + defined_tags         = (known after apply)
          + display_name         = "dr-mgmt-public_ip-vm-c"
          + freeform_tags        = (known after apply)
          + id                   = (known after apply)
          + ip_address           = (known after apply)
          + lifetime             = "RESERVED"
          + public_ip_pool_id    = (known after apply)
          + scope                = (known after apply)
          + state                = (known after apply)
          + time_created         = (known after apply)
        }

    ..
    # oci_core_public_ip.dr_firewall_public_ip["dr-mgmt-public_ip-vm-d"] will be created  + resource "oci_core_public_ip" "dr_firewall_public_ip" {
    ...
    # oci_core_public_ip.dr_firewall_public_ip["dr-untrust-floating-public_ip"]..
    + resource "oci_core_public_ip" "dr_firewall_public_ip" {
    ...
    # oci_core_public_ip.dr_firewall_public_ip["dr-untrust-floating-public_ip_frontend_1"] ..
    + resource "oci_core_public_ip" "dr_firewall_public_ip" {
    ... --- OTHER Primary region resources

    Plan: 8 to add, 0 to change, 0 to destroy.

    Changes to Outputs:
      + Montreal_public_ips = {
          + dr-mgmt-public_ip-vm-c                   = (known after apply)
          + dr-mgmt-public_ip-vm-d                   = (known after apply)
          + dr-untrust-floating-public_ip            = (known after apply)
          + dr-untrust-floating-public_ip_frontend_1 = (known after apply)
        }
       + Toronto_public_ips  = {
          + mgmt-public_ip-vm-a                   = (known after apply)
          + mgmt-public_ip-vm-b                   = (known after apply)
          + untrust-floating-public_ip            = (known after apply)
          + untrust-floating-public_ip_frontend_1 = (known after apply)
        }

    2. deployment (Apply)


    And here you 8 resources created among which 4 public IPs in both regions (Toronto/Montreal) with one config.   

    #original output was truncated for more visibility

    $ terraform apply -–auto-approve

    oci_core_public_ip.primary_firewall_public_ip["mgmt-public_ip-vm-a"]: Creating...
    oci_core_public_ip.primary_firewall_public_ip[untrust-floating-public_ip_frontend_1]:Creating..
    oci_core_public_ip.primary_firewall_public_ip["mgmt-public_ip-vm-b"]: Creating...
    oci_core_public_ip.primary_firewall_public_ip["untrust-floating-public_ip"]: Creating...
    oci_core_public_ip.dr_firewall_public_ip["dr-mgmt-public_ip-vm-c"]: Creating...
    oci_core_public_ip.dr_firewall_public_ip["dr-mgmt-public_ip-vm-d"]: Creating...
    oci_core_public_ip.dr_firewall_public_ip["dr-untrust-floating-public_ip"]: Creating...
    oci_core_public_ip.dr_firewall_public_ip["dr-untrust-floating-public_ip_frontend_1"]:Creating..

    Apply complete! Resources: 8 added, 0 changed, 0 destroyed.
    Outputs:
      + Montreal_public_ips = {
       + dr-mgmt-public_ip-vm-c   = "name: dr-mgmt-public_ip-vm-c IP:155… OCID:xx"
       + dr-mgmt-public_ip-vm-d   = "name: dr-mgmt-public_ip-vm-d IP:155…OCID:xx"
       + dr-untrust-floating-public_ip  = name: dr-untrust-floating-public_ip IP:155…
    + dr-untrust-floating-public_ip_frontend_1 = "name: dr-untrust-floating-public_ip_frontend_1
        }
       + Toronto_public_ips  = {
       + mgmt-public_ip-vm-a                   = "name: mgmt-public_ip-vm-a...
       + mgmt-public_ip-vm-b                   = "name: mgmt-public_ip-vm-b ...
       + untrust-floating-public_ip            = "name: untrust-floating-public_ip...
       + untrust-floating-public_ip_frontend_1 = "name: untrust-floating-public_ip_frontend_1..
        }


    How about terraform modules?

    To declare a configuration alias within a module in order to receive an alternate provider configuration from the parent module, you can add the aliases using the Configuration_aliases argument to the r provider's required_providers entry.  

    terraform {
    required_version = ">= 1.0.3"    
    required_providers {
      oci = {
       source  = "oracle/oci"
    version = "4.105.0"
           configuration_aliases =  [ oci.primary, oci.dr ]
        }  } }


    Conclusion:

    • Provider aliases in Terraform provide a powerful capability to deploy resources across multiple regions.

    • This allows you to simplify your Terraform configuration and avoid duplicating code for each region.

    • Provider aliases can also be used for targeting multiple Docker hosts, multiple Consul hosts, etc..

    • Sometimes a non popular feature doesn’t mean hard to implement as a quick look at the doc can get you going.  Hope this was helpful

    Thanks for reading