Showing posts with label OVM. Show all posts

Monday, August 9, 2021

OVM Series part 3: Backup and recovery with ovm-Bkp (plus scripts)

Intro

This is the last part of the OVM series where I will describe the backup package provided by oracle called ovm-bkp . Even if the Premier Support period has already ended (March, 2021) and OLVM is supposed to be the replacement, a lot of workloads are still running on OVM including new PCAs (Private Cloud Appliances).

The part that was lacking until recently was a comprehensive solution to backup and restore the vms in the OVM platform. I am not saying it’s perfect nor equivalent to the GUI based service on vmware but it does the job at least, especially since OVM has zero license cost


ovm-bkp utilities

Is a package allowing to get a crash-consistent backup of a running Virtual Machine and share it to external systems like Storages (NFS) or Media Server. Below figure depicts the backup options provided by ovm-bkp utility 
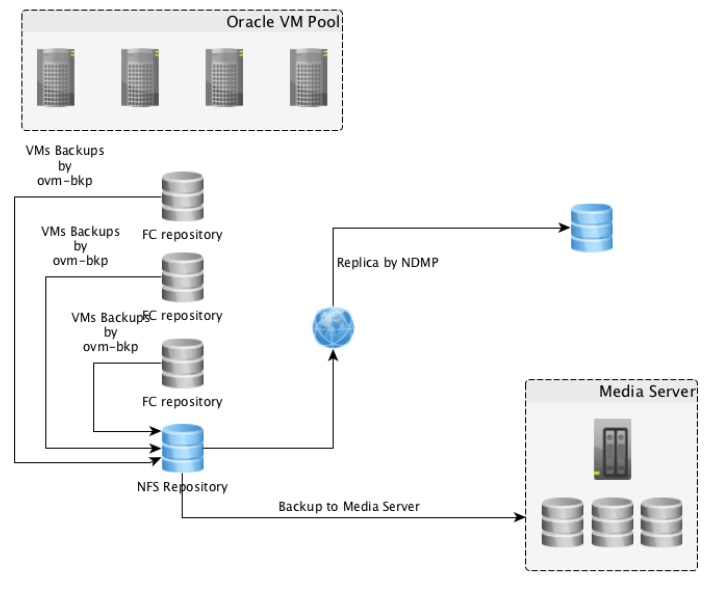
This image has an empty alt attribute; its file name is image-11.png

All the backup operations will be executed starting from OVM Manager server managing the OVM Pool; the entire solution is based on scripts and OVMMCLI interface.

What you need to know

Requirements

  • "ovm-bkp" supports OVM 3.4 and must be installed on OVM Manager machine to function
  • OVM Resources (OVM Pools, VMs, Repositories ) must not contain a space in their name (must be renamed if so)
  • Online backups of a Running VM can be taken only if vdisks reside on OCFS2 repositories (iSCSI or Fiber Channel links)
  • Backup of running VMs with disks on NFS repositories won’t be possible without the vm being shut down first which ovm-bkp will do silently (without warning).
    • Reason: hot-clone feature relies on ocfs2 ref-link option that only works with iSCSI/ FC storage links
    • Destination repository however can be either NFS or OCFS2
    • To make a backup work on a vm hosted in an NFS repo a little tweak must done for the backup script 
  • Backups will contain only virtual-disks. Physical disks are out of scope and must be handled separately    


Installation and configuration

rpm package

[root@em1 ~]# yum -y localinstall ovm-bkp-1.1.0e-20201012.noarch.rpm

Configure the Oracle VM Manager access for "ovm-bkp" utilitie

This script will generate an ovm backup configuration file that contains OVM metadata like the UUID and OVMCLI access info

[root@em1~]# /opt/ovm-bkp/bin/ovm-setup-ovmm.sh
       log as OVM admin user /password
       New configuration file /opt/ovm-bkp/conf/ovmm/ovmm34.conf created:
------------------------
# Oracle VM Manager Command Line Interface User
ovmmuser=admin
# Oracle VM Manager Command Line Interface Password - Encrypted
ovmmpassenc=U2FooGVkX1/OvXXXXXXXXXXXXXX
# Oracle VM Manager Host
ovmmhost=em1
# Oracle VM Manager CLI Port
ovmmport=10000
# Oracle VM Manager UUID
ovmmuuid=0004fb000001XXXXXXXXXXXXXXX 


Configure virtual  machine backup

  • Syntax

./ovm-setup-vm.sh VMname (d=days| c=counts) [target_Repository]  disktoexlude(X,X)

  • Example

[root@ovm-manager01 bin]#  /opt/ovm-bkp/bin/ovm-setup-vm.sh  My_VM c1 vmdata_Repo   --- Target repository where the vm is stored and the backup will be saved
    New configuration file for VM My_VM has been created at
/opt/ovm-bkp/conf/vm/My_VM-0004fb000006000030121f9302f49f44.conf:
   
# Oracle VM Pool
    ovmpool=OVM-Lab
    # VM Details
    vmname=My_VM
    vmuuid=0004fb000006000030121f9302f49f44
    vdiskstoexclude=
    # Retention to Apply
    retention=c1
    # Target Repository
    targetrepo=vmdata_repo

Backup steps

  1. Collect required information (VM name, id and configuration).
  2. Create a dedicated "Clone Customizer" based on the info of the VM.
  3. Create a clone of the VM on the same OCFS2 repository (using ocfs2-reference-link)
    • If  "backup type" = "SNAP", it goes to step (4).
    • If  "backup type" = "FULL", it moves the cloned vm to target Repo (NFS/OCFS2) defined in the config file.
    • If "backup type" = "OVA" , it creates an OVA file – based on the clone and saves it to the target Repo defined in the config file (under Assembly folder).
  4. Move the cloned VM under folder "Unassigned Virtual Machine" on OVM Manager
        o All "SNAP" and "FULL" backups will be displayed under "Unassigned Virtual Machines"
        o Retention policy is applied and all backups that don’t satisfy it are deleted (unless they are flagged preserved)

Backup script

  • Syntax   -- "ovm-backup.sh"

[root@em1]# /opt/ovm-bkp/bin/ovm-backup.sh <Vm name> <backup type> <preserve>

<backup_type> :
        - FULL => will create a full vdisk backup on a further repository
        - SNAP => will create an ocfs2 reference-link snapshot of the vm on the same Repo
        - OVA => will create a packaged OVA file on a further repository

<preserve> "preserve": preserved backup will be ignored by the retention policy applied.

  • Example

Below is a full backup that will not be preserved (checked by the retention policy on the next backup)

[root@em1]# /opt/ovm-bkp/bin/ovm-backup.sh My_VM  FULL n        
=================
Oracle VM 3.4 CLI
=================
=====================================================    
Adding VM My_VM information to bkpinfo file /opt/ovm-bkp/bkpinfo/info-backup-My_VM-FULL-20210728-1316.txt =====================================================  
================================================     
Creating Clone-Customizer to get VM snapshot....   <--1 
================================================ 
=======================
Getting VM snapshot....            <--2
=======================        
=====================     
Backup Type: FULL....  
=====================  
=======================================================
Moving cloned VM to target repository ....   <--3  
=======================================================                                
=======================================================                                
Waiting for Vm moving to complete......10 seconds
...

Waiting for Vm moving to complete......800 seconds                                     
=======================================================                                
=================================================                                       
Renaming VM backup to gcclub.0-FULL-20210728-1316....                               
=================================================                                       
===================================                                                    
Adding proper TAG to backup VM....                                                    
===================================
Guest Machine My_VM has cloned and moved to My_VM-FULL-20210728-1316 on repository vmdata_Repo     <-- 4
Guest Machine My_VM-FULL-20210728-1316 resides under 'Unassigned Virtual Machine Folder' Retention type is Redundancy-Based
Actual reference is: 20210728-1316                                                    
Latest 2 backup images will be retained while other backup images will be deleted!!!
======================================================                                 
=======>> GUEST BACKUP EXPIRED AND REMOVED: <<========                                 
======================================================                                 
=============================================================                          
Based on retention policy any guest backup will be deleted!!!
=============================================================
====================================================================================   
=====> Backup available for guest My_VM (sorted by date) : <====================    
========================================================================================
= BACKUP TYPE == BACKUP  DATE == BACKUP  TIME == BACKUP  NAME             == PRESERVED ==
========================================================================================
=    FULL     ==   20210718   ==     0423     == My_VM-FULL-20210718-0423 ==  NO    
=    FULL     ==   20210725   ==     0451     == My_VM-FULL-20210725-0451 ==  NO        

Other commands

There are few other operations that can list, delete, and preserve backups. We will talk about the restore script separately

  •  ovm-listbackup.sh

[root@em1]# /opt/ovm-bkp/bin/ovm-listbackup.sh vbox-bi       
===============================================================================
         =====> Backup available for guest vbox-bi (sorted by date) :       
===============================================================================       
= BACKUP TYPE == BACKUP DATE == BACKUP TIME == BACKUP NAME == PRESERVED ==       
===============================================================================       
= FULL == 20170829 == 1159 == vbox-bi-FULL-20170829-1159 == YES       
= SNAP == 20180207 == 2030 == vbox-bi-SNAP-20180207-2030 == YES       
= SNAP == 20180207 == 2031 == vbox-bi-SNAP-20180207-2031 == NO 

  • ovm-delete.sh 

Use ovm-delete.sh <backup name>
[root@em1]# /opt/ovm-bkp/bin/ovm-delete.sh My_VM-FULL-20210725-0451

  • ovm-preserve.sh 

Use ovm-preserve.sh <backup name> Y

[root@em1]# /opt/ovm-bkp/bin/ovm-preserve.sh vmdb01-SNAP-20210824 Y

Restore script

  • ovm-restore.sh

The script will restore the VM backup in an interactive fashion.

[root@ovm-manager01 bin]# /opt/ovm-bkp/bin/ovm-restore.sh My_vm
============================================================ Please choose the VM vm1 backup you want to restore: ============================================================ ======================================================= 1) My_vm-FULL-20210305-0926        2) My_vm-SNAP-20210305-0936 =======================================================
Choice: -> 2 ============================================================
===================================================================
Oracle VM Pool will be the same of the backup taken.
With backup type SNAP it means that this is an OCFS2 reflink of the
source VM and, as you know, OCFS2 repositories cannot be presented
to more than one Oracle VM Pool.
===================================================================
==================================================================
Refreshing repository – vmdata_Repo - to get updated information...
==================================================================
===================================================================
Here you can see the list of repositories where the restore can be
executed on Oracle VM Pool OVM-Lab.
Backup vm1-SNAP-20200304-1825 size is equal to 20 GB
Please choose the Oracle VM repository where to restore the backup
named My_vm-SNAP-20200304-1825:
===================================================================
=======================================================
1) vmdata_Repo - Free 4758 GB
=======================================================
Choice: –> 1
===================================================================
=======================================================================
WARNING: vNIC(s) HW-ADDR are still used by the source VM or by an other VM
WARNING: restored VM will use other vNIC(s) HW-ADDR
=======================================================================
================================================
Creating Clone-Customizer to get VM restored....
================================================
=======================================================
Restoring to target repository vmdata_Repo....
=======================================================
=======================================================
Waiting for Vm restore to be available......0 seconds
... Waiting for Vm restore to be available......160 seconds
=======================================================
=======================================================
Deleting temporary CloneCustomizer created......
=======================================================
=======================================================
Addinv vNIC(s) using configuration of the source VM
vNic 1 on Network-Id: 0a0b3c00
=======================================================
=======================================================
Moving Vm My_vm-RESTORE-20200304-1842
to the Oracle VM Pool: OVM-Lab
=======================================================

Notice that the name of the restored vm will not be the same as the original but will have “Restore-date” appended to it.  

My scripts

I had to write some on my own too, as there it is no way to list the vm backups and their configuration in a bulk mode. It can get very tedious to do your regular checks If you have 20 vms with multiple backups each. I now made them available in my github 

Displays all repositories and their filesystem (NFS/OCFS), all attached vms (simple_name and UUID).
  Note: run this from the ovm server and not from the ovmm.

[root@ovm-server02]# ./check_repo_vm.sh

====================================================================================    
VMs for directory /OVS/Repositories/0004fb00000300005e228a81464525c4               
Used_GB : 5.5T Free_GB: 2.4T Free_pct: 71% ==================================================================================== 0004fb0000060000e15330805c08afd6 => OVM_simple_name = 'Mysqlvm' 0004fb00000600006d36f09c20f39584 => OVM_simple_name = 'DNS1_vm' 0004fb000006000078cdd427c9b38b3a => OVM_simple_name = 'wwweb'

    List the current ovm-bkp setup (Per vm) in your ovm environment

[root@em1]# ./check_vm_bkp_config.sh | grep Myvm

    List all backups that are currently stored for configured vms

[root@em1]# ./check_vm_backuplist.sh

    Let’s say you have been asked to drop all backups for 3 or 4 vms that are to be decommissioned. This will generate the 
   drop script “drop_bkps.sh” for all the backups linked to those vms . You only need to put the vm names in the script string list 

[root@em1]# vi drop_vm_backup.sh
#!/bin/bash

strings=(
Myvm1 # <----- change me
Myvm2 # <----- change me
myvm3 # <----- change me )

for i in "${strings[@]}"; do /opt/ovm-bkp/bin/ovm-listbackup.sh  "$i"|awk -F'    == ' '{print $3}'| cut -d ' ' -f 1 | grep "\S" | awk '{print "/opt/ovm-bkp/bin/ovm-delete.sh " $0}' #>> drop_bkps.sh
done

    Same principle here, you only need to put the vms name in the script string list to display their backups. It’s faster
     than grepping from my other script check_vm_backuplist.sh output and handy for 3-10 vms check. 

Purge oldest reserved backups

Preserved backups will never be deleted but sometimes customers like to keep single monthly preserved backup for a vm for example. This script relies on a check_vm_backup.sh that you have to adapt with the list of vms you want to delete the old preserved backups from. Once run, it will generate delete_reserved_date.sh file  that can be run to delete all redundant preserved backups (in crontab for example).

[root@em1 ~]# vi ./clean_reserved_bkp.sh

#!/bin/bash

/opt/ovm-bkp/bin/check_vm_backup.sh > backup_list-"`date +"%d-%m-%Y"`".log 2awk '!= "YES" {next} {s=$8; sub(/-FULL-.*/, "", s)} s == ps {print pval} {ps = s; pval="/opt/ovm-bkp/bin/ovm-delete.sh "$8}' backup_list-"`date +"%d-%m-%Y"`".log > delete_reserved_"`date +"%d%m%Y"`".sh 3chmod u+x delete_reserved_"`date +"%d%m%Y"`".sh 4delete_reserved_"`date +"%d%m%Y"`".sh
delete_reserved_"`date +"%d%m%Y"`".sh

cron entry :

0 2 1 * * /root/clean_reserved_bkp.sh


Conclusion

This will close this series dedicated to Oracle VM environment. Next time I talk about about Oracle virtualization it would be about the successor of OVM which is called OLVM that ditched xen for KVM (a fork of Open source Ovirt project). A very fresh and exciting technology that I can’t wait to explore.   

Thank you for reading

Tuesday, August 3, 2021

OVM series part 2: What to collect when opening an SR

Intro

In my last post, I have described few commands within Oracle OVM manager CLI. This time, the topic is about how to identify the relevant information of your OVM environment as well as the logs and their location for each component.
OVM servers and OVM manager have their own logs, and when issues occur It’s good to have them handy before reaching out to Oracle support. Checking the details of your configuration preemptively also helps making sure you are communicating the right release number of the components along with their state quickly.

Check the configuration

Oracle VM Manager

Configuration can be checked  through ovm_admin command. content is usually set by default

[root@em1 ~]# /u01/app/oracle/ovm-manager-3/bin/ovm_admin --listconfig

Oracle VM Manager Release 3.4.4 Admin tool
Oracle VM Manager Configuration
Database type               : MySQL
Database Server hostname    : localhost
Database name               : ovs <-- Database storing the ovmm metadata
Database Listener port      : 49500
Oracle VM Database user     : ovs
WebLogic Server admin       : weblogic
Oracle VM Manager admin     : admin

Or by checking the configuration file  where you can find the OVMM UUID and build number useful in case of reinstall/restore

[root@em1 ~]# cat /u01/app/oracle/ovm-manager-3/.config
DBTYPE=MySQL
DBHOST=localhost
SID=ovs
LSNR=49500
OVSSCHEMA=ovs
APEX=8080
WLSADMIN=weblogic
OVSADMIN=admin
COREPORT=54321F
UUID=0004fb00000100007cc584fa7bf6e57f
BUILDID=3.4.4.1709 <--- exact build number

Here you can have a look at the ovmm service  and the mysql backup configuration

[root@em1 ~]# cat  /etc/sysconfig/ovmm
JVM_MEMORY_MAX=4096m
JVM_MAX_PERM=512m
RUN_OVMM=YES
DBBACKUP=/u01/app/oracle/mysql/dbbackup
DBBACKUP_CMD=/opt/mysql/meb-3.12/bin/mysqlbackup
UUID=0004fb00000100007cc584fa7bf6e57f

Oracle VM server

Configuration can be checked  through The xm commands which interact with the Xen hypervisor in the ovm host

[root@ovm-01 ~]# xm info
host                   : ovm-01
release                : 4.1.12-124.20.3.el6uek.x86_64
version                : #2 SMP Thu Oct 11 17:47:32 PDT 2018
machine                : x86_64
nr_cpus                : 24
nr_nodes               : 2
cores_per_socket       : 6
threads_per_core       : 2
cpu_mhz                : 3059
hw_caps                : bfebfbff:2c100800:00000000:01703f00:029ee3ff:00000000:xxx:000
virt_caps              : hvm hvm_directio
total_memory           : 147447
free_memory            : 75478
free_cpus              : 0
xen_major              : 4
xen_minor              : 4
xen_extra              : .4OVM
xen_caps               : xen-3.0-x86_64 xen-3.0-x86_32p hvm-3.0-x86_32 hvm-3.0-x86_32p hvm-3.0-x86_64
xen_scheduler          : credit
xen_pagesize           : 4096
platform_params        : virt_start=0xffff800000000000
xen_changeset          :
xen_commandline        : placeholder dom0_mem=max:3792M allowsuperpage dom0_vcpus_pin dom0_max_vcpus=20 crashkernel=512M@64M
cc_compiler            : gcc (GCC) 4.4.7 20120313 (Red Hat 4.4.7-18.0.7)
cc_compile_by          : mockbuild
cc_compile_domain      : us.oracle.com
cc_compile_date        : Thu Sep  6 08:24:27 PDT 2018
xend_config_format     : 4

-- list the vms in the ovm host

[root@ovm-server04 ~]# xm list
Name                                        ID   Mem VCPUs      State   Time(s)
0004fb00000600000f199f55466d4b84            14  8199     1     -b---- 100696.0
0004fb00000600001a440b79c4e6e194            20  4099     2     -b----  36437.3

Directory purpose
------------ -------------------------------------------------------------------------

/etc/xen      Contains OVM Server configuration files for the OVM Server daemon
and virtualized guests.

OVM agent

You can check the version by running an rpm command on the agent package  or checking its service status

[root@ovm-04 ~]# rpm -aq ovs-agent
ovs-agent-3.4.5-11.el6.x86_64

[root@ovm-04 ~]# service ovs-agent status


Available logs

Oracle VM Server directories
  all log directories are usually located under /var/log directory, each of them logs information for a specific module

Directory         Purpose
----------------- ----------------------------------------------------------------------- /var/log          Contains the OVM Agent log file, ovs-agent.log.
                  Contains the ovmwatch.log, which logs virtual machine life cycle events.
                  Contains the ovm-consoled.log, which logs remote VNC console access, and all communication with OVM Manager. /var/log/xen      Contains OVM Server log files.
/var/log/messages Contains OVM Server messages.

 LogFile          ------      Purpose
-------------------------- ----------------------------------------------------------------
/var/log/xen/xend.log    ---- All OVM Server daemon actions. Same output as xm log command. /var/log/xen/xend-debug.log More detailed logs of OVM Server daemon. /var/log/xen/xen-hotplug.log log of hotplug events if a device or network script doesn’t start up or become available. /var/log/xen/qemu-dm.pid.log log for each hardware virtualized guest. Replace the pid this in the file name. /var/log/ovs-agent.log         log for OVM Agent. /var/log/osc.log               log for OVM Storage Connect Plug-ins. /var/log/ovm-consoled.log      log for the OVM virtual machine console. /var/log/ovmwatch.log log for the OVM watch daemon.

Oracle VM Server Command-Line Tools
Beside tailing ovs-agent.log you can also use xm diagnostic commands

command Purpose
--------- ----------------------------------------------------------
xentop   Displays real-time CPU/Mem information about OVM Server and domains
xm dmesg Displays log information on the hypervisor.
xm log   Displays log information of the OVM Server daemon.

OVM manager

The main log file is AdminServer.log which has multiple versions according to its rotation.

  Directory File
-------------------------------------------------------------------------- -----------
/u01/app/oracle/ovm-manager-3/domains/ovm_domain/servers/AdminServer/logs/ AdminServer.log    
access.log
AdminServer-diagnostic.log

You can also use an ovm tool called OvmLogTool.py to generate an error summary log based on all AdminServer.log versions

[root@ovm-manager01 bin]# cd /u01/app/oracle/ovm-manager-3/ovm_tools/bin [root@ovm-manager01 bin]# python OvmLogTool.py -s -o summary
processing input file: /u01/app/oracle/ovm-manager-3/domains/ovm_domain/servers/AdminServer/logs/AdminServer.log00001 processing input file: /u01/app/oracle/ovm-manager-3/domains/ovm_domain/servers/AdminServer/logs/AdminServer.log

[root@ovm-manager01 bin]# ll summary
-rw-r--r--. 1 root root 985903 Jul 25 06:25 summary


SR related diagnostic logs

Oracle support will probably ask you the following logs right after opening the SR.

SOSREPORT

This report will collect diagnostic and configuration information from OVM manager host and all linked OVM servers.
i.e.: (rpm versions, syslog, network config, filesystems, disk partition details, loaded kernel modules & status of all services)

[root@em1 ~]# sosreport -v
sosreport (version 3.4)
Press ENTER to continue, or CTRL-C to quit.

Please enter your first initial and last name [em1]:
Please enter the case id that you are generating this report for []: 3-236xxxxx

Setting up archive ...
Setting up plugins ...
Running plugins. Please wait ...
Running 94/94: yum...
Creating compressed archive...
Your sosreport has been generated and saved in:/var/tmp/sosreport-em1.3-236xxx-YYYYMMDD.tar.xz

Note sometimes the report fails to run on one of the OVM servers.In that case, just run it separately in each OVM server. 

VMPINFO Diagnostic Tool For Oracle

VMPinfo is a script that collects diagnostic information for OVM, including the OVM Manager and all linked Oracle VM Servers. this script includes the run of sosreport, hence it’s enough to only run VMPinfo command without sosreport 

[root@em1]# cd /u01/app/oracle/ovm-manager-3/ovm_tools/support/
[root@em1 support]# ./vmpinfo3.sh --username=admin listservers
Enter OVM Manager Password:
The following server(s) are owned by this manager: ['ovm-01', 'ovm-02']

[root@ovm-manager01 support]# ./vmpinfo3.sh --username=admin

Enter OVM Manager Password:

Gathering files from all servers. This process may take some time.
Gathering OVM Model Dump files Gathering sosreport from ovm-01 Gathering sosreport from ovm-02
Data collection complete
Gathering OVM Manager Logs
Clean up metrics
Copying model files
Copying DB backup log files
Running lightweight sosreport
Archiving vmpinfo3-20210725-073817

=======================================================================================
Please send /tmp/vmpinfo3-3.4.6.2424-20210725-073817.tar.gz to Oracle support
=======================================================================================


Check for Database Corruption in OVM Manager

OVM manager operations and metadata are stored in a MySQL repository database. The database is automatically backed up daily but if any corruption is detected the backups will stop and all new changes won’t be recovered in case of a crash. 

[root@em1 mysql]# cd  /u01/app/oracle/mysql/data
[root@em1 data] # cat my.cnf |grep log
log-error=/u01/app/oracle/mysql/data/mysqld.err
innodb_log_group_home_dir=/u01/app/oracle/mysql/data
innodb_log_buffer_size=256M
innodb_log_file_size=768M
innodb_flush_log_at_trx_commit=2
innodb_log_files_in_group=2
--
[root@em1 mysql]# tail mysqld.err


Consistency check

1. Look for ONF (Object Not Found) errors in OVMM DB.

[root@em1 ~]# /usr/bin/ovm_shell.sh -u admin
    Password:
    OVM Shell: 3.4.4.1709 Interactive Mode
    --- Run below commands in this order in OVMM shell prompt.
    >>> om = OvmClient.getOvmManager()
    >>> f = om.getFoundryContext()   
    >>> f.fixupScan()                
    [11509]   <--- If the result is not empty then there is corruption and inconsistencies in OVMM DB.

2. Validate if Daily AutoFullBackup DB backups stopped working.

[root@em1 ~]# ls -ldt /u01/app/oracle/mysql/dbbackup/AutoFullBackup*
/u01/app/oracle/mysql/dbbackup/AutoFullBackup-20210722_222459 <--- must be <=24h old
/u01/app/oracle/mysql/dbbackup/AutoFullBackup-20210721_222433

3. Look for Object Not Found (ONF) and Cluster is null errors in OVM Manager Admin Server logs.

[root@em1 ~]# egrep -iR "cluster is null|ObjectNotFound|inconsistencies" /u01/app/oracle/ovm-manager-3/domains/ovm_domain/servers/AdminServer/logs/AdminServer*


Action If corruption is confirmed, then perform a OVM Manager DB rebuild (Regeneration)  Doc ID 2038168.1


Conclusion

This was just a preview of what you might look at when troubleshooting the OVM environment. For my part , the common issues happening most of the time are related to some job locks or network stack hiccups . For the later the Support will also ask you to run commands like “netstat -ltnp” , “nc –zv” or “tcpdump” between the manager and the OVM hosts. In the next post we will be covering the backup and recovery tools available for OVM.

Thank you for reading

Monday, July 26, 2021

OVM series part 1: Getting started with OVMCLI


Intro

I have been introduced to Oracle OVM rather accidentally. I was more familiar with the traditional vmware or hyper-V but when I was asked to help a client to implement their ovm backups, I got more curious about it. This post is the first of a series of 3.

I will try to show some basic examples on how to create resources like a vm using OVMCLI, since the web Console equivalent is overrated :). OVM Manager CLI supports the same functions as those on the browser interface but can be scripted & fully automated to enable flexibility to help deploy and manage your OVM environment. CLI changes are reflected in real time in the OVM Manager Console.


Concepts

OVM Server is based upon Xen hypervisor technology, and includes Oracle VM Agent. Its Linux kernel is run as Dom0 to manage one or more DomU virtual machines, each of which could be Linux/ Solaris, or Microsoft Windows.

OVM Manager is a server side component that allows you to configure and manage your Oracle VM environment. It includes both a CLI and a web-based user interface. Users can create server pools and virtual machines, as well as manage networking and storage.

All right, let’s see how these commands work.


CLI examples

First let’s get acquainted with the CLI environment. How to connect to it and how its commands look like.

Create user
Admin user is created by default during the installation of ovm manager but additional users can be created.

[root@ovm-manager01 bin]# cd  /u01/app/oracle/ovm-manager-3/bin/
[root@ovm-manager01 bin]# ./ovm_admin --createuser    

Connection to OVMMCLI
It can be done through  ovm manger's hostname or IP

[ovm-mgr01]# ssh -l admin localhost -p 10000
           # export ovmmhost=`hostname -s`
[ovm-mgr01]# ssh -l admin $ovmmhost -p 10000
           # export ovmip=10.10.30.60
[ovm-mgr01]# ssh -l admin $ovmip -p 10000

     Known connection issue:

         ErrorOVMM CLI connection is not available on port 10000 host ovm-mgr01

        Workarounds

  • Check /start ovmcli service if stopped

    [ovm-mgr01]#  service ovmcli status|start  
  • If Both "diffie-hellman-group1-sha1" key exchange and "ssh-dss" host keys used by OVMMCLI ssh-server are disabled. Try them explicitly during the connection (openssh-client 7+) :

    # ssh -oKexAlgorithms=+diffie-hellman-group1-sha1 -oHostKeyAlgorithms=+ssh-dss -l admin  localhost -p 10000
  • Likely Solution:
    Upgrade OVMM to 3.4.5 release or higher (i.e 3.4.6 ) if the version is older.


OVMMCLI commands
 

  • Like any CLI linked to an API CRUD like commands are available
create <objectType> [(attribute1)="value1"] ... [on <objectType> <instance>]
delete <objectType> <instance>
edit   <objectType> <instance>  (attribute1)="value1" ...
list   <objectType>
show   <objectType> <instance>
-- For Most Object Types with Children:
add    <objectType> <instance> to <objectType> <instance>
remove <objectType> <instance> from <objectType> <instance>

- Object types: ServerPool/vm/Vnic/Repository/Fileserver/network/Vdisk/physicaldisk …etc.
- Instance: { id=value | name=value }
  • Client Session Commands
set alphabetizeAttributes=[Yes|No]  ---> display output in alphabetical order.
set commandMode=[Asynchronous|Synchronous] --->  default CLI run mode is Synchronous.
set commandTimeout=[1-43200]               ---> in seconds.
set endLineChars=[CRLF,CR,LF]       ---> end of line character to use for your SSH client.
set outputMode=[Verbose,XML,Sparse] --->  output mode for command results.
showclisession                      ---> list CLI session options and their settings
  • Other Commands:
showallcustomcmds             ---> list all commands and the objects that they relate to.
showcustomcmds <objectType>   ---> list all commands for an objectType (i.e vm)
showobjtypes ---> list all object types. showversion ---> Shows the version of OVMM and its CLI.
exit


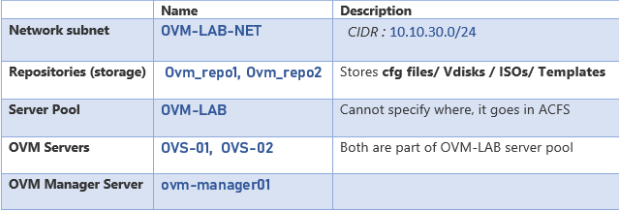
Our environment

This image has an empty alt attribute; its file name is image-10.png


1. Create a VM

  • Syntax

create Vm [ memory=value ] [ memoryLimit=value ] [ cpuCount=value ]
[ cpuCountLimit=value ] [ cpuPriority=value ] [ cpuUtilizationCap=value ]
[ highAvailability= { Yes | No } ] [ hugePagesEnabled= { Yes | No } ] [ osType=value ]
[ restartActionOnCrash= { RESTART | STOP | RESTART_AFTER_DUMP | STOP_AFTER_DUMP } ]
[ mouseType= { OS_DEFAULT | PS2_MOUSE | USB_MOUSE | USB_TABLET } ]
domainType= { XEN_HVM | XEN_HVM_PV_DRIVERS | XEN_PVM| LDOMS_PVM | UNKNOWN }
[ keymapName= { en-us |..| fr } ] [ bootOrder= { PXE | DISK | CDROM } ]
[ networkInstallPath=value ] repository=value [ server=value ]
[ startPolicy= { BEST_SERVER | BALANCE_SERVER | CURRENT_SERVER | USE_POOL_POLICY } ]
[ viridian= { Yes | No } ] name=value [ description=value ] on ServerPool instance

  • Example

OVM> create Vm name=My_server memory=8192 memoryLimit=8192 cpuCount=3 cpuCountLimit=4 \
     osType="Microsoft Windows Server 2012" repository=OVM_repo1 domainType=XEN_HVM \
    server=ovs-01 startPolicy=BEST_SERVER on ServerPool name=OVM-Lab ;

Time: 2021-03-28 02:47:35,332 EDT
Data:id:0004fb0000060000549e161d2ea0400b  name:My_server

  • Note: You can always edit the vm’s attributes after creation (i.e below domain Type has windows drivers)

OVM> edit Vm name=My_server domainType=XEN_HVM_PV_DRIVERS


2. Create a virtual disk to use as the boot disk

  • Syntax

Create VirtualDisk size=value shareable= { Yes | No } sparse= { Yes | No } name=value
[ description=value ] on Repository instance

  • Example

OVM> create VirtualDisk name=My_disk size=60 sparse=Yes  shareable=No on Repository \
name=OVM_repo2

Time: 2021-03-28 02:48:17,120 EDT
Data: id:0004fb0000120000edae47c4bf5252c8.img  name:My_disk


3. Map the virtual disk to the virtual machine

  • Syntax

OVM> create VmDiskMapping slot=value
{ physicalDisk=value | virtualDisk=value | virtualCd= { value | EMPTY_CDROM } }
name=value [ description=value ] on Vm instance

  • Example

OVM> create VmDiskMapping slot=0 virtualDisk=My_disk name="My server Boot Disk" \
on Vm name=My_server
Time: 2021-03-28 02:49:10,135 EDT
Data:id:0004fb0000130000dce7093f1fb141c4  name:My_server Boot Disk


4. Map an ISO file to the virtual machine

  • Syntax

create VmDiskMapping slot=value  { physicalDisk=value | virtualDisk=value | virtualCd= { value | EMPTY_CDROM } }
name=value [ description=value ] on Vm instance

  • Example (here the Iso is located in the same repository than the vm config file OVM_repo1)

OVM> create VmDiskMapping slot=1 virtualCd=WINDOWS_2012R2.iso  name="DVDROM Drive" \
    on Vm name=My_server

Time: 2021-03-28 02:49:42,553 EDT
Data:id:0004fb00001300004693d433aafceca7  name:DVDROM Drive

       with 100% completion but a warning that wasn’t impactful .

5. Set up the disk boot order

  • Example

OVM> edit Vm name=My_server bootOrder='CDROM,DISK' startPolicy=BEST_SERVER
Status: Success   Time: 2021-03-28 02:50:30,114 EDT            
JobId: 1585378228467

6. Create a VNIC and add it to the virtual machine

  • Syntax

create Vnic network=value name=value [ macAddress=value ] [ description=value ] on Vm instance

  • Example

OVM> create Vnic name=Ethernet1 network=OVM-LAB-NET on Vm name=My_server
Status: Success  Time: 2021-03-28 02:51:46,227 EDT                                        JobId: 1585378294963                                                       Data: id:0004fb0000070000e6d766a1ce769034  name:Ethernet1

7- Start the vm

OVM> start vm name=My_server        
-- Restart a vm OVM> restart { Server | Vm }   name =value
-- Resume OVM> resume  Vm   name=My_server
--> Miscellaneous <--
-- Kill a server or a vm OVM> kill { Server | Vm } name =value
-- Migrate a vm OVM> migrate Vm name=My_server destServer=MyServer

OVM> migrate Vm name=My_server destServerPool=MyServerPool 


List Commands

  • Repositories

OVM> list repository
      Command: list repository  Status: Success
      Time: 2020-03-19 19:47:16,227 EDT
Data:
id:0004fb0000030000d6744a0a7e3649db  name:OVM_repo1
id:0004fb0000030000394dd4b78643b4b5  name:OVM_repo2


  • Servers

OVM> list server
     Command: list server     Status: Success
     Time: 2020-02-24 18:08:27,900 EST
Data:
    id:ff:20:00:08:ff:ff:ff:ff:ff:ff:00:21:28:e7:df:8e  name:ovs-01
    id:08:00:20:ff:ff:ff:ff:ff:ff:ff:a0:df:e7:28:21:00  name:ovs-02

  • Fileserver

OVM> list fileserver
     Command: list fileserver     Status: Success
     Time: 2020-02-24 18:10:27,634 EST
     Data:
       id:0004fb0000090000033d51d61b4a92fa  name:Oracle ZFS

Show Commands

  • VM

OVM> show Vm name=My_Server
Data: Status = Stopped Memory (MB) = 4096 Max. Memory (MB) = 4096 Processors = 2 Max. Processors = 2 VmDiskMapping 1 = 0004fb00001300002b1908da5ee6c251 [Mapping for disk Id
  • Virtual disk

OVM> show virtualdisk name=0004fb0000120000ed4b60a8dea41e5d.img                            
Data:
Absolute Path = /dev/mapper/3600144f08e../VirtualDisks/0004fb0000120000ed4b60a8dea41e5d.img Mounted Path = /OVS/Repositories/0004fb../VirtualDisks/0004fb0000120000ed4b60a8dea41e5d.img
VmDiskMapping 1 = 0004fb000.. [Mapping for disk Id (0004fb0000120000ed4b60a8dea41e5d.img)]

Max (GiB) = 300.0
Used (GiB) = 278.45
Shareable = No
Repository Id = 0004fb00000300007292ef76d1746897 [VM Storage]

Add a server to the server pool

  • In case the server is unassigned to a pool

OVM> add Server name=ovs-03 to ServerPool name=OVM-LaB


CONCLUSION

I didn’t want to put too much in one post but you get the gist of how the CLI interface works in OVM. The list of object types and the related commands is quite long. However, If you want to explore them in detail you can refer to the below document.
Next we will be talking about the logs available for OVM and some diagnostic tools required for SRs .


Thank you for reading